Author Topic: Planis Farm Boy Engine  (Read 6966 times)

Offline Plani

  • Full Member
  • ****
  • Posts: 82
Planis Farm Boy Engine
« on: April 25, 2020, 08:26:34 PM »
Hi everyone

Since I always enjoy watching buildlogs, I want to start one of my adaption of the Farm Boy engine.

Some time back i got my hands on a set of drawings of the famous Farm Boy engine from Jerry Howell. I liked the design of the engine a lot and also the fact that it can be made from bar stock.
Since I'm all metric I had to redraw the plans. While playing around on the CAD I figured, I might as well make the engine a little bit bigger than original and so I settled for a scale of 32mm to the Inch. This means the engine will be about 30% bigger than original.


The engine specs are:
 - Bore: 32mm
 - Stroke 44mm
 - Compression ratio 4:1
 - Displacement 35cc
 - Flywheel diam 192mm

Because I've never made a one piece crankshaft before, I decided to start with that one, so in case it is not turning out right I can still abort the project...

To start with I got some normalized S355 bar which will hopefully not distort too much while being machined


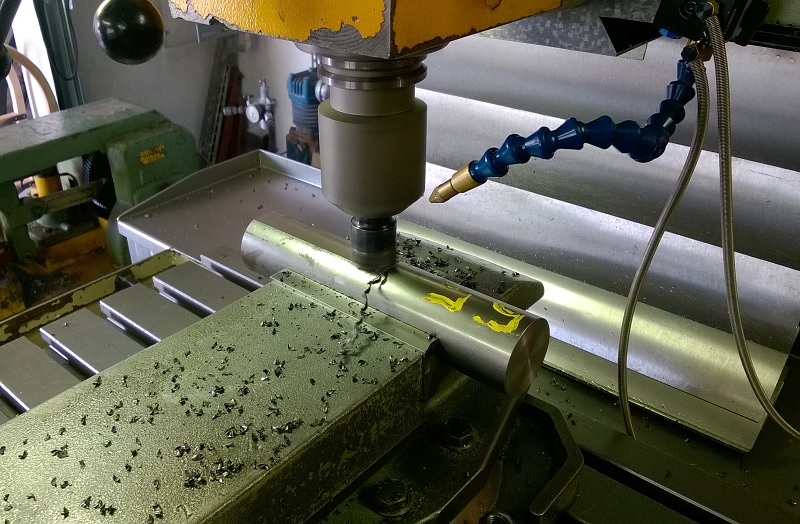
The round bar was machined square and then the shape of the crank was roughed out


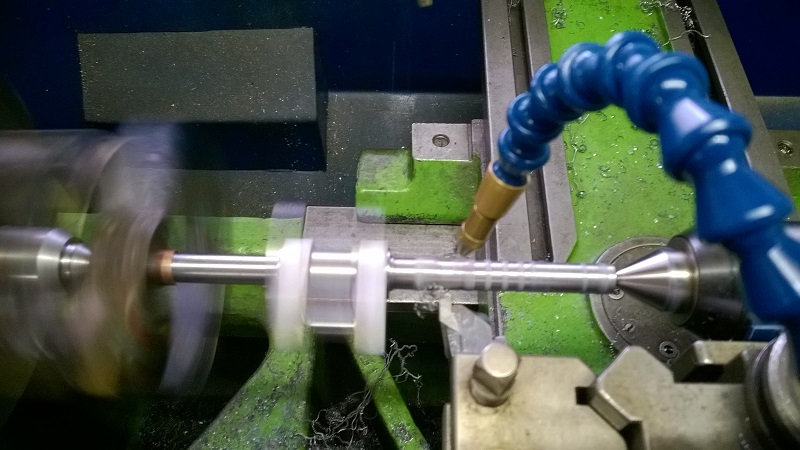
Then turning the crank pin


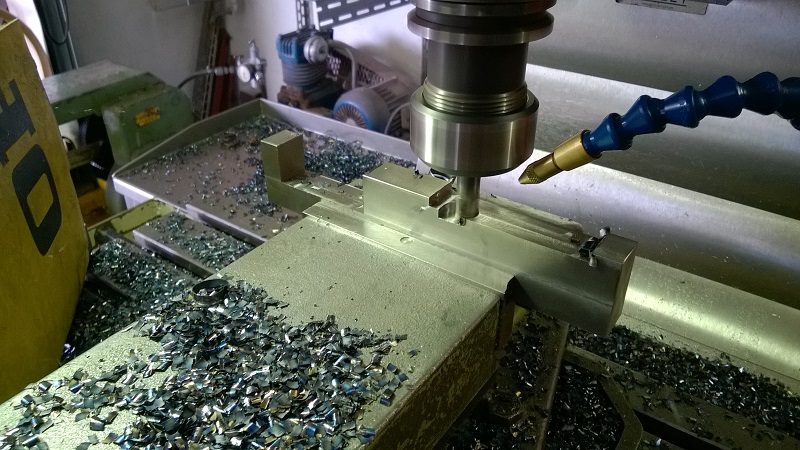
Roughing the outer parts of the shaft


Since I've done some wrong thinking :facepalm:, the crankshaft hat to be shortened and center drilled  again


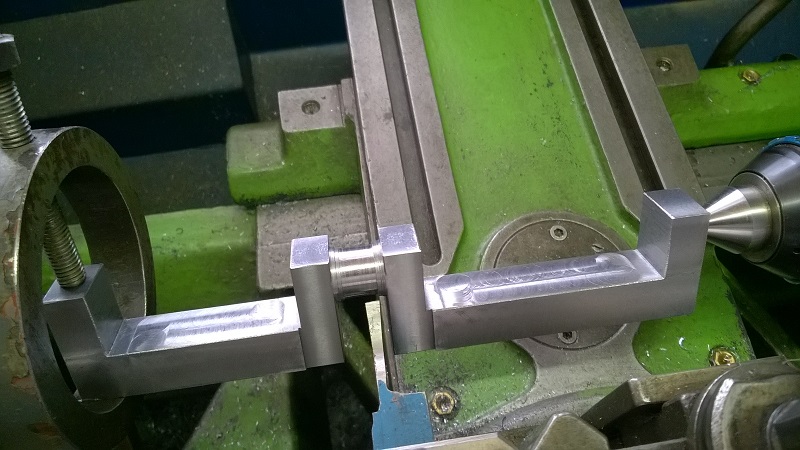
To then finishing the shafts


That's what it looked like so far. I left some material to take a skim cut on the crank webs too.
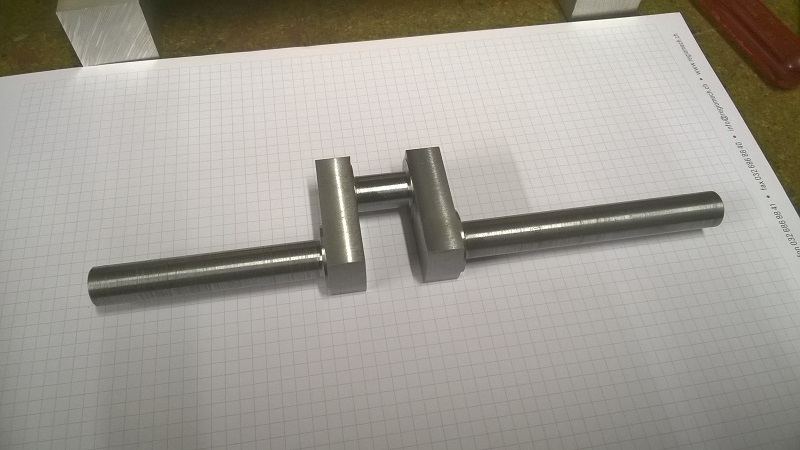
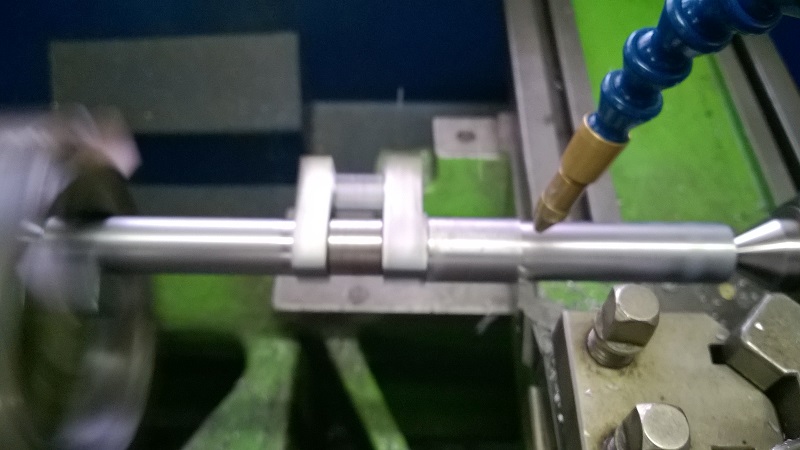
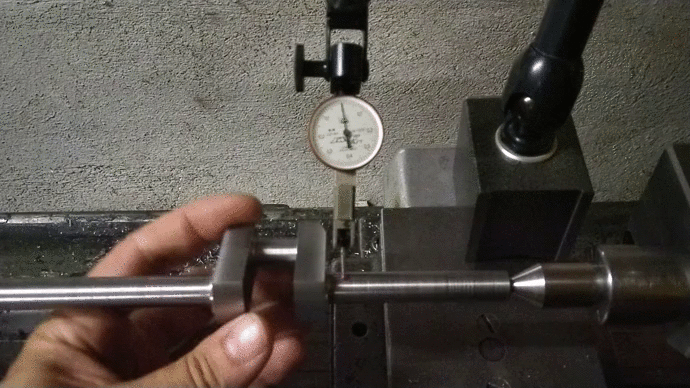


Moment of truth  :thinking: I think I can live with a runout of about 0.02mm  :)


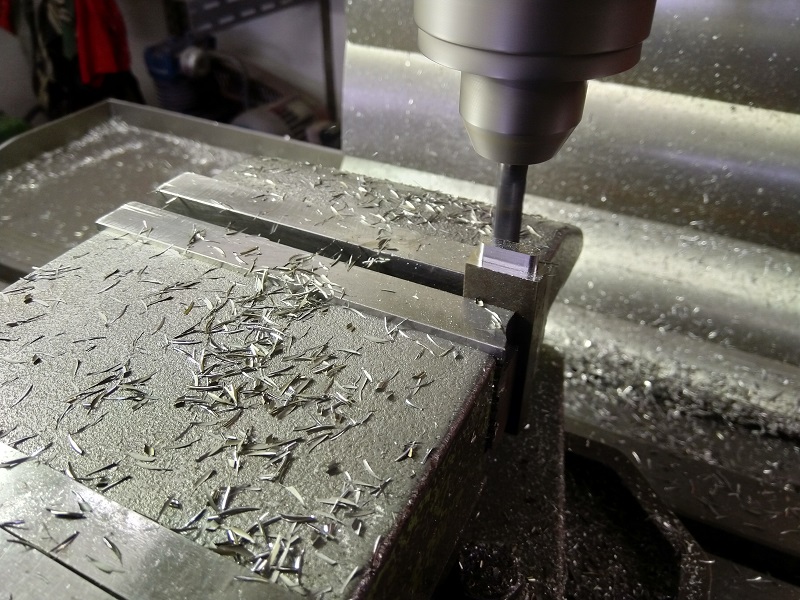
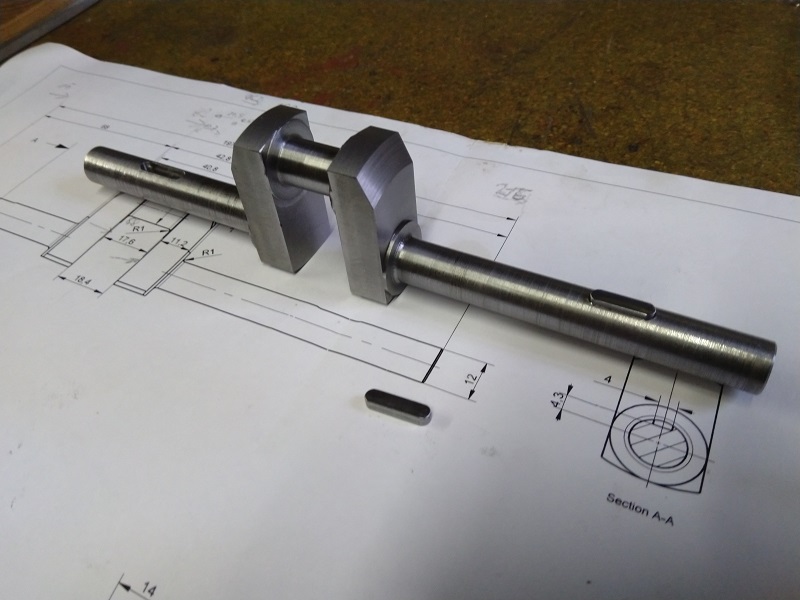
So I went on with cutting the keyways


And cutting the key accordingly


Done:


Plani


Offline yogi

  • Full Member
  • ****
  • Posts: 450
  • Duncannon, PA USA
    • Yogi's Workshop
Re: Planis Farm Boy Engine
« Reply #1 on: April 25, 2020, 09:27:59 PM »
Looking good!  :ThumbsUp: :ThumbsUp: :ThumbsUp:
I'm looking forward to see this one coming together.  :popcorn:

Offline Roger B

  • Global Moderator
  • Full Member
  • *****
  • Posts: 6162
  • Switzerland
Re: Planis Farm Boy Engine
« Reply #2 on: April 26, 2020, 09:01:21 AM »
That's a good start  :praise2: You may find that the runout changes over time as the stresses in the metal release. Generally it can be trued up again.
Best regards

Roger

Offline Brian Rupnow

  • Full Member
  • *****
  • Posts: 7606
  • Barrie, Ontario Canada
Re: Planis Farm Boy Engine
« Reply #3 on: April 26, 2020, 03:11:29 PM »
Nice cad work and very nice job on the crankshaft.---Brian

Offline awake

  • Full Member
  • ****
  • Posts: 303
Re: Planis Farm Boy Engine
« Reply #4 on: April 26, 2020, 08:08:26 PM »
Great work! Looking forward to seeing more.
Andy

Offline Plani

  • Full Member
  • ****
  • Posts: 82
Re: Planis Farm Boy Engine
« Reply #5 on: April 27, 2020, 05:42:51 AM »

Thank you guys for the kind comments  :cheers:

Roger, I sure hope it will not distort more. But we will see, time will tell....

Plani

Offline Plani

  • Full Member
  • ****
  • Posts: 82
Re: Planis Farm Boy Engine
« Reply #6 on: May 03, 2020, 08:59:45 PM »
Hi everyone

Next I started with the flywheels. There have been two blanks of steel of pretty much the perfect size lying underneath the shelf in the shop for ages. As it seems, these have finally come to their destination.  :)


Ready to go


Turning the outer shapes


I decided to mill the reliefs in the wheels instead of turning them. Here are the two Flywheels ready for the mill


 :Mad: :censored: :censored: :censored: :cussing: :cussing: The crappy endmill I used for this didn't quite cut it. It got dull an therefore pulled out of the collet. This is the inner side of the governor side Flywheel. That's going to leave a mark. I guess....
But since I'm planning to paint this engine, I think I'll be able to fix that.


I purchased some decent carbide endmills (what I should have done from the beginning) and these made live much easier.


Relief milled of the non governor side flywheel


There was some material left at the bottom of the reliefs to be cleaned up on the lathe.


Next step was to mill the spokes.


Then a radius cutter was used to mill the radii on each side of the spokes.


Milling the slots for the spoke lugs on which the pulley will be fixed.


Milling the relief to balance the weight of the piston using a ball nose endmill.


The flywheels so far. There is still the bore to do and on the rims there is also some material left for a final cut in the same set up as the bore will be done.


Thank you for following along an stay tuned for more
Plani

Offline kuhncw

  • Full Member
  • ****
  • Posts: 234
Re: Planis Farm Boy Engine
« Reply #7 on: May 03, 2020, 09:44:31 PM »
Very nice work on the flywheels.

Chuck

Offline Dave Otto

  • Full Member
  • *****
  • Posts: 4704
  • Boise, Idaho USA
    • Photo Bucket
Re: Planis Farm Boy Engine
« Reply #8 on: May 05, 2020, 12:56:57 AM »
The flywheels are beautiful!
Very nice work.

Dave

Offline Plani

  • Full Member
  • ****
  • Posts: 82
Re: Planis Farm Boy Engine
« Reply #9 on: May 06, 2020, 04:49:52 PM »
Thank you for the kind comments Chuck and Dave  :cheers:

Is it only me or does some one else also know this behavior: On a project first the most demanding Part (i.e. crankshaft) is made, then the "interesting" ones like flywheels and then it boils slowly down to the fiddly bits which need be done...
So to counteract this at least a little, I decided to make the spoke lugs next.


Milling the contour from some steel bar stock:


The hole for the bolt drilled


Milling the thickness, all of the lugs in one shot :)


Test fit


Thank you for following along.
Plani

Offline Admiral_dk

  • Full Member
  • *****
  • Posts: 3774
  • Søften - Denmark
Re: Planis Farm Boy Engine
« Reply #10 on: May 06, 2020, 09:23:06 PM »
Quote
Is it only me or does some one else also know this behavior: On a project first the most demanding Part (i.e. crankshaft) is made, then the "interesting" ones like flywheels and then it boils slowly down to the fiddly bits which need be done...

No - I believe that this is a very common thing among many of us  :-[

Nice parts so far  :ThumbsUp:

Offline Plani

  • Full Member
  • ****
  • Posts: 82
Re: Planis Farm Boy Engine
« Reply #11 on: June 07, 2020, 07:43:08 PM »
Hi everyone

Next part to make was the conrod.

I started with the bearing cap of the big end


The bearing cap was then bolted in place on the stock for the conrod in order to mill the outer contour


Milling the recess on the first side


And then the seat for the bearing and the relief


First side done


Set up for the second side. In the scrap aluminum underneath were two bosses milled to locate the con rod.


Milling the contour


Contour done


And the final setup to mill the lubrication access in the small end


Finished part


Thank you for following along.
Plani

Offline b.lindsey

  • Global Moderator
  • Full Member
  • *****
  • Posts: 13860
  • Dallas, NC, USA
    • Workbench-Miniatures
Re: Planis Farm Boy Engine
« Reply #12 on: June 07, 2020, 09:45:15 PM »
Very nice progress Plani. I am just seeing this thread. The parts are all very nicely finished as well. Looking forward to your continued progress on this great engine.

Bill

Offline yogi

  • Full Member
  • ****
  • Posts: 450
  • Duncannon, PA USA
    • Yogi's Workshop
Re: Planis Farm Boy Engine
« Reply #13 on: June 07, 2020, 10:09:10 PM »
Looking good!  :ThumbsUp: :ThumbsUp: :ThumbsUp: :popcorn: :popcorn: :popcorn:

Offline scc

  • Full Member
  • ****
  • Posts: 1107
  • Lancashire, UK
Re: Planis Farm Boy Engine
« Reply #14 on: June 08, 2020, 11:24:15 AM »
Cracking job Plani  :ThumbsUp: I see no coolant so do you use a gentle airstream to keep swarf away from cutters? That must help towards your beautiful surface finish.          Terry


SimplePortal 2.3.5 © 2008-2012, SimplePortal