Author Topic: Building the Potty Grasshopper engine.  (Read 23858 times)

Offline zeeprogrammer

  • Full Member
  • *****
  • Posts: 6811
  • West Chester, PA, USA
Re: Building the Potty Grasshopper engine.
« Reply #60 on: February 23, 2017, 10:59:01 PM »
Good looking handles.

I also found the support beam work interesting.  :ThumbsUp:
Carl (aka Zee) Will sometimes respond to 'hey' but never 'hey you'.
"To work. To work."
Zee-Another Thread Trasher.

Offline Gas_mantle

  • Full Member
  • ****
  • Posts: 1365
  • North Yorks - UK.
    • My Youtube channel
Re: Building the Potty Grasshopper engine.
« Reply #61 on: February 23, 2017, 11:08:45 PM »
Thanks Carl,

At the time I made the support beam I didn't have any soldering equipment so pinning it together seemed like the best way and it turned out better than I expected. I've now got myself some soldering gear so I'll use that to make the arm from the eccentric which is going to be made from linked rings.

Peter.

Offline b.lindsey

  • Global Moderator
  • Full Member
  • *****
  • Posts: 13860
  • Dallas, NC, USA
    • Workbench-Miniatures
Re: Building the Potty Grasshopper engine.
« Reply #62 on: February 24, 2017, 01:07:32 AM »
Nice to see an update Peter...beautiful work as always.

Bill

Offline sbwhart

  • Full Member
  • ****
  • Posts: 745
  • Live Long and Prosper
Re: Building the Potty Grasshopper engine.
« Reply #63 on: February 24, 2017, 07:11:46 AM »
Good going Peter I liked the way you did the vertical beam, the boiler looks a little small you may find that you run out of steam, but it will be fun finding out

Stew
A little bit of clearance never got in the way

Offline Gas_mantle

  • Full Member
  • ****
  • Posts: 1365
  • North Yorks - UK.
    • My Youtube channel
Re: Building the Potty Grasshopper engine.
« Reply #64 on: February 24, 2017, 09:17:04 AM »
Thanks guys  :)

As for the boiler I did wonder whether it will provide enough steam but I'm hoping as it is meant to be a slow running engine it will cope. I guess I wont really know till I try it.

Peter.

Offline pgp001

  • Full Member
  • ****
  • Posts: 813
  • West Yorkshire - UK
Re: Building the Potty Grasshopper engine.
« Reply #65 on: February 24, 2017, 01:10:06 PM »
Have you tried the new gas burner yet Peter ?

I did hear a loud bang from across the valley and wondered if you had anything to do with it.  :lolb:

Phil

Offline Gas_mantle

  • Full Member
  • ****
  • Posts: 1365
  • North Yorks - UK.
    • My Youtube channel
Re: Building the Potty Grasshopper engine.
« Reply #66 on: February 24, 2017, 01:21:42 PM »
Hi Phil,

Yes the burner works great as does the hand feed pump - whether the set up will generate enough steam to keep the engine running remains to be seen. I'm hoping to buy to some wood as a base in a few days then I ought to get the crankshaft fitted and start making a few tests. The outer bearing for the shaft will sit beyond the flywheel on its own pillar so until I can get that fitted on a base I can't really get the crankshaft an flywheel in place.

I was planning on sealing the fittings, will Loctite 542 create a strong seal that isn't permanent and withstand the heat of steam ?

Thanks
Peter.


Offline Gas_mantle

  • Full Member
  • ****
  • Posts: 1365
  • North Yorks - UK.
    • My Youtube channel
Re: Building the Potty Grasshopper engine.
« Reply #67 on: February 27, 2017, 04:00:46 PM »
Hi,

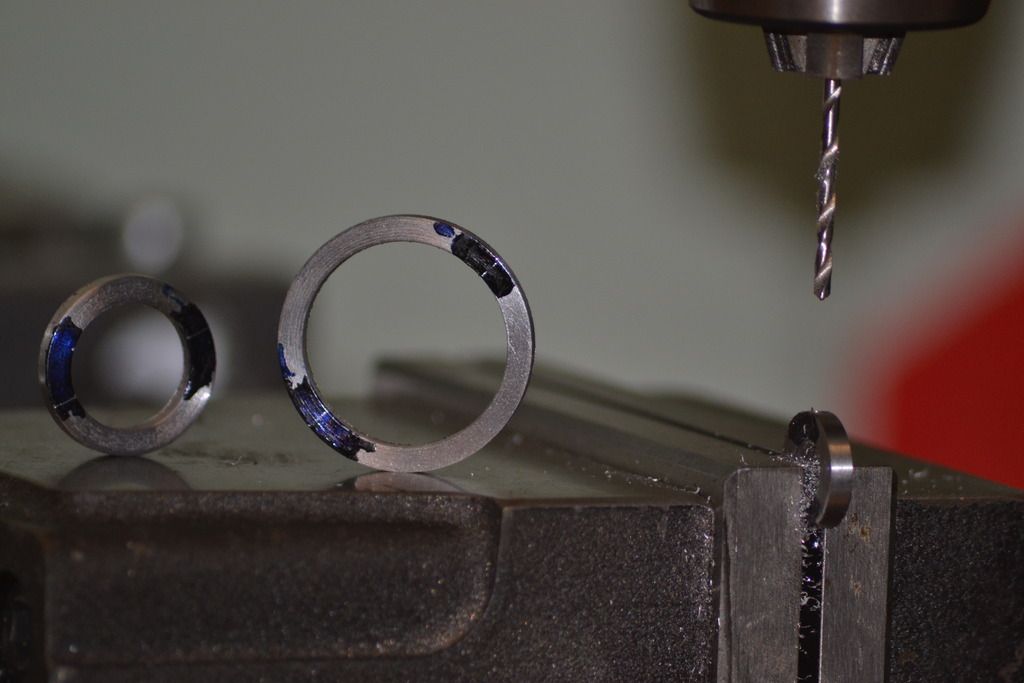
I've now got a little bit further by partly making the eccentric arm, it follows the theme of some of the other parts and is made from 3 steel rings that will attach to the eccentric sheath.

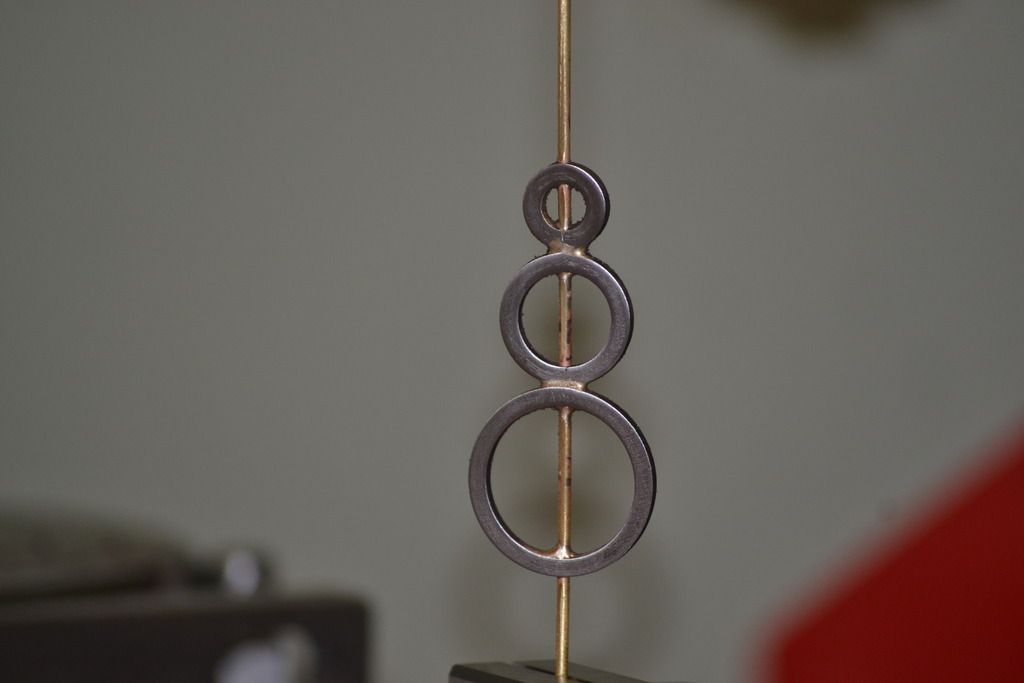
After turning them to size they need drilling to take a brass rod for soldering together.


Apart from a few practice run on pieces of scrap this is the first time I've soldered so I'm not sure what to expect.


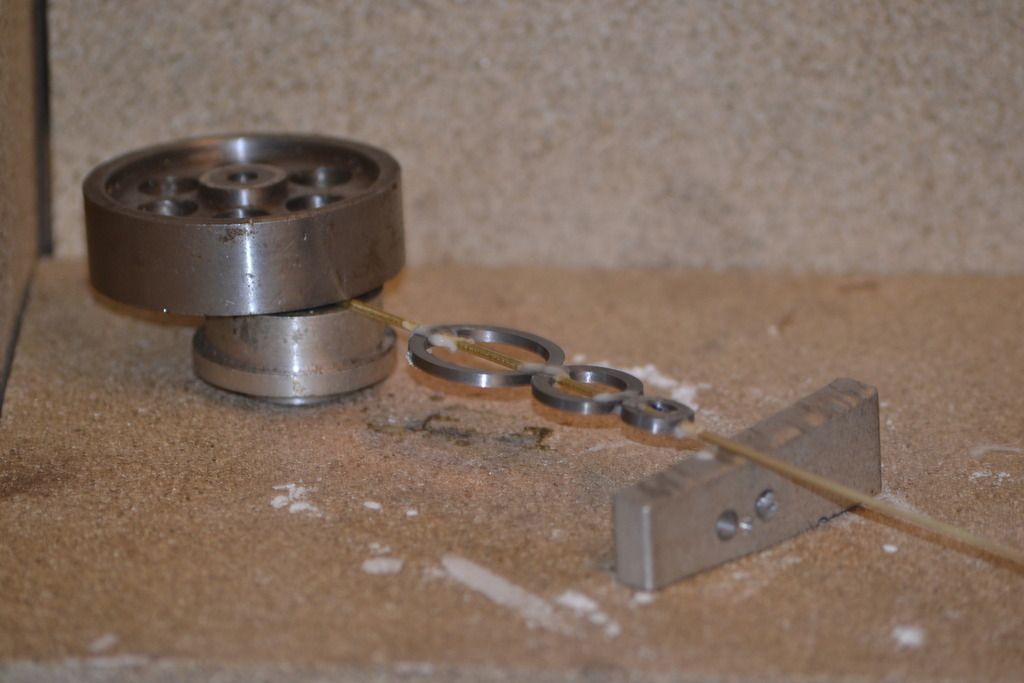
It's never going to get me into the Guild of Master solderers but I'm quite pleased with it as a first attempt.


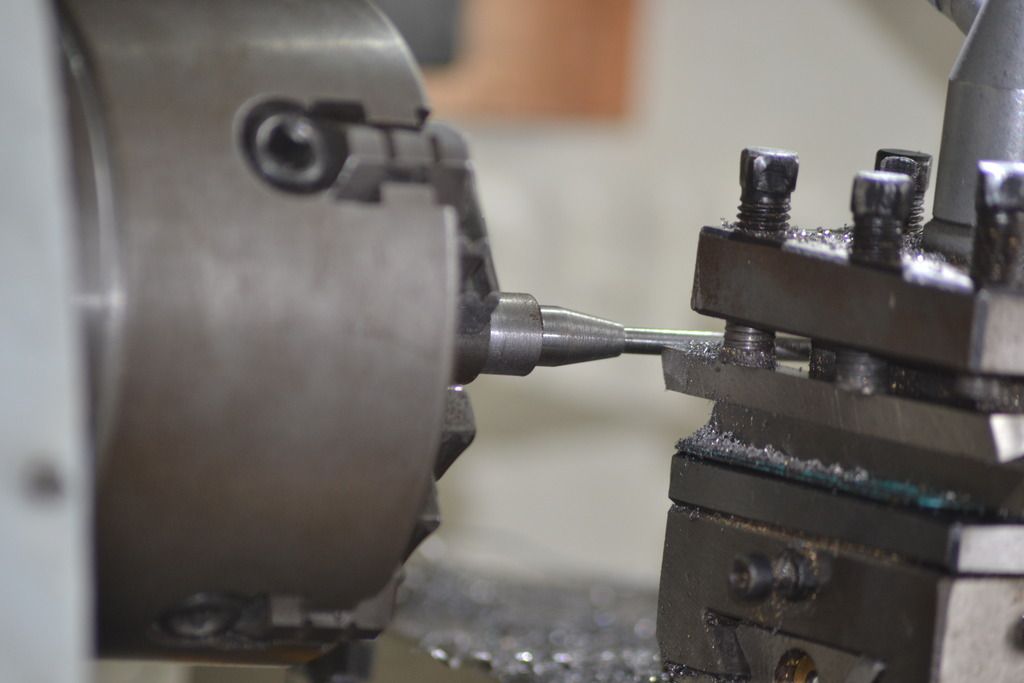
The rod that will attach to the rings at the valve end is a simple threaded affair with a taper at one end to blend with the smallest ring.

My tailstock chuck is a perfect match with the diestock to help getting accurate threading  :)


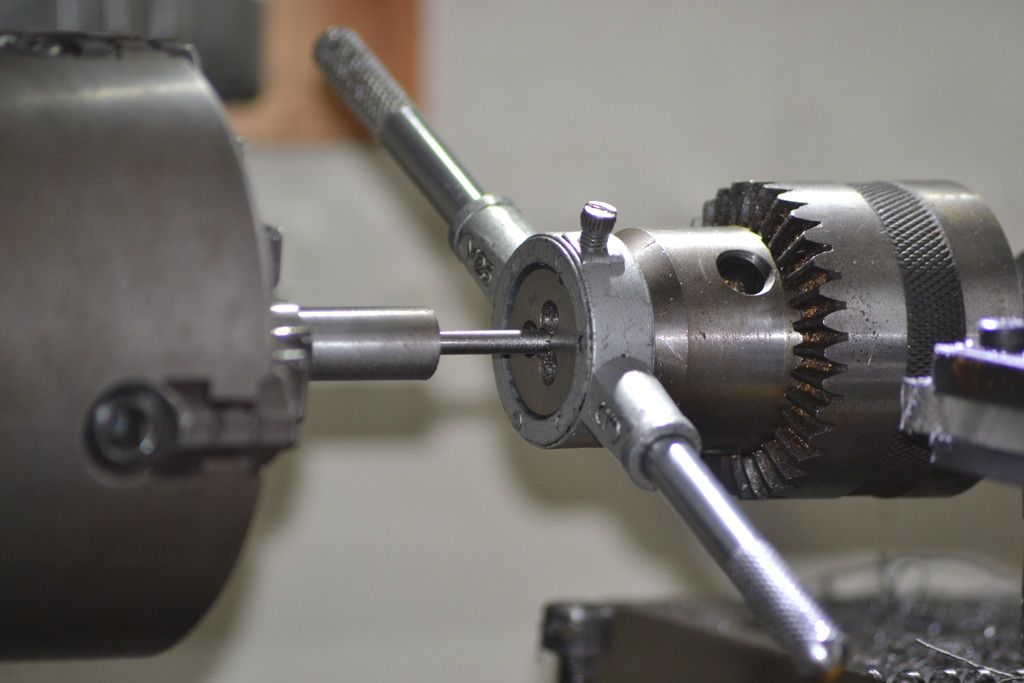
With the top slide at a 10o angle I can cut the taper.


I need to have a bit of a think before decide how to machine the other end of the taper to match the rigs so I'll call it a day for now.

The handle looks to be leaning but its just that there is still a small pip on the bottom after parting off - the rings are smooth on the inside despite how the look and just a bit more emery should clean them up.


I'm hoping to get some wood for a base tomorrow so with a bit of luck I ought to be ready to start testing it shortly  :)

Peter.

Online Kim

  • Global Moderator
  • Full Member
  • *****
  • Posts: 7950
  • Portland, Oregon, USA
Re: Building the Potty Grasshopper engine.
« Reply #68 on: February 28, 2017, 06:06:30 AM »
That solder job looks mighty good to me!  Did hard solder it? Or soft?
Kim

Offline Gas_mantle

  • Full Member
  • ****
  • Posts: 1365
  • North Yorks - UK.
    • My Youtube channel
Re: Building the Potty Grasshopper engine.
« Reply #69 on: February 28, 2017, 10:23:12 AM »
Thanks Kim

It's silver soldered with Easyflo 55 solder.

Offline Gas_mantle

  • Full Member
  • ****
  • Posts: 1365
  • North Yorks - UK.
    • My Youtube channel
Re: Building the Potty Grasshopper engine.
« Reply #70 on: April 20, 2017, 04:06:24 PM »
Hi

Progress has been a bit slow lately as I've been tinkering with a few other things at the same time but I'm pleased to say the engine is just about completed :-)

All I really needed to do was make a simple 3 part eccentric and a few fixings to take the beam link rods and I'm pretty much now in a position to test if tomorrow.


Here it can be seen mounted temporarily on a wooden base and I'm pleased with how it's starting to look.


I haven't yet decided what colour to paint it or how to decorate the woodwork but once I've got it running I spruce it up and make a video of the final result.

Peter.


Offline b.lindsey

  • Global Moderator
  • Full Member
  • *****
  • Posts: 13860
  • Dallas, NC, USA
    • Workbench-Miniatures
Re: Building the Potty Grasshopper engine.
« Reply #71 on: April 20, 2017, 05:48:03 PM »
That's a real beauty Peter!!  Looking forward to seeing the first run too.

Bill

Offline Gas_mantle

  • Full Member
  • ****
  • Posts: 1365
  • North Yorks - UK.
    • My Youtube channel
Re: Building the Potty Grasshopper engine.
« Reply #72 on: April 20, 2017, 05:51:48 PM »
Thanks Bill, I've had it turning over on air and steam by just moving the valve by hand, now I have the eccentric in place I'm hoping tomorrow I can get it running continuously :-)


Offline b.lindsey

  • Global Moderator
  • Full Member
  • *****
  • Posts: 13860
  • Dallas, NC, USA
    • Workbench-Miniatures
Re: Building the Potty Grasshopper engine.
« Reply #73 on: April 20, 2017, 06:16:43 PM »
Peter, I am not even sure it needs much paint, maybe just the spokes and inner rim of the flywheel, the eccentric rod (the joined circles), or the risers off the top of the cylinder....just a few colored accents, but that is just me. Whatever you decide its still a very nice looking engine!!

Bill

Online gerritv

  • Full Member
  • ****
  • Posts: 760
  • St Catharines, ON
Re: Building the Potty Grasshopper engine.
« Reply #74 on: April 20, 2017, 07:22:15 PM »
The risk of painting any part of this model is that it will take you eyes off all the other great bits. A really elegant design, well executed.

Gerrit
Don't confuse activity with progress


SimplePortal 2.3.5 © 2008-2012, SimplePortal