Author Topic: Building the Potty Grasshopper engine.  (Read 23788 times)

Offline Gas_mantle

  • Full Member
  • ****
  • Posts: 1365
  • North Yorks - UK.
    • My Youtube channel
Building the Potty Grasshopper engine.
« on: September 13, 2016, 03:44:21 PM »
Hi,

Having built Stewart Harts 'Potty mill engine' last year I thought I'd have a go at his Grasshopper engine - the engine uses the same basic cylinder as the mill engine but has a few more parts and it a tad more complex although still aimed at beginners with limited tooling.

<a href="https://www.youtube.com/watch?v=ZERrt1BqCp4" target="_blank">http://www.youtube.com/watch?v=ZERrt1BqCp4</a>

I have decided to scale my version up by 50% so the result will have a 25mm bore and 10" flywheel.

Here goes -

First things first, I made a 25mm bore cylinder 78mm long from Aluminium round stock and milled a flat face to accommodate  a 24mm square aluminium bar that will be the valve chest.


The steam passages will be 4.5mm dia drilled into the cylinder wall so I next drilled the 2 inlet ports followed by the passages leading to the cylinder ends.


A 5mm mill nicely cut a side passage into the cylinder itself


Hardly rocket science but so far so good.


Peter.


Offline kvom

  • Full Member
  • *****
  • Posts: 2649
Re: Building the Potty Grasshopper engine.
« Reply #1 on: September 13, 2016, 03:58:53 PM »
Good start

Offline pgp001

  • Full Member
  • ****
  • Posts: 813
  • West Yorkshire - UK
Re: Building the Potty Grasshopper engine.
« Reply #2 on: September 13, 2016, 09:30:39 PM »
OK, You have had nearly six hours................Is it finished yet ?  ;D

Phil

Offline Gas_mantle

  • Full Member
  • ****
  • Posts: 1365
  • North Yorks - UK.
    • My Youtube channel
Re: Building the Potty Grasshopper engine.
« Reply #3 on: September 13, 2016, 09:39:10 PM »
OK, You have had nearly six hours................Is it finished yet ?  ;D

Phil

Not quite  :)  will probably get the valve chest done tomorrow though.

I've treated myself to a beginner kit of castings today, I had intended to go for a Stuart 10 but gone for the little Crosskill oscillator by Anthony Mount - it's only a simple engine but looks attractive and will do as a first go at working with castings.

http://www.pollymodelengineering.co.uk/sections/stationary-engines/anthony-mount-models/crosskills-Oscillating-Engine.asp

Peter.


Offline b.lindsey

  • Global Moderator
  • Full Member
  • *****
  • Posts: 13860
  • Dallas, NC, USA
    • Workbench-Miniatures
Re: Building the Potty Grasshopper engine.
« Reply #4 on: September 14, 2016, 12:57:07 AM »
Great start on the grasshopper Peter, and I like the little cross kill too. Following along with you for both.

Bill

Offline eweb101

  • Full Member
  • ****
  • Posts: 31
Re: Building the Potty Grasshopper engine.
« Reply #5 on: September 14, 2016, 01:07:30 AM »
I really like the look of all three engines in that series. Looking forward to seeing your grasshopper!

Offline Gas_mantle

  • Full Member
  • ****
  • Posts: 1365
  • North Yorks - UK.
    • My Youtube channel
Re: Building the Potty Grasshopper engine.
« Reply #6 on: September 14, 2016, 01:26:58 AM »
Thanks

The Potty series are great for beginners the mill engine can be built without a milling machine and is fairly straightforward to machine, it's well worth a go for anyone with limited tools and experience.

Peter.

Offline Gas_mantle

  • Full Member
  • ****
  • Posts: 1365
  • North Yorks - UK.
    • My Youtube channel
Re: Building the Potty Grasshopper engine.
« Reply #7 on: September 14, 2016, 04:25:45 PM »
I've now managed to complete the valve chest, making it is simply an exercise in drilling , drilling and more drilling but as this thread is likely to be of more interest to beginners I'll post an update for the benefit of anyone else who may want to make this engine.

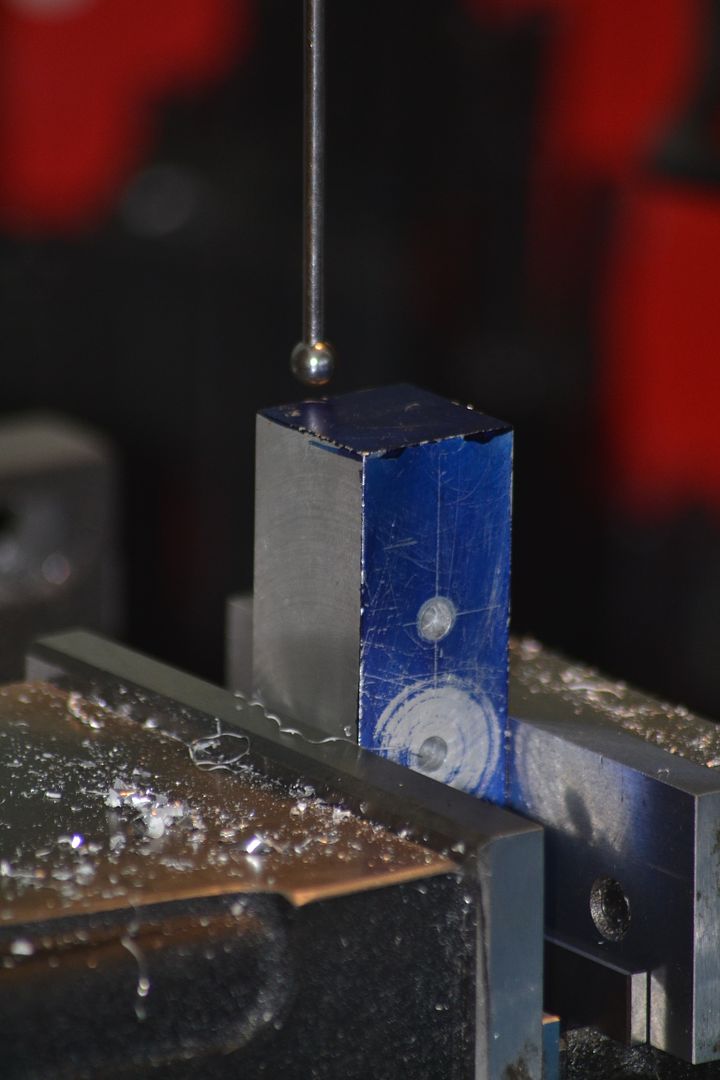
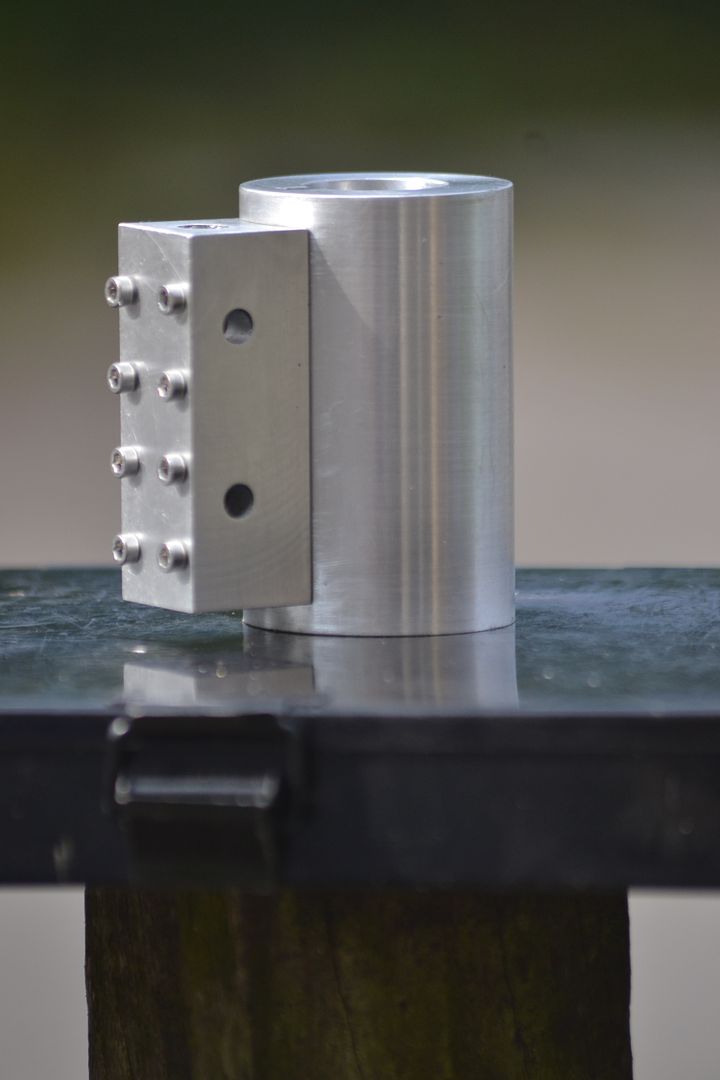
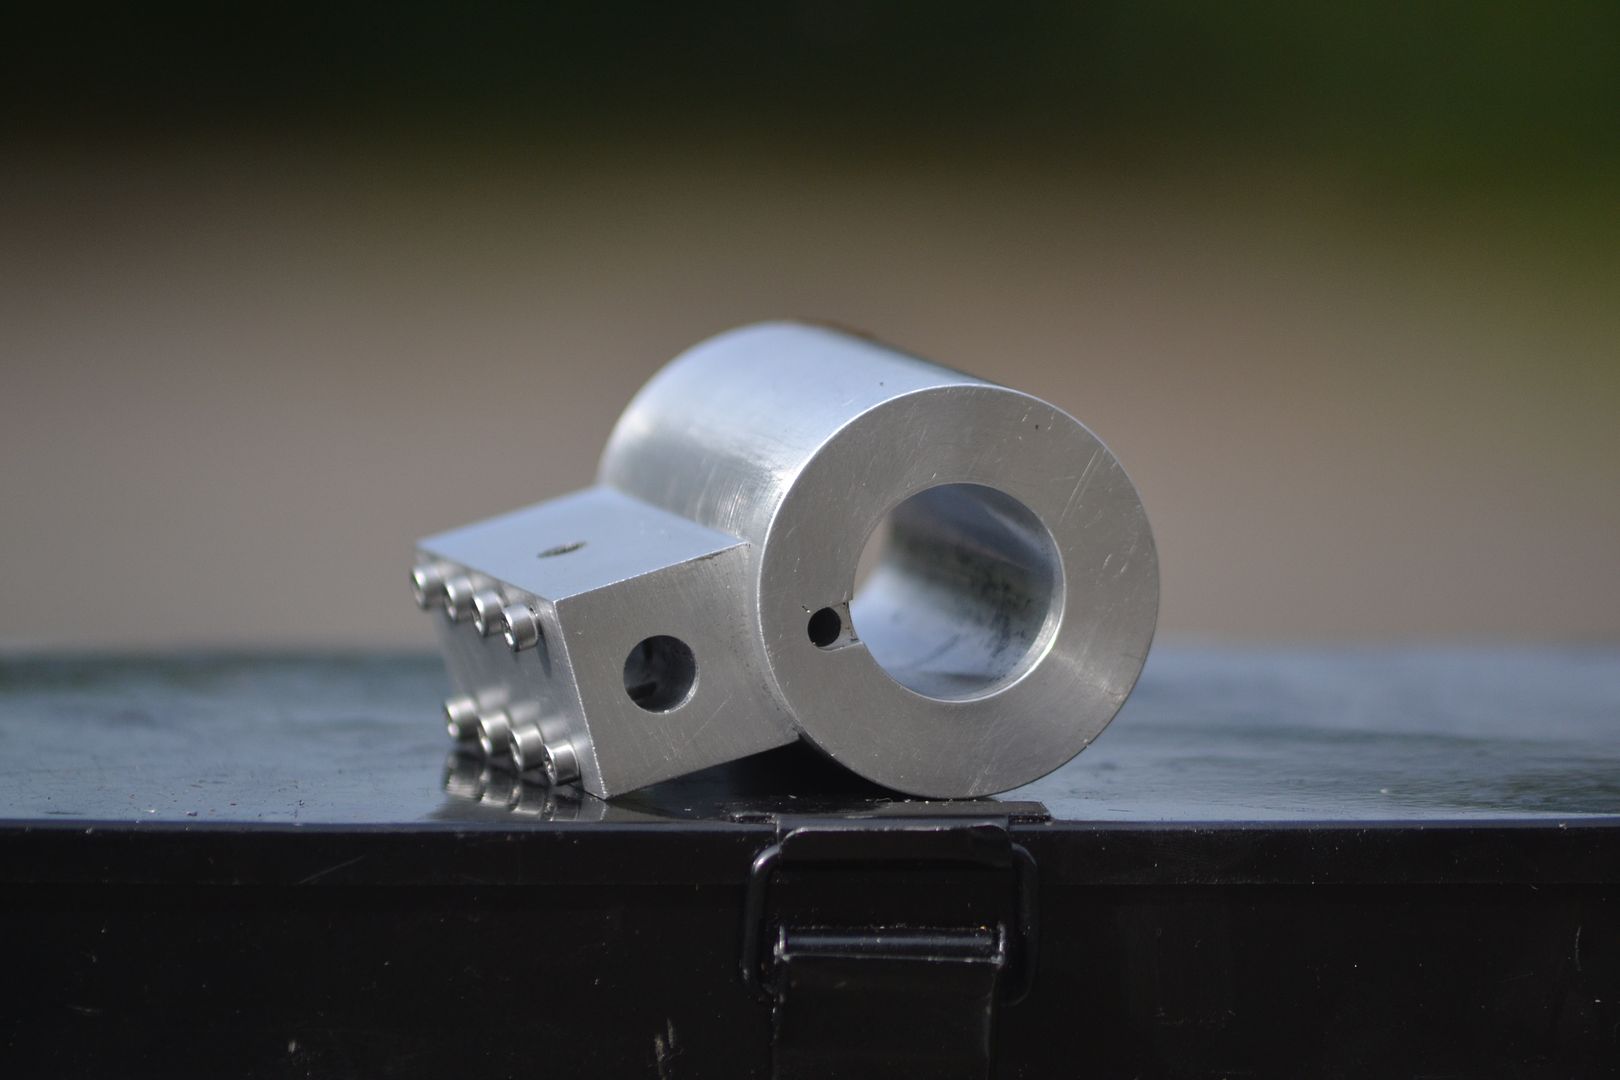
The valve chest is a 24mm square aluminium block 66 mm long, the first photo shows 2  6mm dia holes drilled to meet will the cylinder holes and about to drill a full length hole of 9mm dia to take the spool valve. I've never used a wiggler edge finder before but this seemed a good opportunity to try it in order to get the hole 9.5mm from the rear edge. (it may be worth mentioning to any other newbies wanting to build this engine that the spool bore isn't central in the chest but is offset in 1 axis.)


Looks to be running true and swarf is coming out where it should.


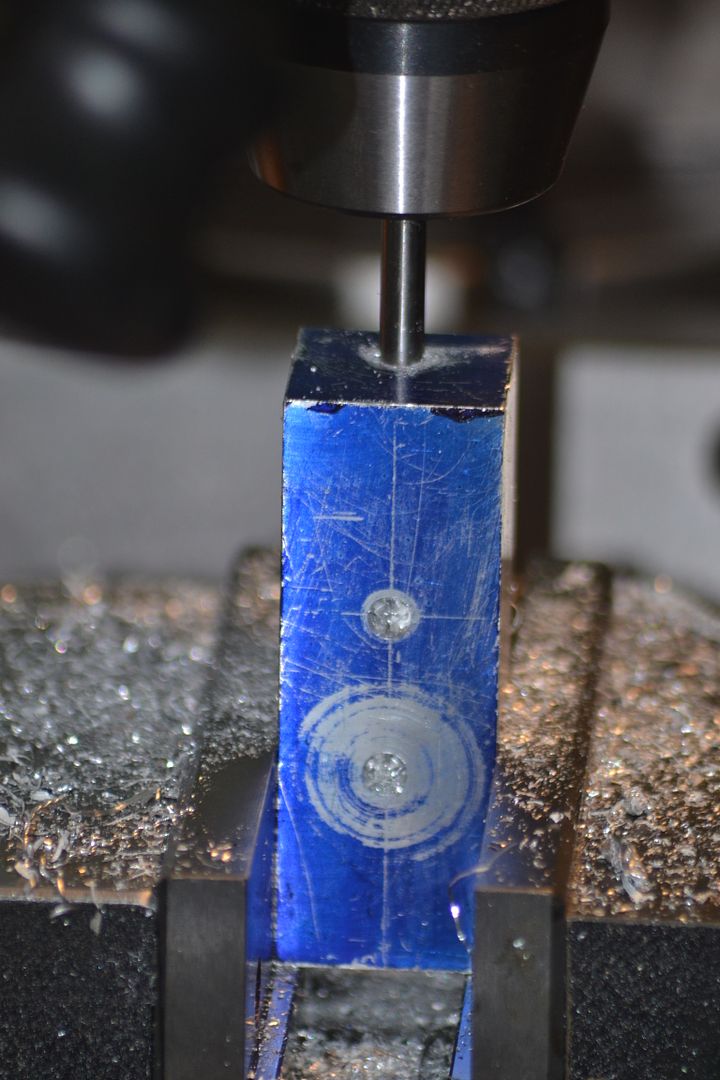
2 more 6mm dia holes are drilled to meet the central bore these will form the exhaust - another single hole is drilled on the opposite face to form the inlet.


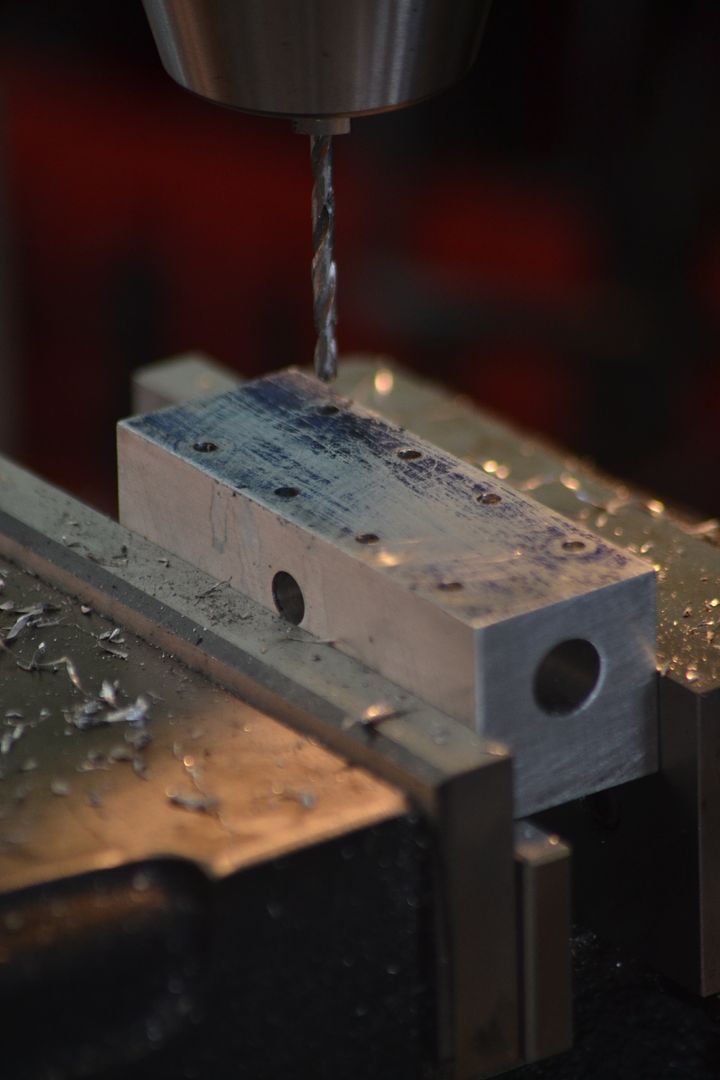
The inlet hole can be seen in this photo as I drill the 8 securing holes.


I wasn't really sure of the best way of getting the cylinder holes and valve chest holes to line up exactly - I had used the hand dials on the mill to drill the holes in the chest exactly evenly spaced and possibly could have adopted the same method on the cylinder but decided I'd drill the cylinder with the chest in place.

Lining the chest up against the side of the drill bit and ensuring it is seated flat on the cylinder I drilled 1 hole in the cylinder then removed everything tapped the cylinder at 3mm before bolting the 2 parts together and repeating to get a 2nd bolt in place. With 2 bolts holding the chest in place I drilled the remaining 6 holes.


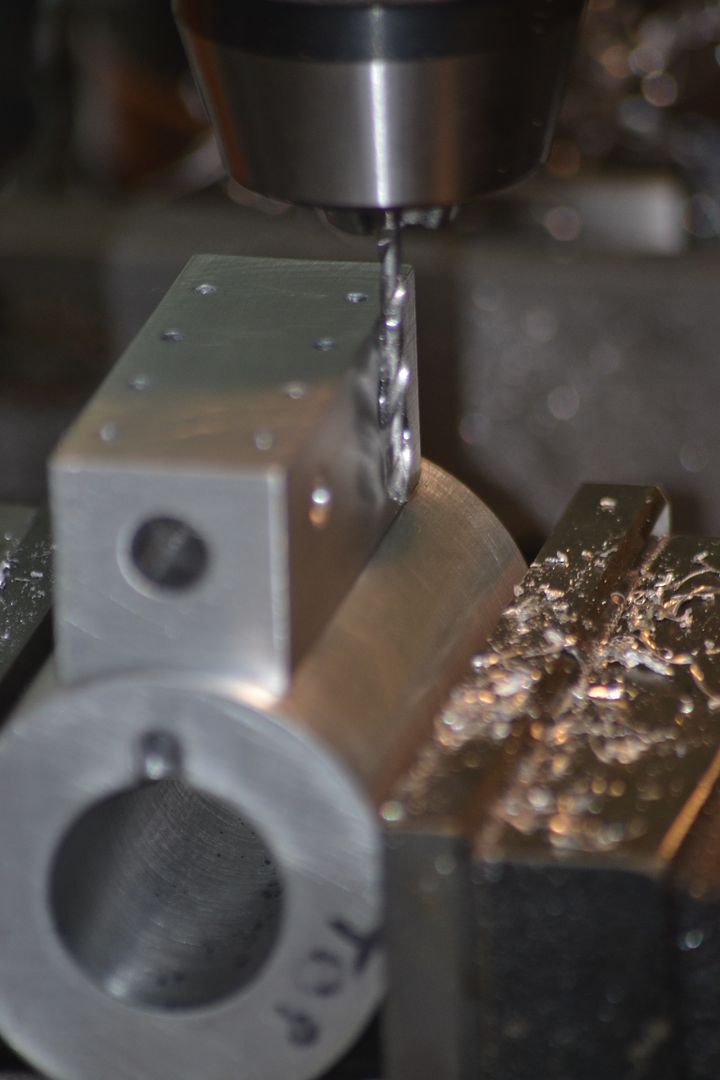
Maybe it was a bit of an amateurish way of going about it but the result turned out well.


That's enough drilling for today, now off to get myself a few cans of the amber stuff - maybe will do the cylinder end covers tomorrow depending on the severity of the forthcoming hangover  ;)

Peter.


Offline Jasonb

  • Full Member
  • *****
  • Posts: 9489
  • Surrey, UK
Re: Building the Potty Grasshopper engine.
« Reply #8 on: September 14, 2016, 04:57:00 PM »
You are off to a good start.

Jo did a build thread of the Crosskill. I think she was not feeling herself when she did it as no castings were used :LittleDevil: should be on here somewhere

Offline Gas_mantle

  • Full Member
  • ****
  • Posts: 1365
  • North Yorks - UK.
    • My Youtube channel
Re: Building the Potty Grasshopper engine.
« Reply #9 on: September 14, 2016, 05:15:28 PM »
Cheers Jason,

I had a bit of a search online for a build of the Crosskill but couldn't find much about it, youtube don't have anything at all.

Polly models rang me to say I should have it tomorrow, I think there are only about 4 castings to machine so hopefully it will be straightforward to build.

Peter.

Offline Jo

  • Administrator
  • Full Member
  • *****
  • Posts: 15305
  • Hampshire, england.
Re: Building the Potty Grasshopper engine.
« Reply #10 on: September 14, 2016, 06:26:43 PM »
Jo did a build thread of the Crosskill. I think she was not feeling herself when she did it as no castings were used :LittleDevil: should be on here somewhere

 ::) http://www.modelenginemaker.com/index.php/topic,1818.0.html

Jo
Enjoyment is more important than achievement.

Offline Gas_mantle

  • Full Member
  • ****
  • Posts: 1365
  • North Yorks - UK.
    • My Youtube channel
Re: Building the Potty Grasshopper engine.
« Reply #11 on: September 14, 2016, 06:29:29 PM »
Thanks Jo,

That's my evening reading sorted out  :)

Offline Larry

  • Full Member
  • ****
  • Posts: 166
  • Atlanta, GA
Re: Building the Potty Grasshopper engine.
« Reply #12 on: September 16, 2016, 05:57:42 AM »
I am glad you are doing this. I have finished the Cylinder Assembly and am now working on the valve crank arms. Mine will be to scale and converted to imperial dimensions. Anxious to follow along.

Offline Gas_mantle

  • Full Member
  • ****
  • Posts: 1365
  • North Yorks - UK.
    • My Youtube channel
Re: Building the Potty Grasshopper engine.
« Reply #13 on: September 16, 2016, 04:04:05 PM »
Thanks Larry,

Part of the reason I'm scaling up by 50% is to get around the need for M2 threads, I struggled a bit with them on the mill engine but on this engine the smallest I will need is M3. The beginner set of taps and dies I have probably isn't the best quality in the land and my inexperience also plays its part so that I end up with poor threads under 3mm. I don't have any trouble on steel or brass but cant seem to cut neat threads in aluminium. I'm looking at buying a BA set soon and think it may be worth paying a bit more this time.

I've now got one cylinder cover done and will hopefully get the other one and the cylinder base done tomorrow.

Peter

Offline pgp001

  • Full Member
  • ****
  • Posts: 813
  • West Yorkshire - UK
Re: Building the Potty Grasshopper engine.
« Reply #14 on: September 16, 2016, 05:19:38 PM »
Peter

I can fix you up with some BA taps.

Phil


SimplePortal 2.3.5 © 2008-2012, SimplePortal