Author Topic: 1/3rd Scale Allman Vertical Engine  (Read 15910 times)

Offline zeeprogrammer

  • Full Member
  • *****
  • Posts: 6811
  • West Chester, PA, USA
Re: 1/3rd Scale Allman Vertical Engine
« Reply #15 on: May 17, 2016, 10:01:56 PM »
Just catching up. Always an enjoyable read and loads of learning.

Bummer about the lack of food.  ;D
Carl (aka Zee) Will sometimes respond to 'hey' but never 'hey you'.
"To work. To work."
Zee-Another Thread Trasher.

Offline b.lindsey

  • Global Moderator
  • Full Member
  • *****
  • Posts: 13860
  • Dallas, NC, USA
    • Workbench-Miniatures
Re: 1/3rd Scale Allman Vertical Engine
« Reply #16 on: May 18, 2016, 12:51:53 AM »
Great pictures Jason and some very nice progress too. Its going to be a beauty....well I guess it already is, but looking forward to the end of the movie :)

Bill

Offline Dave Otto

  • Full Member
  • *****
  • Posts: 4707
  • Boise, Idaho USA
    • Photo Bucket
Re: 1/3rd Scale Allman Vertical Engine
« Reply #17 on: May 18, 2016, 02:06:05 AM »
Looking good Jason!

Dave

Offline Art K

  • Full Member
  • ****
  • Posts: 1766
  • Madison, Wisconsin USA
Re: 1/3rd Scale Allman Vertical Engine
« Reply #18 on: May 18, 2016, 03:00:31 AM »
Jason,
I just caught your build looks like a good catch with the castings and promises to be a good build.
Art
"The beautiful thing about learning is that no one can take it away from you" B.B. King

Offline RayW

  • Full Member
  • ****
  • Posts: 735
Re: 1/3rd Scale Allman Vertical Engine
« Reply #19 on: May 18, 2016, 10:54:38 AM »
Hi Jason,

Looks a really interesting build. Following your progress with interest and looking forward to seeing the finished product in action.

Ray
Ray

Online Jasonb

  • Full Member
  • *****
  • Posts: 9489
  • Surrey, UK
Re: 1/3rd Scale Allman Vertical Engine
« Reply #20 on: May 28, 2016, 08:34:32 PM »
Thanks for the comments chaps.

The Allman differes from a lot of hit and miss engines by having it's governor weights inside the pully rather than the more common position on inside the flywheel.

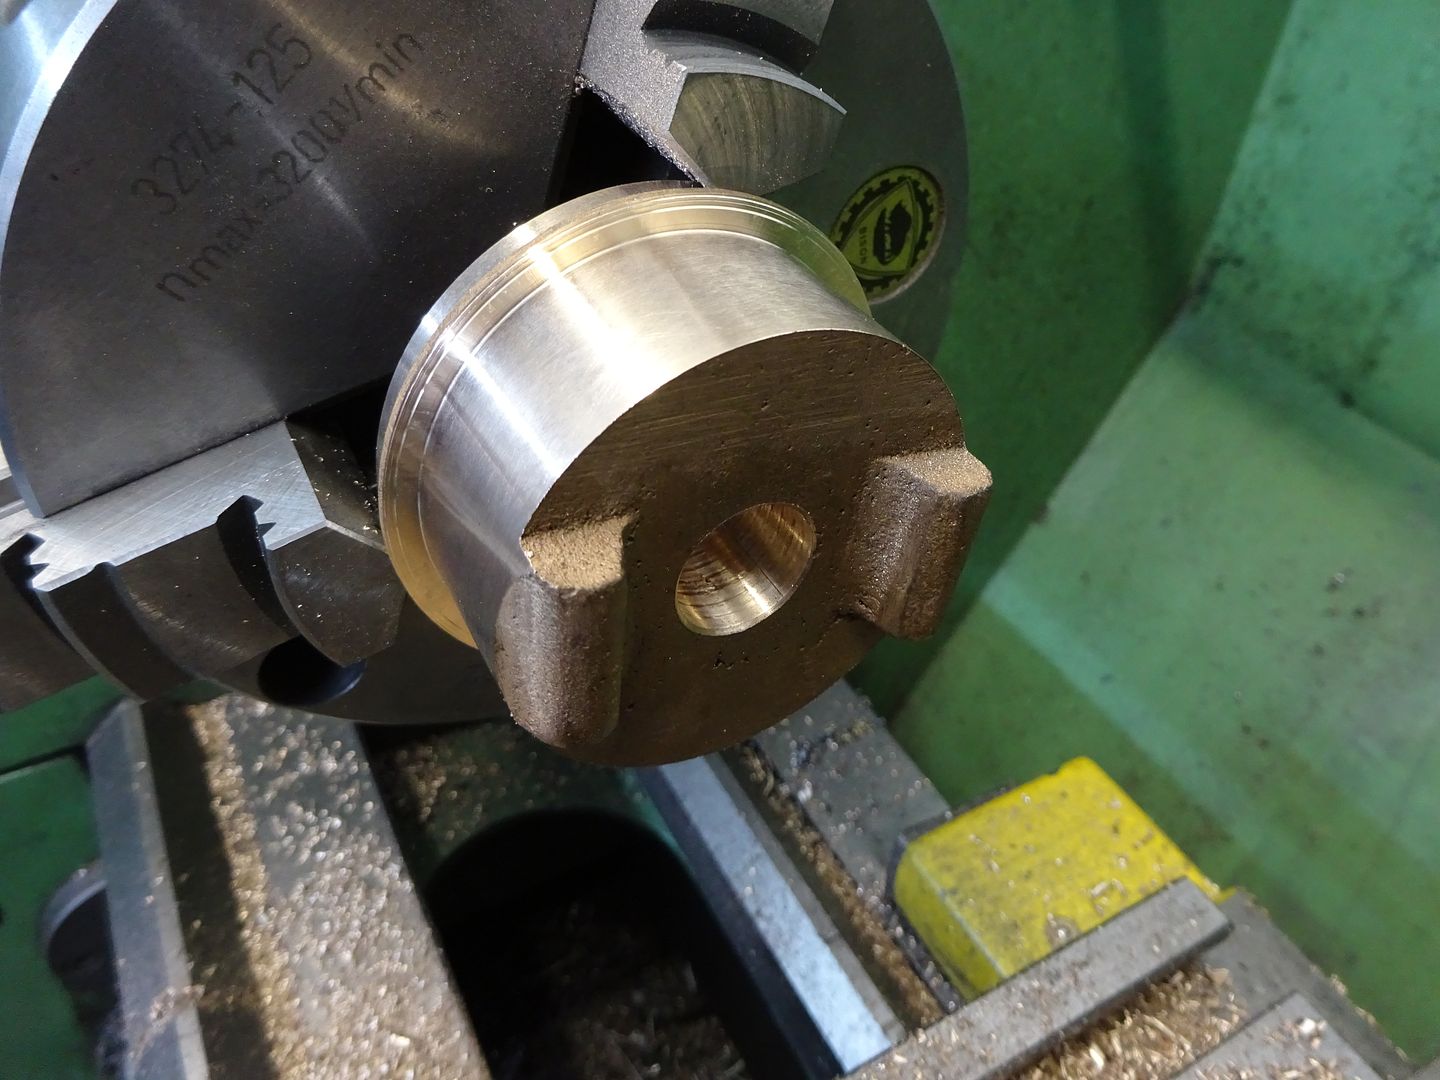
A piece of hollow CI bar is supplied for the pully. First job was to turn the outside diameter, you should be able to see three different bands on the surface this is where I have made two slightly tapered cuts either side of a centrall parallel section, these bands will get blended to form the crown of the pully later.


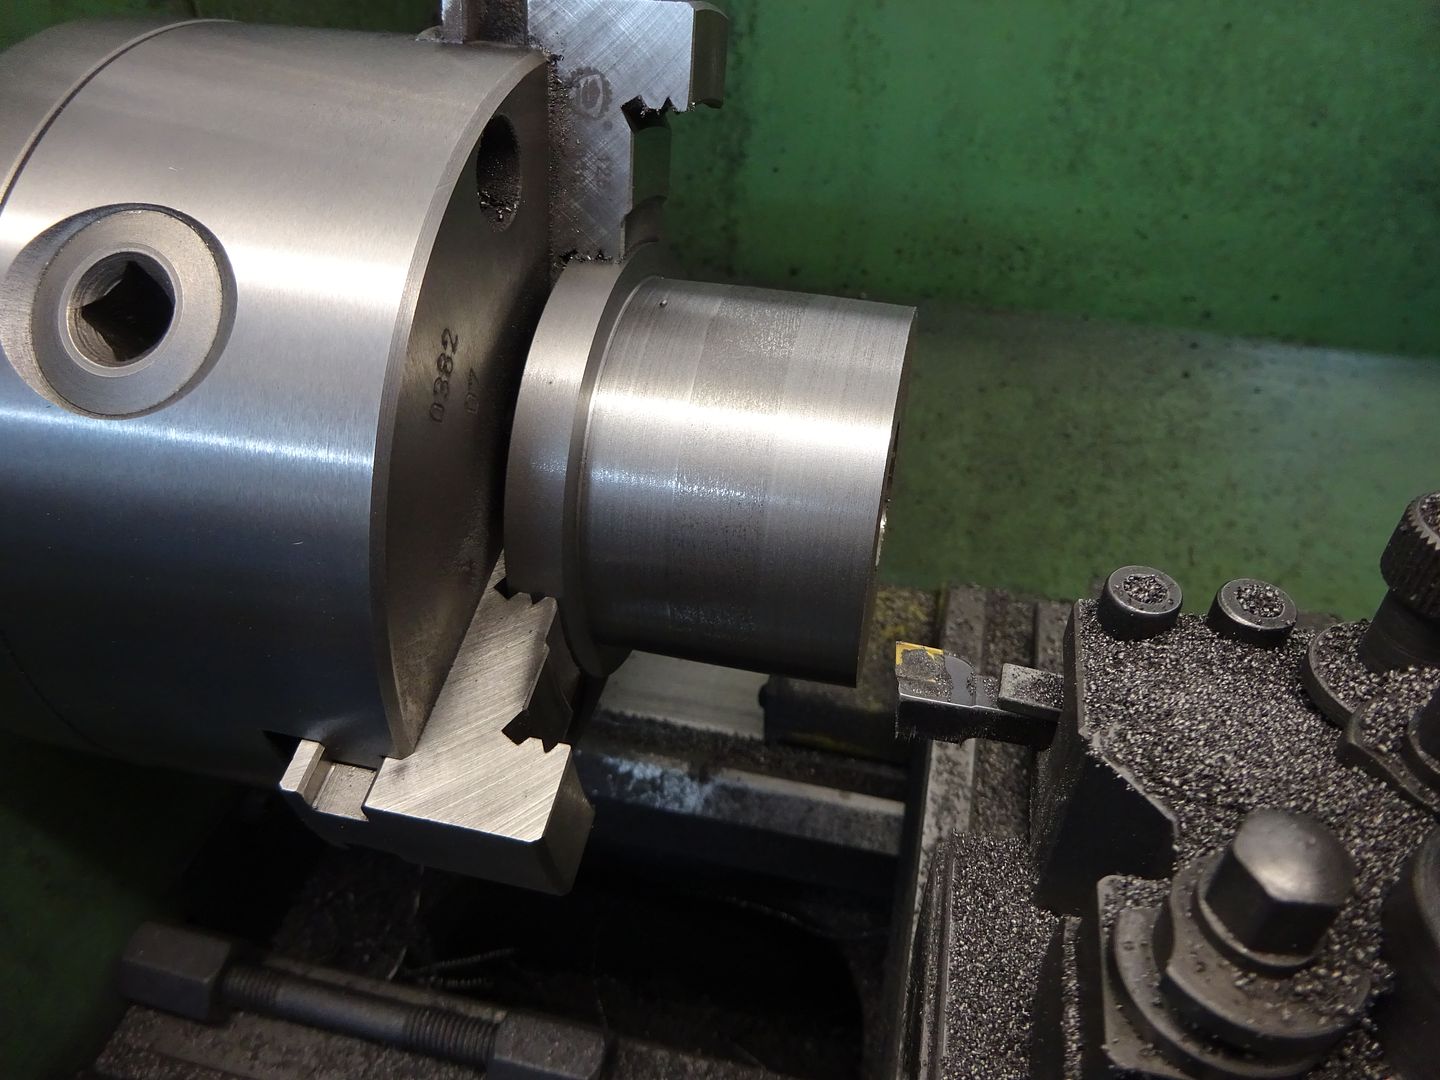
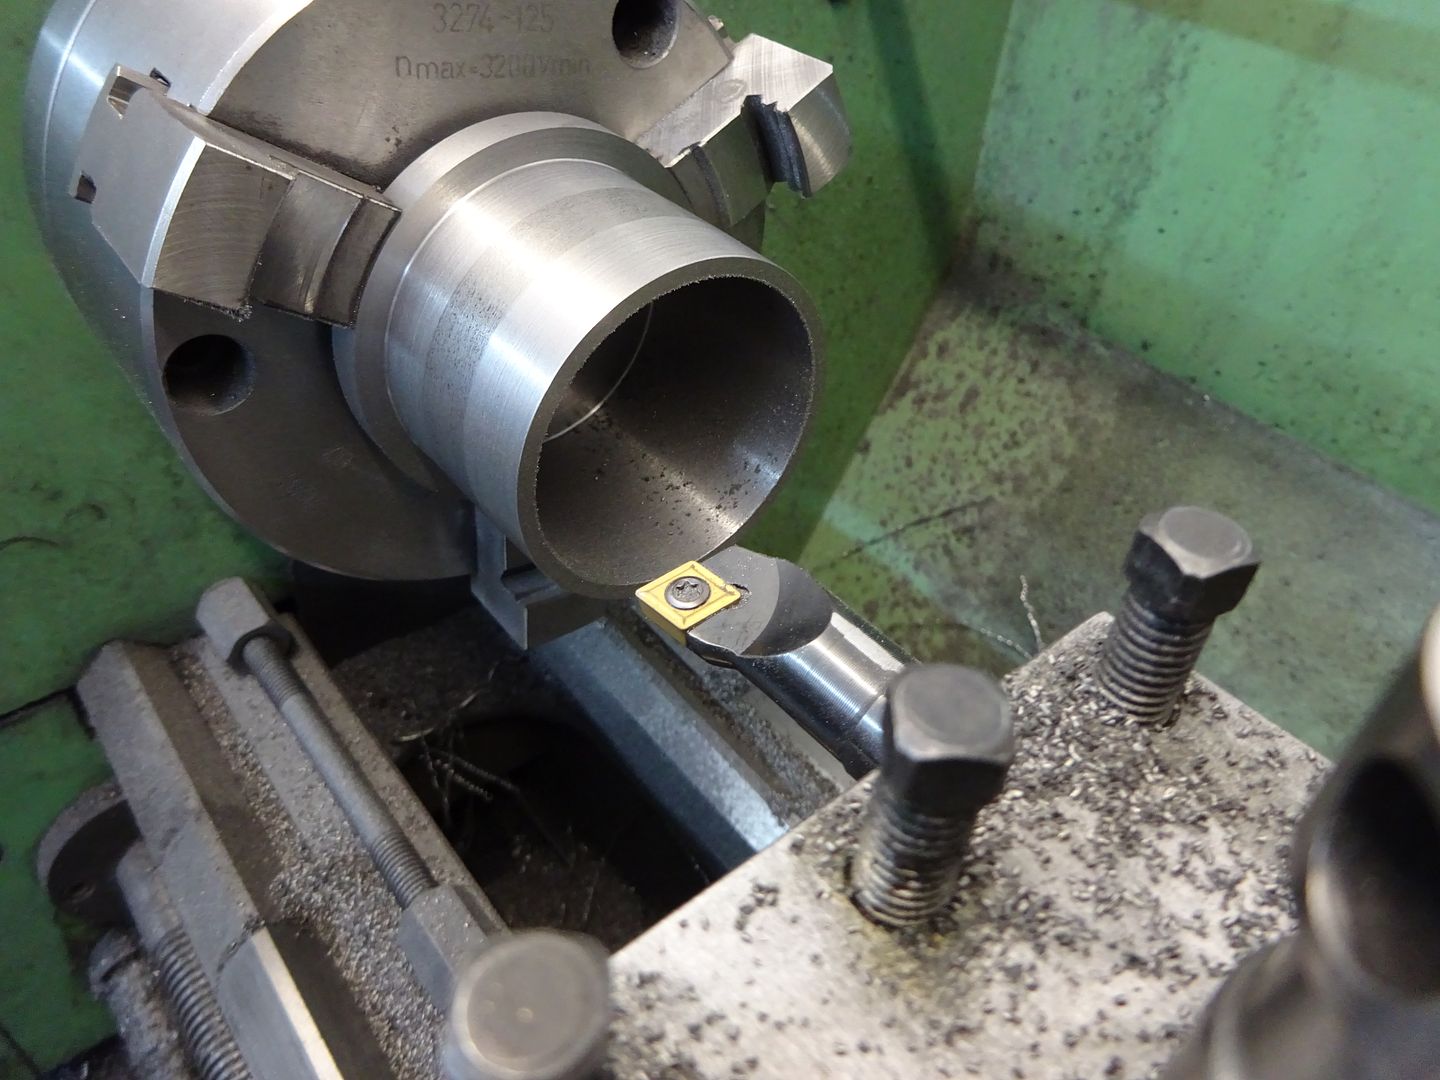
Next using a sturdy 16mm diameter boring bar the inside was opened out to the required 2.125" diameter. I placed the hold down stud and nuts on the bed to act as a carrage stop so I did not run the boring bar out the far end and into the chuck jaws.


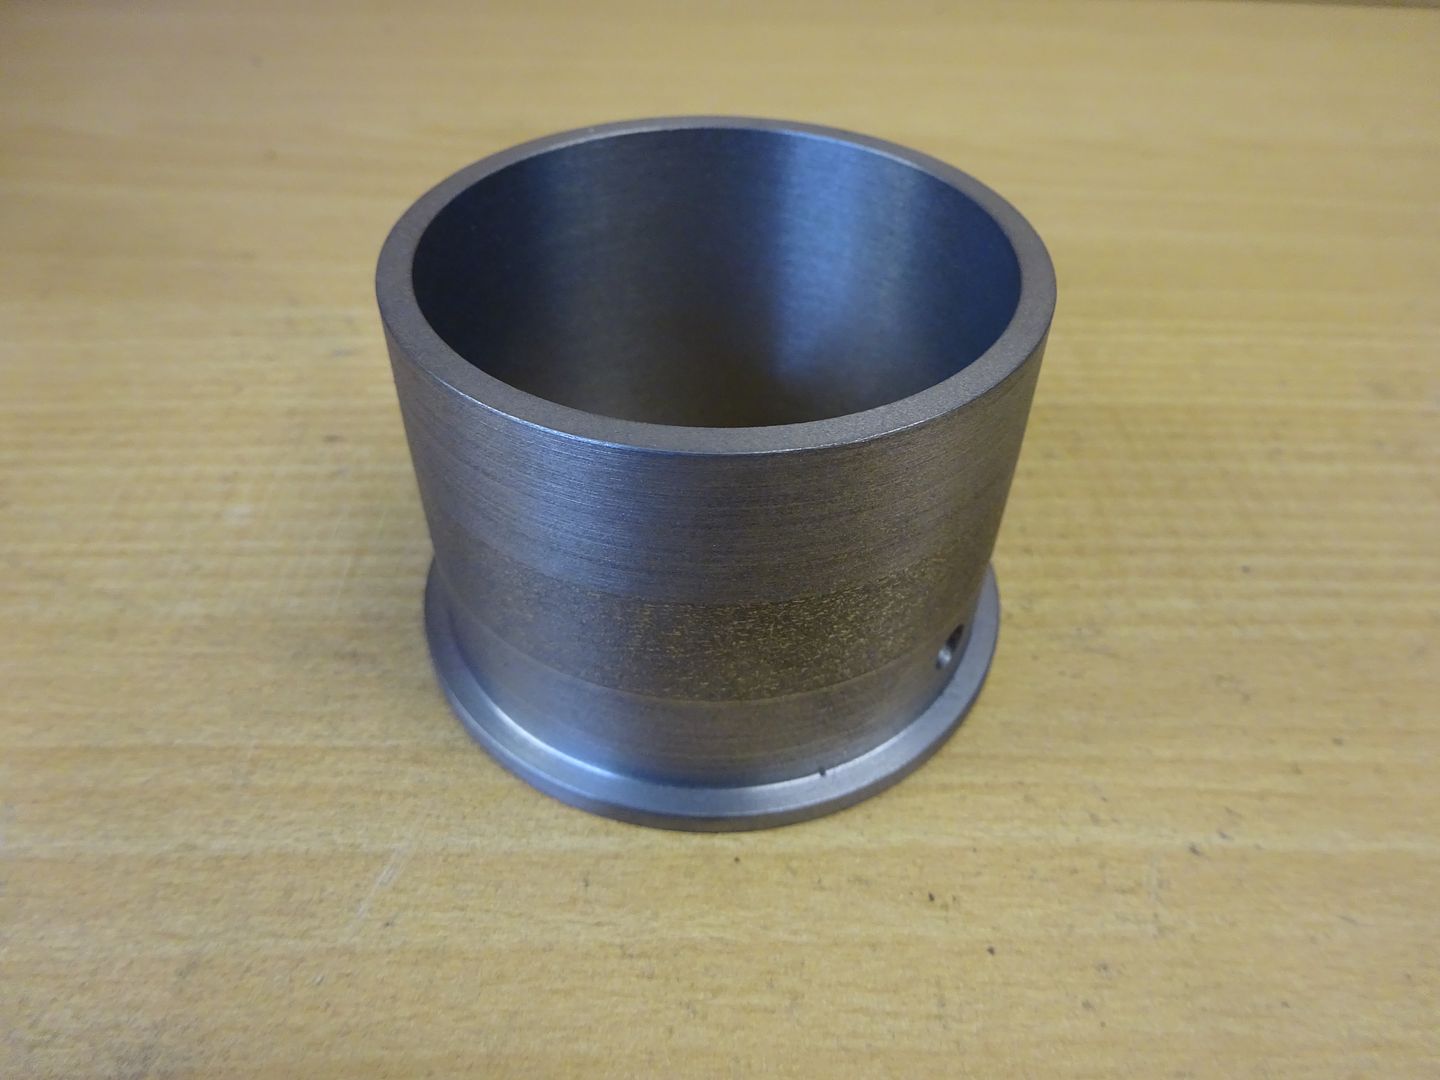
With that done the pully was reversed in the chuck and taken down to final length leaving a small flange at the end which stops any stray belts wandering into the timing gears.


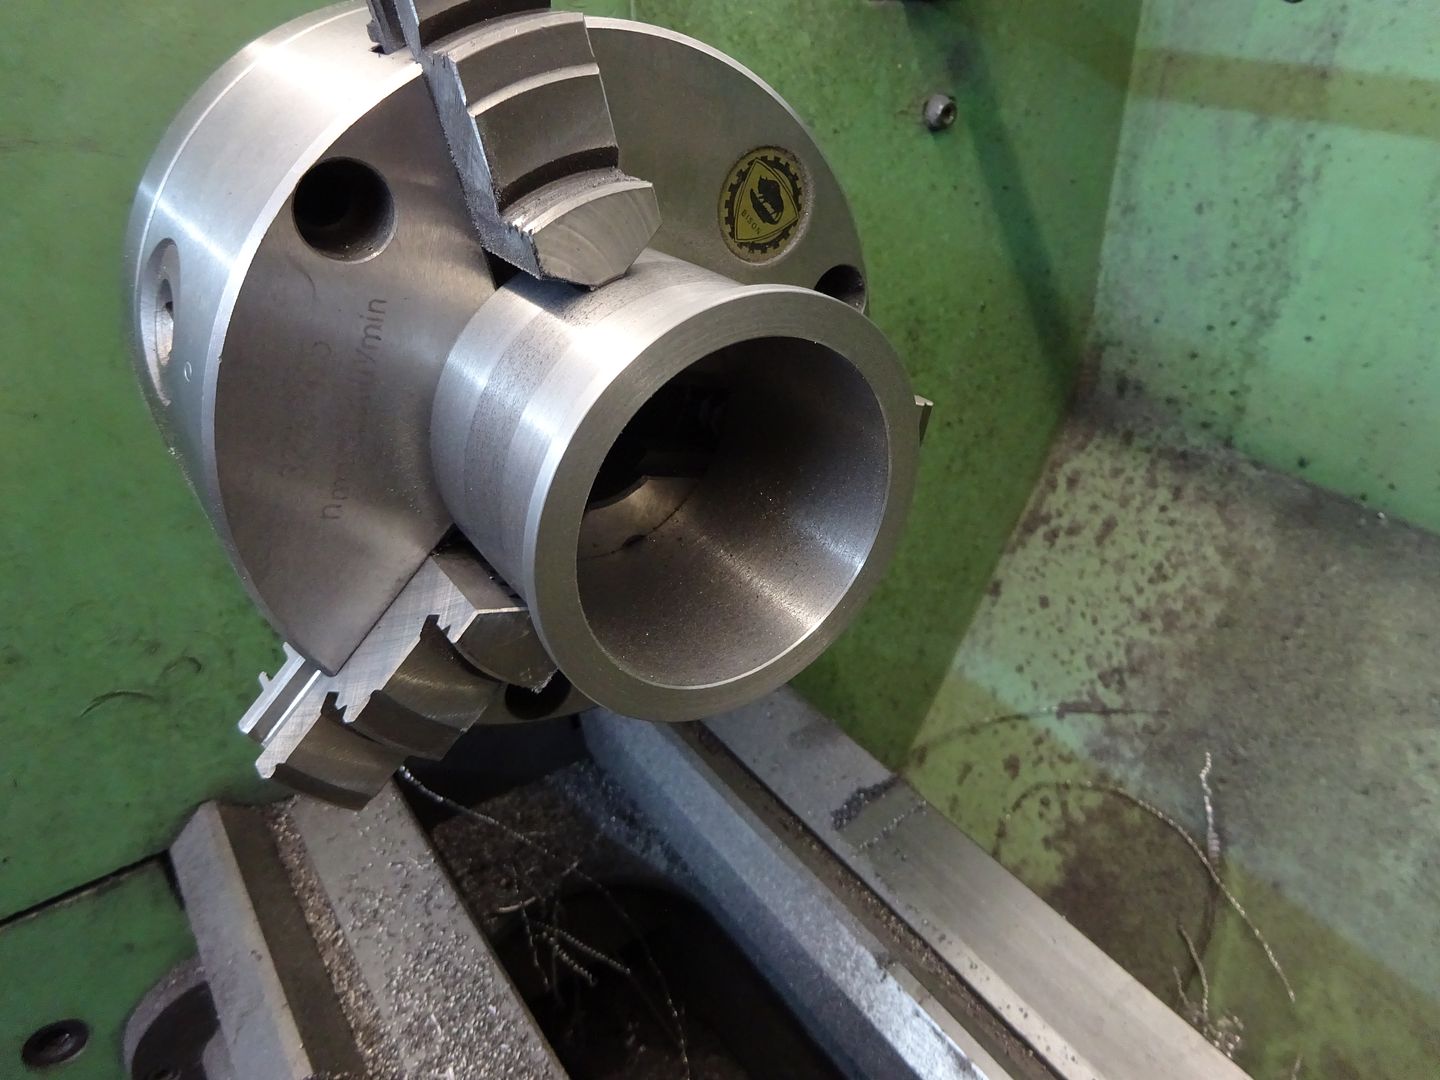
Finally a clearance hole for a hex key was added.


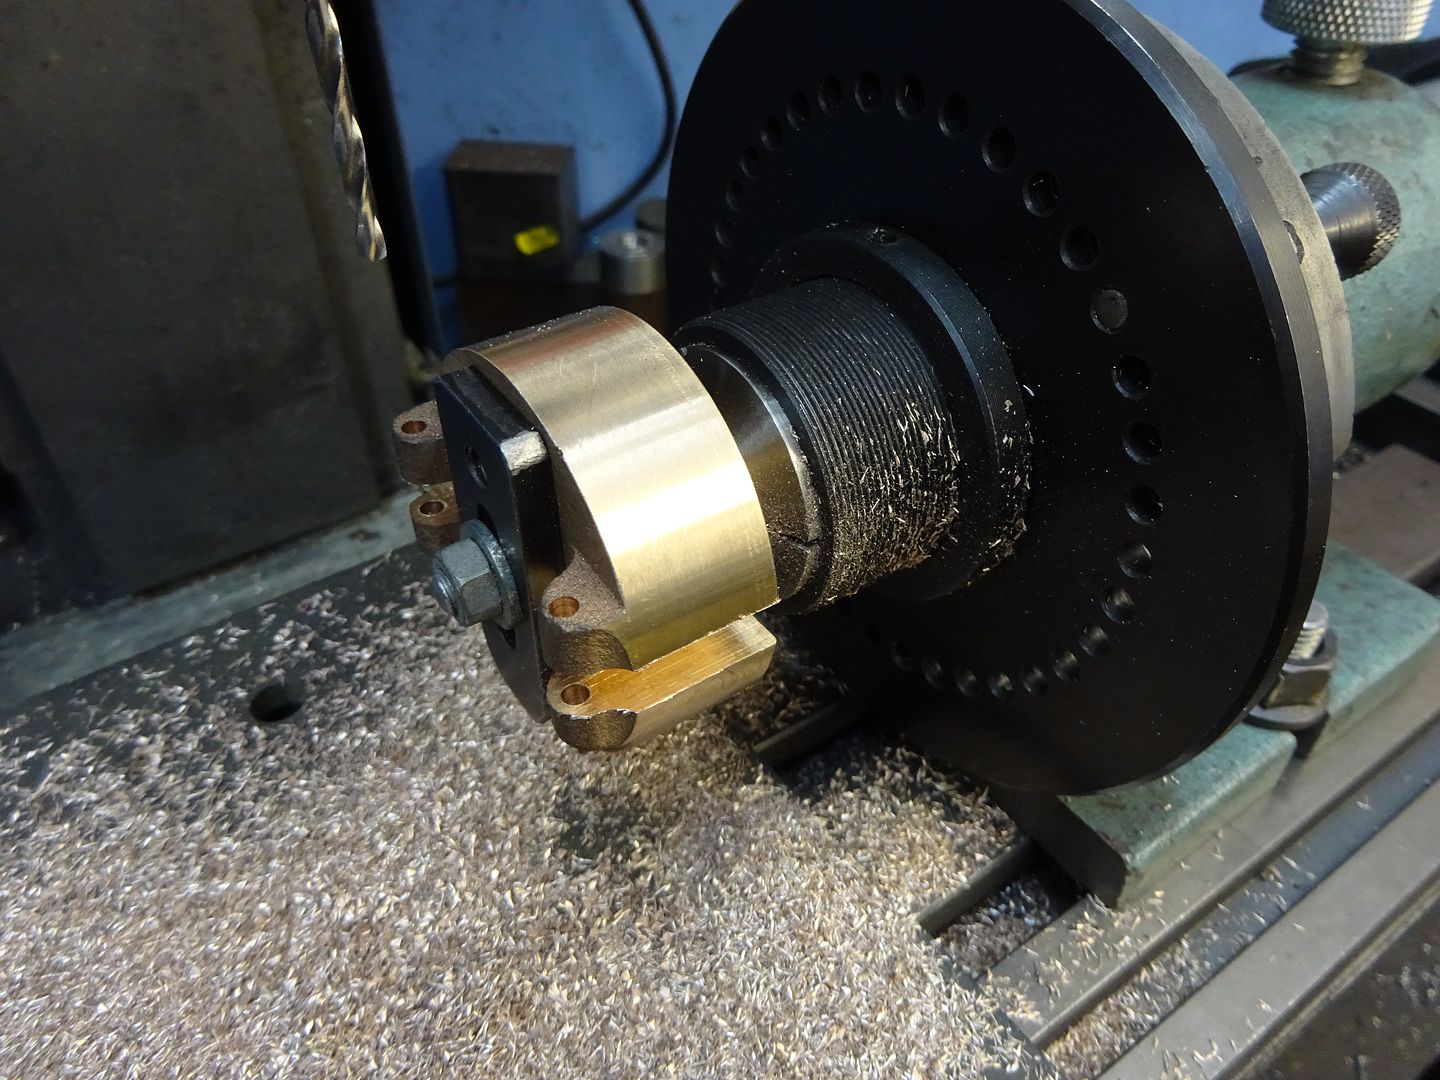
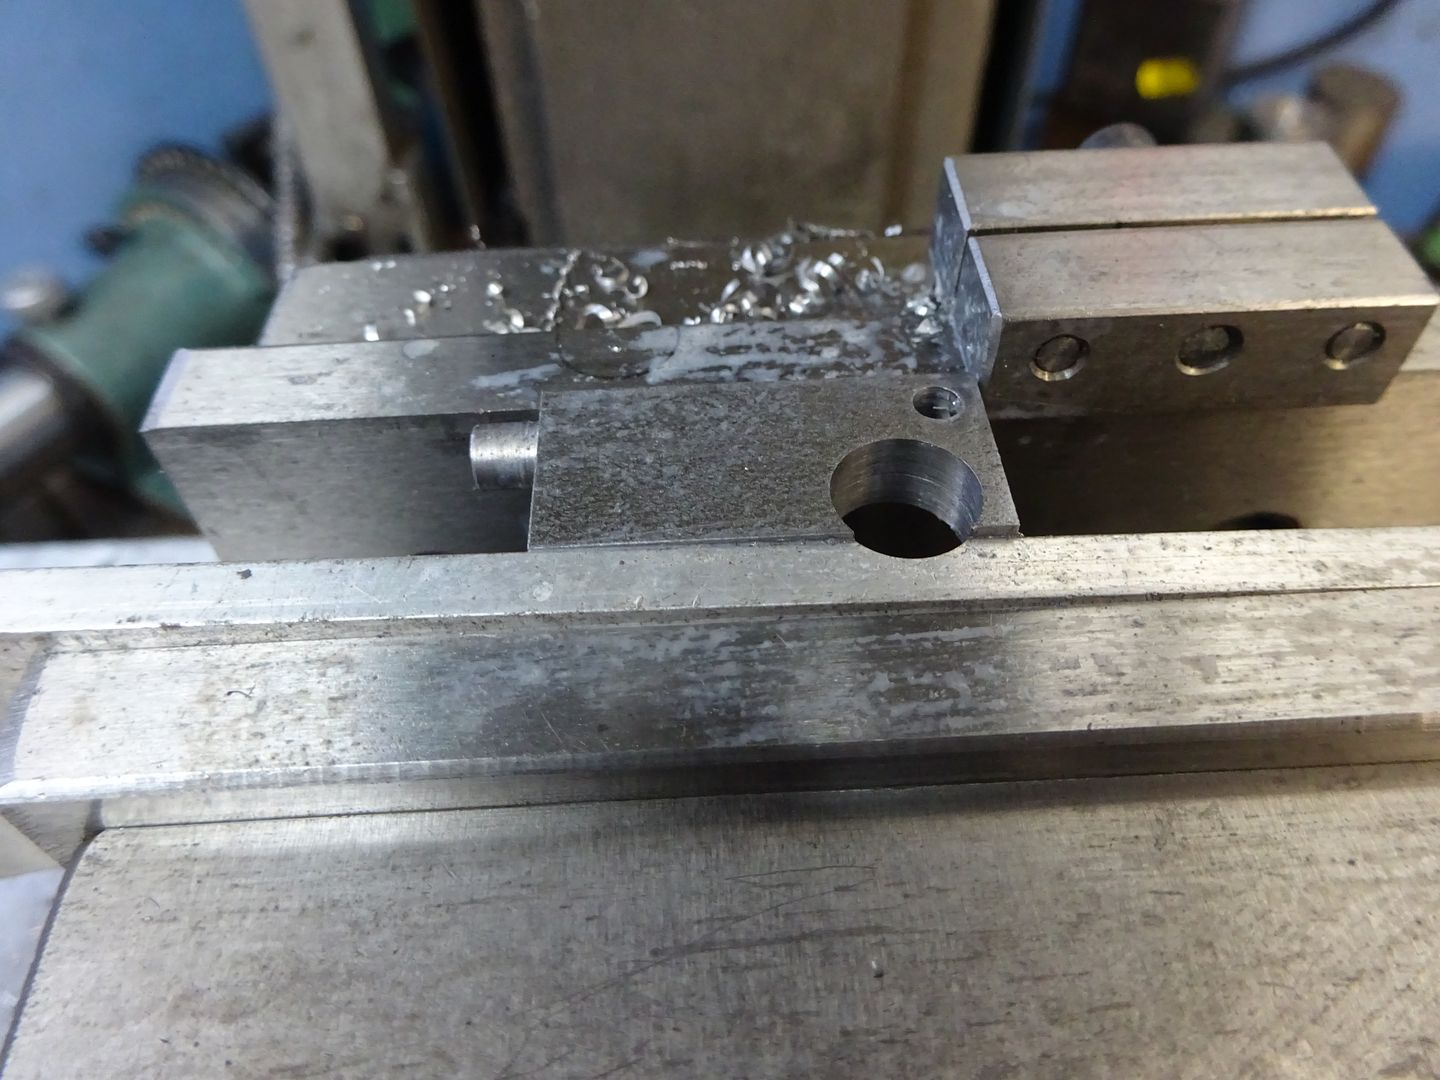
The governor arm bracket is very similar to a lot of others though quite a bit deeper. First thing to do was machine the outside for a press fit into the pully and then bore 5/8" for the crankshaft.


After facing the rear down to final length it's over to the mill and fix the bracket to a mandrel which could be held in the indexer. Mill the two slots for the governor arms and then rotate 90 degrees to drill & ream for the pivot pins.


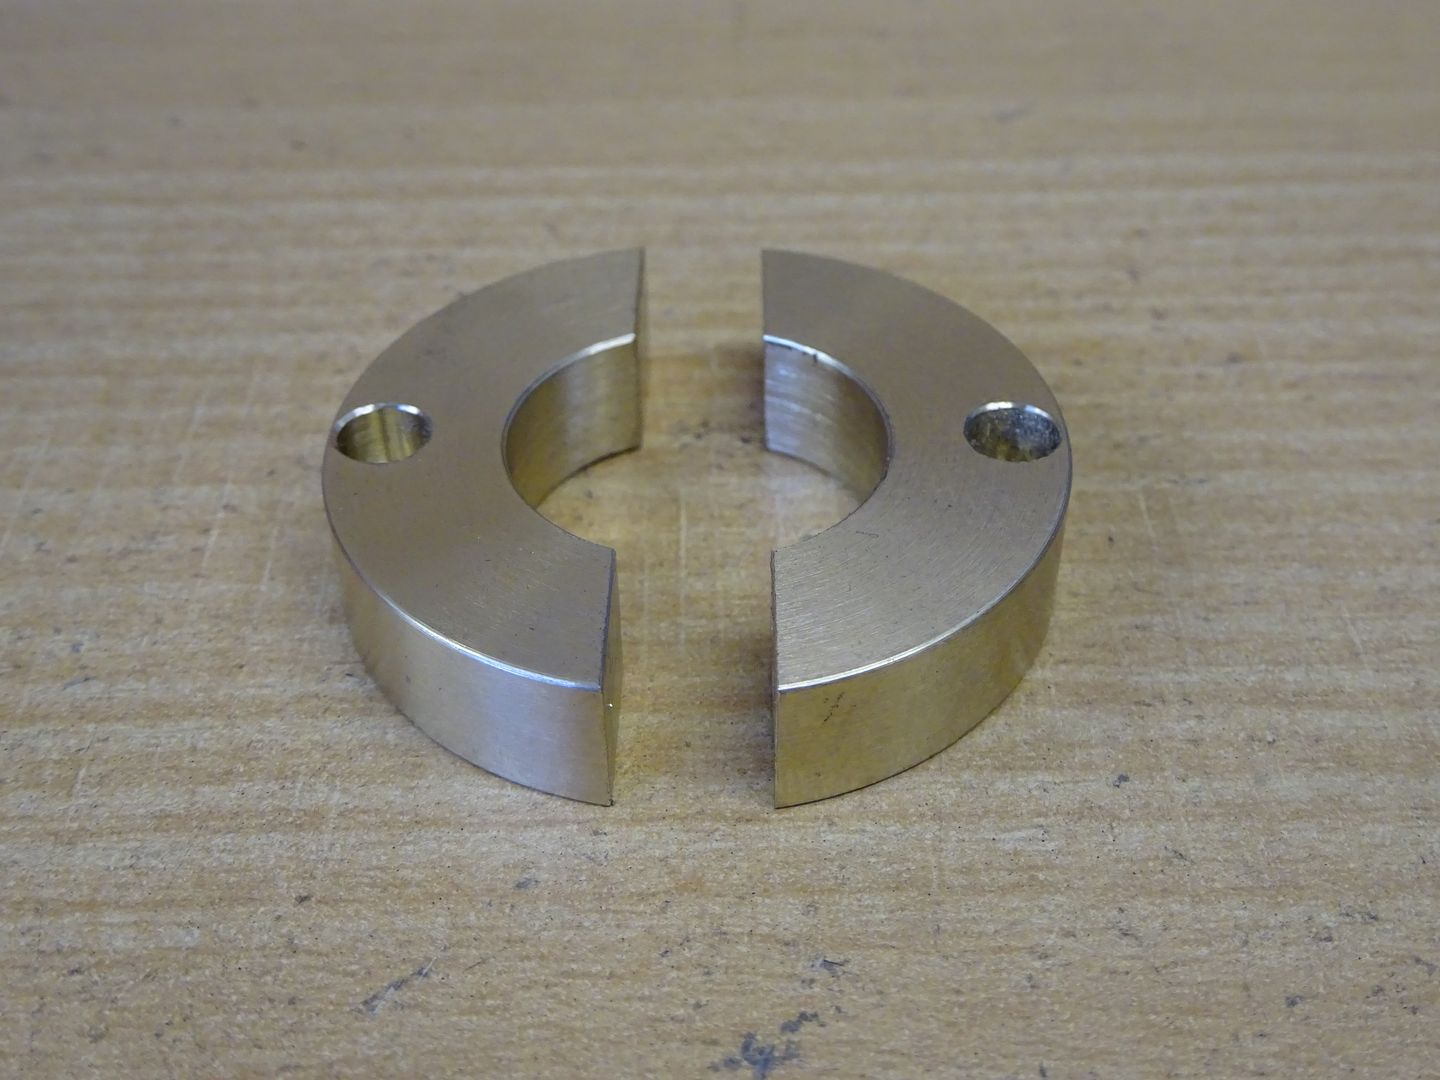
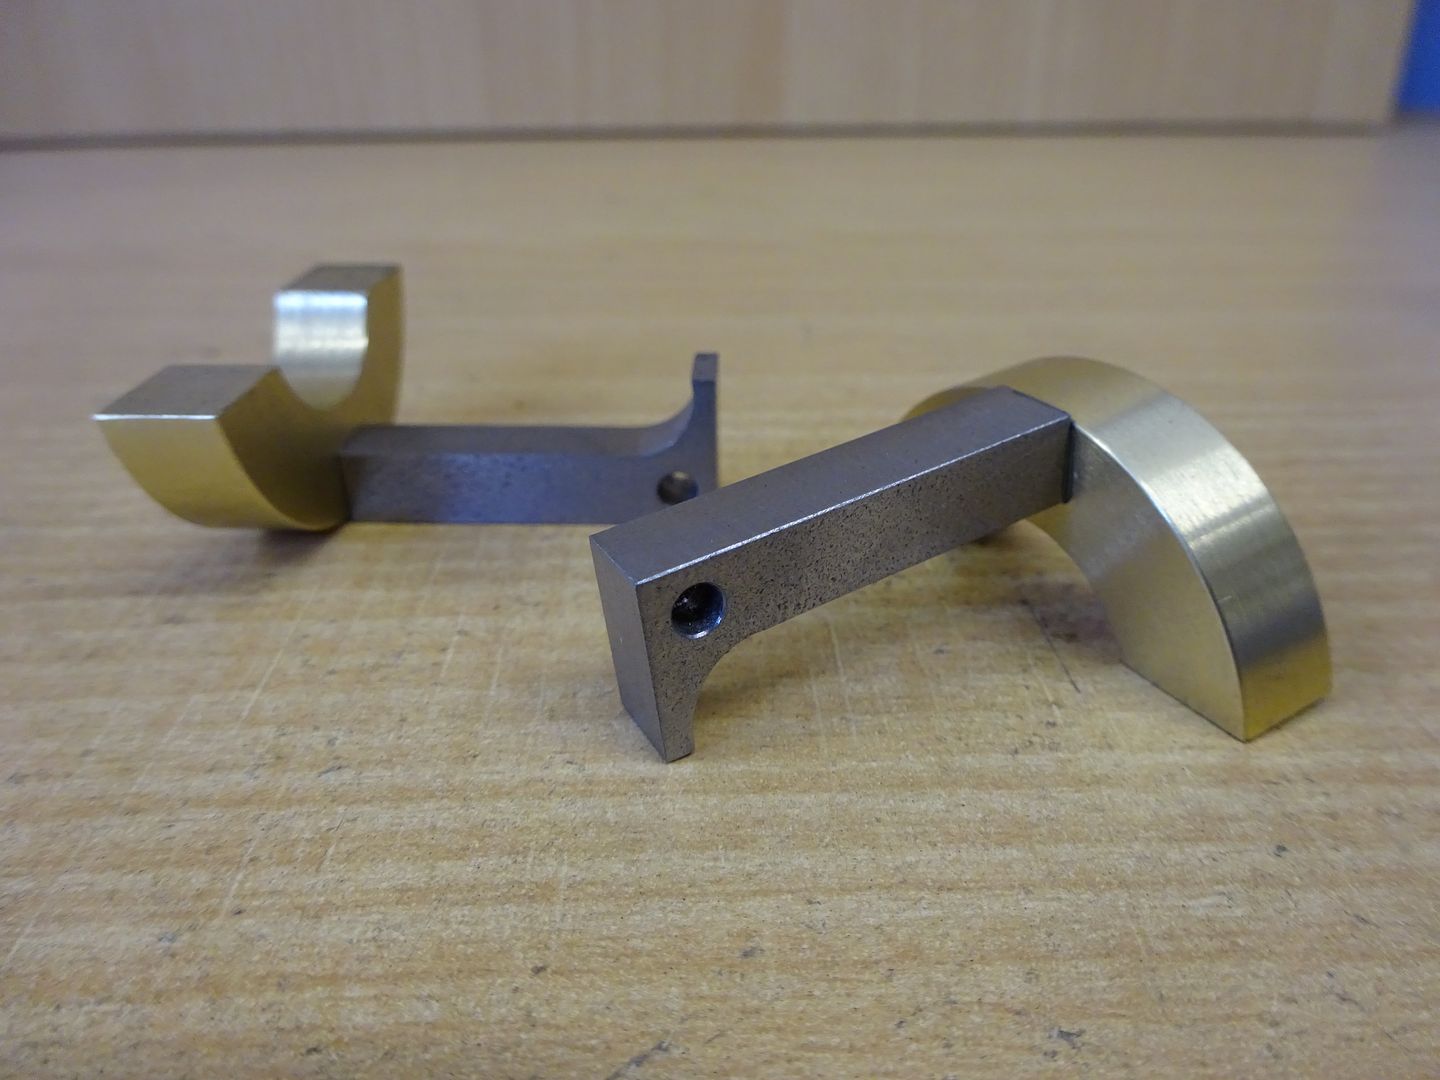
The two governor weights were turned from a slice of brass, cut in half and then a flat bottomed hole cut with a 2-flute milling cutter was added to press the arms into.


For the arms a bit of steel was milled upto size and the spigot that presses into the weight turned on either end.


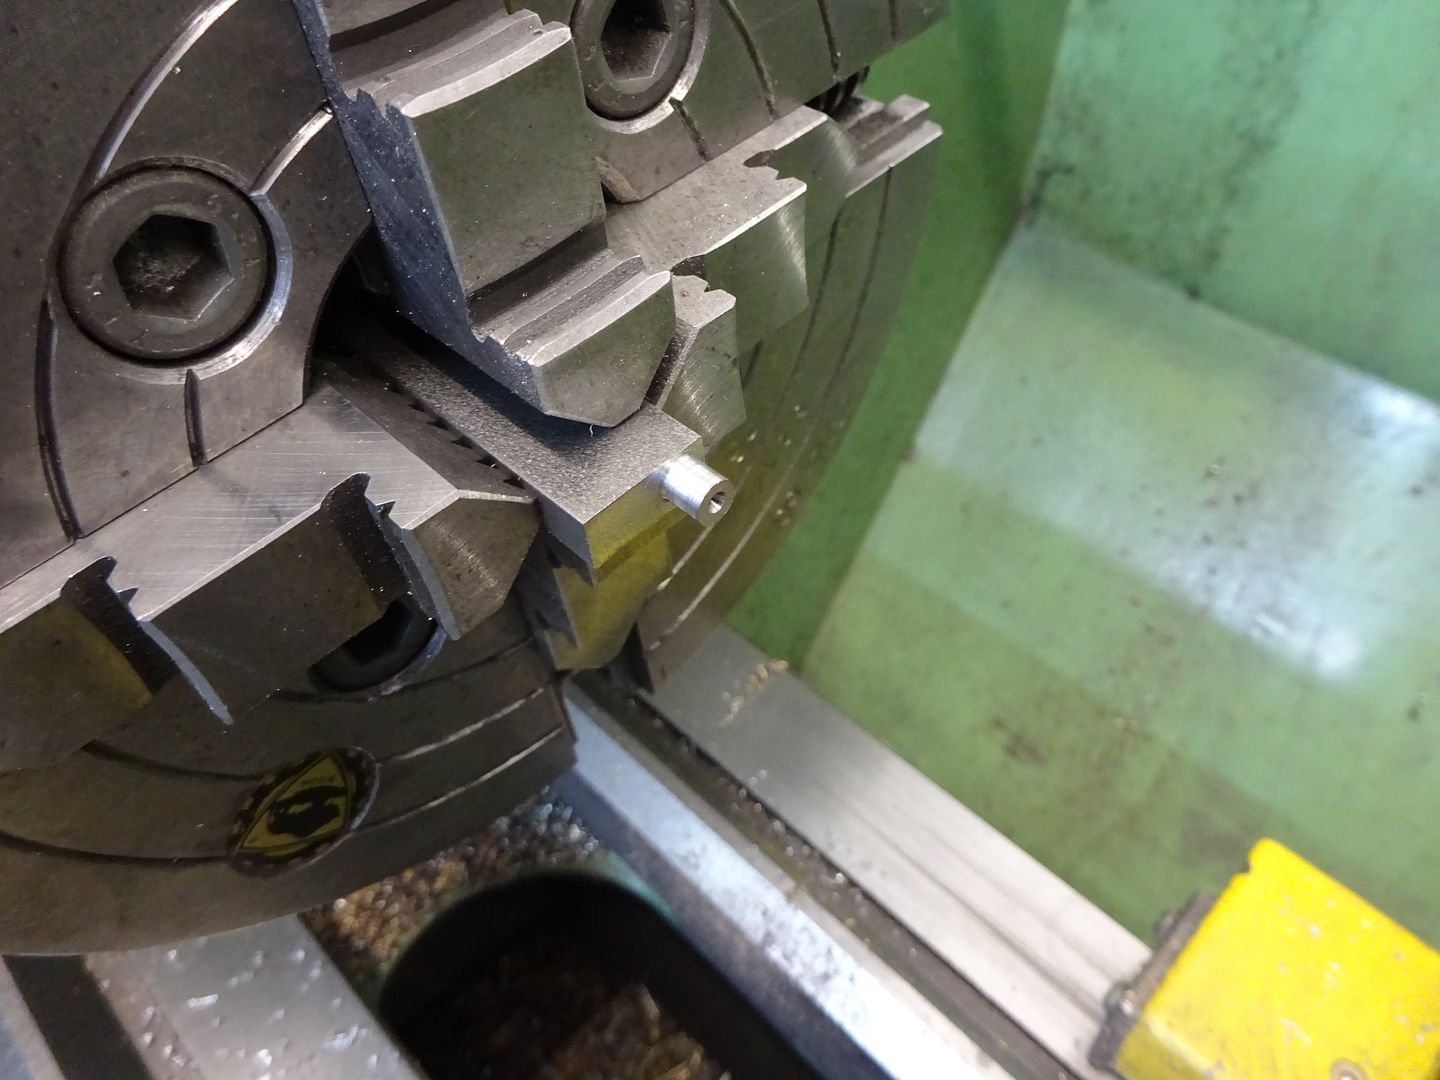
After cutting in half and milling to length the pivot hole was drilled & reamed and a larger hole added to form the inside curve of the arm. Note I have a piece of scrap aluminium to cut into rather than the vice jaw which is always preferable.


A bit more milling and filing and the arms could be pressed into the weights with a bit of loctite for good measure.


Once I had checked that the weights moved freely in their slots and broached a 3/16" keyway the bracket could be pressed into the pully, I used the mills quill to do this.


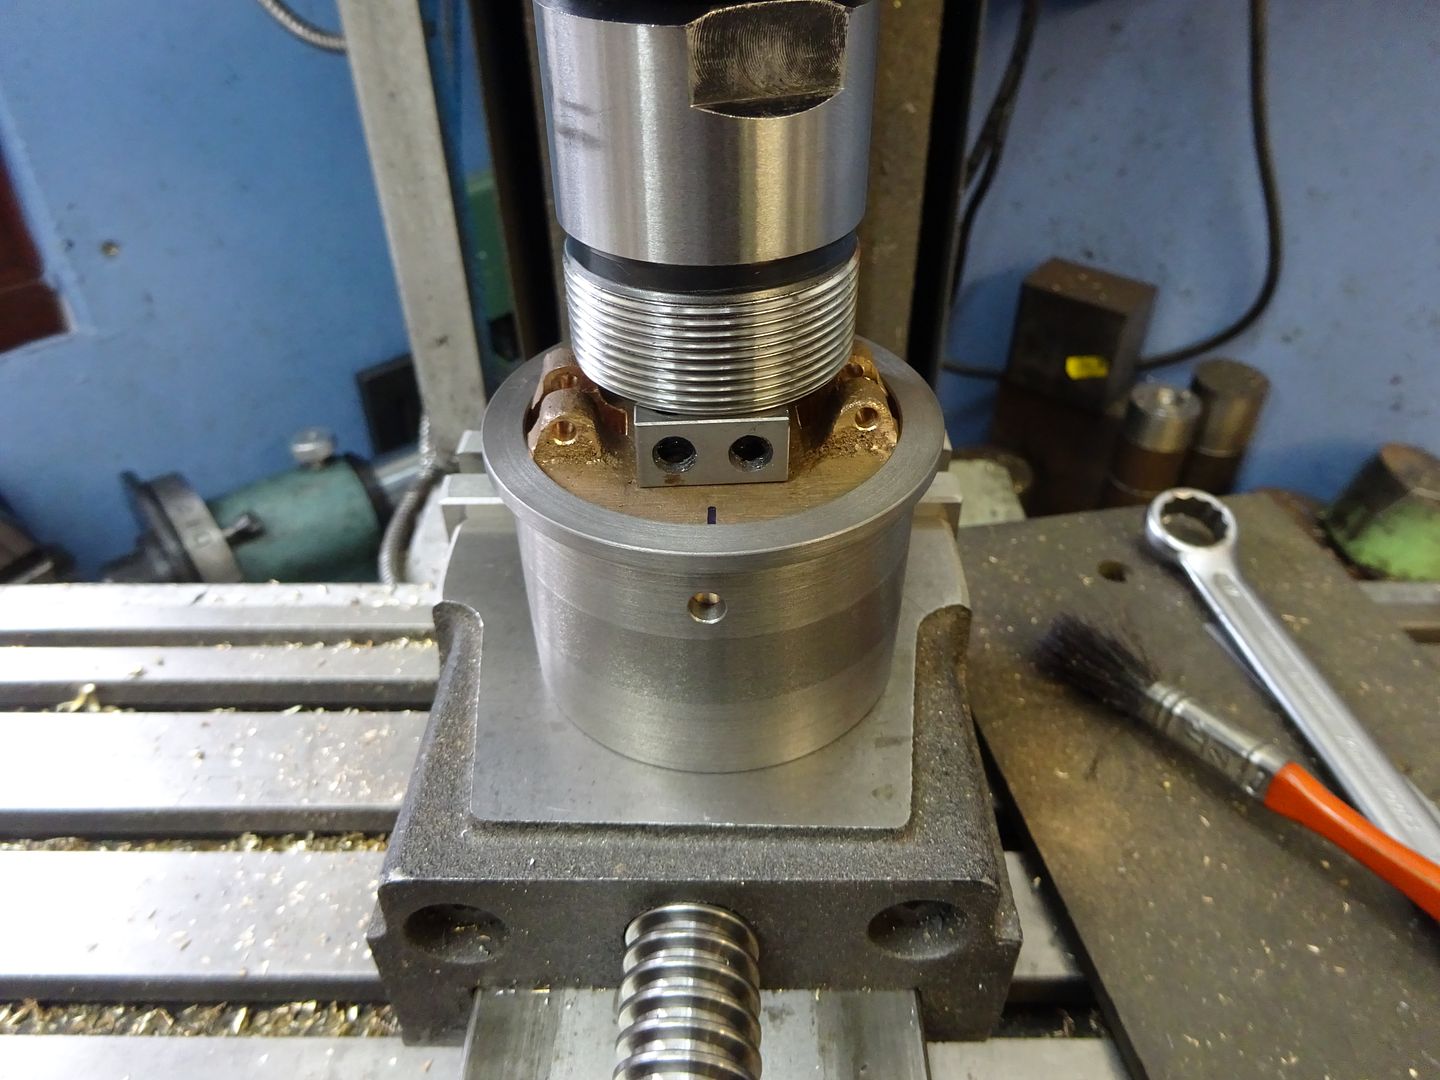
All that was left was to blend in the crown of the pully with teh assembled parts on a temporary shaft in the lathe.

J

Offline NickG

  • Global Moderator
  • Full Member
  • *****
  • Posts: 1430
Re: 1/3rd Scale Allman Vertical Engine
« Reply #21 on: May 29, 2016, 06:32:31 PM »
Looks great that Jason, thanks for very clear and concise notes on your method.

Online Jasonb

  • Full Member
  • *****
  • Posts: 9489
  • Surrey, UK
Re: 1/3rd Scale Allman Vertical Engine
« Reply #22 on: May 30, 2016, 08:27:39 AM »
Thanks Nick.

I just remembered that I took a short Video of the cylinder being bored and forgot to add that earlier so here it is.

[youtube1]https://www.youtube.com/watch?v=AuWl-SZcC58[/youtube1]

Online Jasonb

  • Full Member
  • *****
  • Posts: 9489
  • Surrey, UK
Re: 1/3rd Scale Allman Vertical Engine
« Reply #23 on: June 07, 2016, 07:52:55 PM »
I decided to go with a built up crankshaft as it was a lot of metal to remove from a 1" x 2" bar. So starting with a piece of 5/8" material it was faced and the hole for the crank pin tapped followed by boring another hole for a spigot on the end of the shaft to fit.


Then with the vice ontop of the rotary table the two ends had the required radius milled onto them.


After silver soldering and cross pining the throw onto a legth of precision ground mild steel the throw was faced back to thickness in the lathe which ensures the face that the pin will tighten down onto is perfectly true to the crankshaft.


Finally a couple of keyways can be milled for the flywheel, timing gear and governor bracket and the pin screwed in and retained with a locknut.


The two bearings were straightforward turning jobs once the two halves had been soldered together, the finished crank was used to judge the final fit.


With the bearings and caps in place they could be drilled for oil holes and then using a long series drill the bottom of the bearing and housing were drilled for a 1/16" pin to stop any risk of the bearings rotating in teh housing.


I was just able to hold the flywheel in the 4-jaw chuck but it was a bit tight getting the jaws to fit between the spokes.


As my left hand tools are quite small section I opted to use a 16mm boring bar mounted upside down and ran teh lathe in reverse to do teh outer face of teh flywheel.

<a href="https://www.youtube.com/watch?v=3YZ0mKAzMgE" target="_blank">http://www.youtube.com/watch?v=3YZ0mKAzMgE</a>#Invalid YouTube Link#

A quick trip to a freindly press owner and the 3/16" keyway was easily broached which allowed the fit to be tested. I think that will do, not too many tight spots :embarassed:

<a href="https://www.youtube.com/watch?v=oTnp2QMo4Dk" target="_blank">http://www.youtube.com/watch?v=oTnp2QMo4Dk</a>

« Last Edit: June 07, 2016, 07:57:55 PM by Jasonb »

Offline zeeprogrammer

  • Full Member
  • *****
  • Posts: 6811
  • West Chester, PA, USA
Re: 1/3rd Scale Allman Vertical Engine
« Reply #24 on: June 07, 2016, 11:56:59 PM »
All I did was blink...but I missed some posts here (as elsewhere unfortunately).

What can I say but  :popcorn:

Carl (aka Zee) Will sometimes respond to 'hey' but never 'hey you'.
"To work. To work."
Zee-Another Thread Trasher.

Offline Dave Otto

  • Full Member
  • *****
  • Posts: 4707
  • Boise, Idaho USA
    • Photo Bucket
Re: 1/3rd Scale Allman Vertical Engine
« Reply #25 on: June 08, 2016, 12:50:17 AM »
Lots of great progress there Jason!

Dave

Online Jasonb

  • Full Member
  • *****
  • Posts: 9489
  • Surrey, UK
Re: 1/3rd Scale Allman Vertical Engine
« Reply #26 on: June 21, 2016, 07:13:38 PM »
The iron piston casting was first held head end outwards and about 2/3rds of its length cleaned up. I then had a decent surface to hold while the rod end was faced and the skirt opened out with a boring bar.

I then slid the piston forwards so it could be held by the small amount of waste at the top end, the tailstock ctr was brought up for added support and the OD machined to size. After that a DCMT indexable cutter with a 0.4mm tip radius was used to cut the 1/32" wide half round oil grooves.


Once the remaining oil grooves had been done a change to a parting tool soon had the piston ring grooves added too.


Then over to the mill to drill and ream for the wrist pin.


Job done


While I was playing with cast iron a couple of piston rings were made together with some spares.


Being quite an early engine the conrod is more like that found on a steam engine rather than the forged ones found on later hit & miss engines.  Starting with the small end a piece of steel was drilled and tapped and a mandel made to screw it onto. This then gave me enough clearance to use the ball turner to shape the end.


Over to the indexer on the mill and the two opposite faces were milled flat then a cross hole for the wrist pin drilled & reamed 3/8"


The big end is supplied as a bronze casting, the two edges were lightly skimmed so it could be held firmly while the two bolt holes were drilled tapping right through, opened up to clearance part way and then the lower half tapped 2BA. The oiler hole was also tapped at the same time before splitting in half with a slitting saw.


The big end was then bolted together and the rod hole tapped and that end tidied up. Finally it was pushed onto a mandrel to be taken back to width and then with a round nose tool the width reduced further to leave raised central section.


Add a couple of studs and two locnuts so the central rod can't turn and that is the conrod ready to go.


J

Offline Don1966

  • Full Member
  • *****
  • Posts: 6818
  • Columbia, MS
Re: 1/3rd Scale Allman Vertical Engine
« Reply #27 on: June 21, 2016, 08:12:30 PM »
Just great work as usual Jason and your one of my heroes........I ...........like........... :praise2:


 :popcorn: Don

Offline Tennessee Whiskey

  • Full Member
  • *****
  • Posts: 3781
  • Springfield, Tennessee. USA
Re: 1/3rd Scale Allman Vertical Engine
« Reply #28 on: June 21, 2016, 08:35:00 PM »
Splendid work considering the machines you have  :lolb: :stir:. The DCMT insert has a striking resemblance  to some I just purchased from Warner;  and they do cut nicely.

Cletus

Offline b.lindsey

  • Global Moderator
  • Full Member
  • *****
  • Posts: 13860
  • Dallas, NC, USA
    • Workbench-Miniatures
Re: 1/3rd Scale Allman Vertical Engine
« Reply #29 on: June 22, 2016, 12:12:33 AM »
Great to see an update on this one Jason. That flywheel sure does turn nice and smooth!!

Bill


SimplePortal 2.3.5 © 2008-2012, SimplePortal