Author Topic: Flathead V-8  (Read 171252 times)

Offline gbritnell

  • Full Member
  • ****
  • Posts: 2472
Re: Flathead V-8
« Reply #525 on: October 28, 2015, 12:26:29 AM »
I guess I should have know better! I typed 4 paragraphs of text explaining in detail how I soldered the radiator together along with pictures and when I hit the post button it gave me the internal error window.
SOB!!!!! >:( >:( >:( >:( >:( >:( >:( >:( >:(
Talent unshared is talent wasted.

Offline Dave Otto

  • Full Member
  • *****
  • Posts: 4706
  • Boise, Idaho USA
    • Photo Bucket
Re: Flathead V-8
« Reply #526 on: October 28, 2015, 12:39:30 AM »
George sorry about loosing your work; I have been there and I know how maddening it can be. As I have said before if I need to type more than a couple of lines I will do it in Word then paste it into the MEM text window. At least you can save your work this way.
One other thing that I do when I do take a chance and type directly in the MEM text window; is to highlight and copy all my text to the clipboard before I hit post. This way if it all goes south I can paste it back and try again. >:(

Thanks for showing your work on the tanks; I was thinking that you were going to show us how you milled around those corners and you pulled a fast one on us and did it by hand; beautiful work BTW!

Dave

Offline maury

  • Full Member
  • ****
  • Posts: 515
    • Lone Star Engine Works
Re: Flathead V-8
« Reply #527 on: October 28, 2015, 01:13:30 AM »
George, very nice work on the radiator. I'm sure there was an enormous amount of work to it. I've neen thinking about radiators in my spare time too. Like the guy who sits & thinks sometimes, and who just sits other times. I'm in the process of making bronze castings for a radiator for my Holt.

maury
"The trouble with socialism is that you eventually run out of other people's money."... Margaret Thatcher

Offline steamer

  • Global Moderator
  • Full Member
  • *****
  • Posts: 12699
  • Central Massachusetts, USA
Re: Flathead V-8
« Reply #528 on: October 28, 2015, 02:50:35 AM »
George,

I am very sorry to hear about you losing your post.    I have had that happen too, and it's very frustrating!

To avoid this, on large posts, I type up my post in MS  Word, or frankly any other word processing software, and then do a cut and paste into the post box.    Then post it.

Then I can go back and edit the post to add pictures.   I know then that I won't loose anything

Sorry buddy!.

Dave
"Mister M'Andrew, don't you think steam spoils romance at sea?"
Damned ijjit!

Offline fumopuc

  • Full Member
  • *****
  • Posts: 3252
  • Munich, Germany, EU
Re: Flathead V-8
« Reply #529 on: October 28, 2015, 05:23:34 AM »
I guess I should have know better! I typed 4 paragraphs of text explaining in detail how I soldered the radiator together along with pictures and when I hit the post button it gave me the internal error window.
SOB!!!!! >:( >:( >:( >:( >:( >:( >:( >:( >:(
It will not help, but you are not the only one.I think it has happend to everyone already and it is not a MEM issue, it happend to me at our German forum also.
Kind Regards
Achim

Offline Jo

  • Administrator
  • Full Member
  • *****
  • Posts: 15305
  • Hampshire, england.
Re: Flathead V-8
« Reply #530 on: October 28, 2015, 08:54:08 AM »
Try hitting the go back button on your browser I often find it returns me to the page with the text in the box. Then I copy paste it to a safe place before trying again  ;).

Jo
Enjoyment is more important than achievement.

Offline gbritnell

  • Full Member
  • ****
  • Posts: 2472
Re: Flathead V-8
« Reply #531 on: October 28, 2015, 12:59:37 PM »
 We'll try and give it another go.

 Having never built a radiator quite like this one I had a game plan for the construction but wasn't sure of the outcome. I certainly didn't want to end up losing many hours of work not to mention $150 dollars worth of material.

 When I worked in the pattern shop we had a liquid called Ruby fluid. It's a cleaning and fluxing liquid that when applied to some solder on a hot piece of metal will cause it to flow extremely well. I noticed in the McMaster catalog that they carried it so I ordered a bottle.  I also had some remaining sticks of 50/50 solder, about 10 x 1 x .50 inch. I cut some long thin pieces on the bandsaw in preparation to soldering everything together.

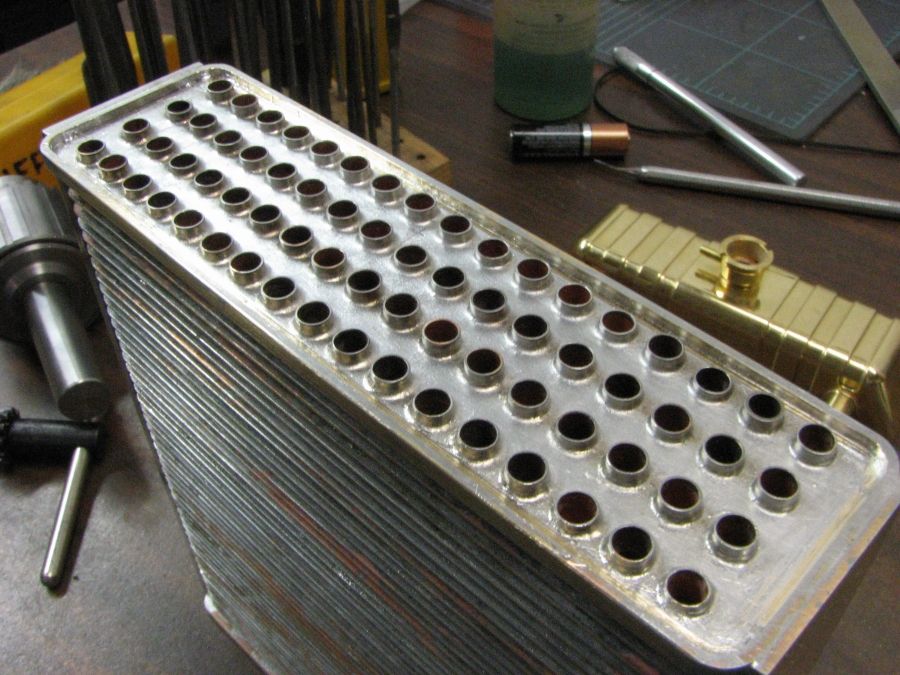
 My plan was to start at the bottom header and solder all the tubes in place. As the heat was applied I would work my way up the core applying solder to just the bottom of the fins. The idea was when finished the tops of the fins would only have solder around the tube/fin joint and not possibly a gob where it had been applied. Using a propane torch I started heating up the header plate. I dabbed solder to the plate near the tubes until it just started to melt. I the brushed on some Ruby fluid and the solder wicked nicely. I worked my way around the header making sure that each tube was well soldered.

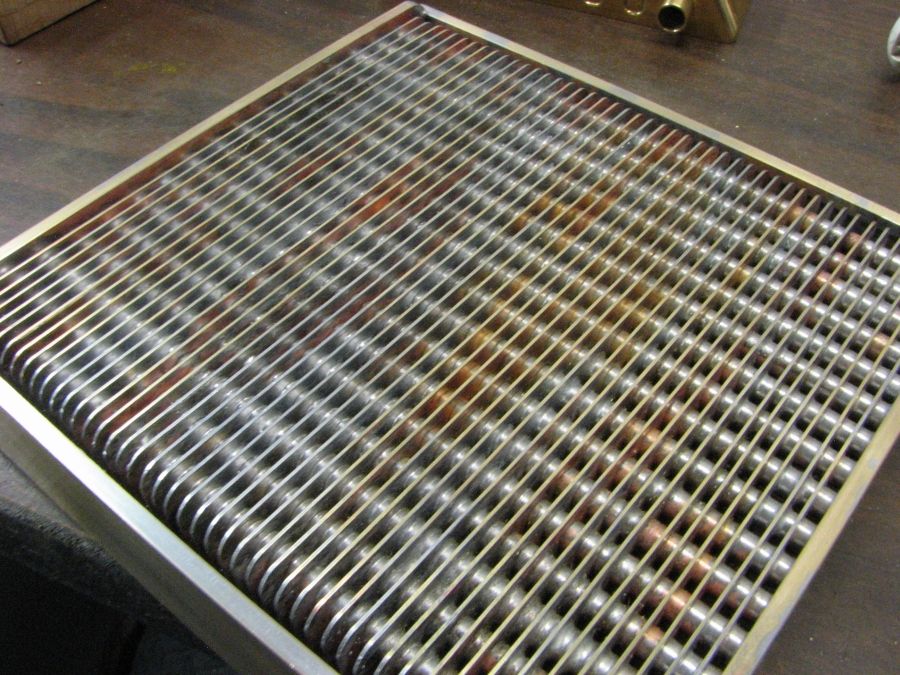
 With some heat built up in the core I started on the fins. I dabbed a bit of solder to the first row and what I had planned didn't work out because with the small space (.090) between the fins the solder wicked to both sides of the fins. Oh well not a big deal. When I had applied solder to 4-5 rows I brushed on some more fluid and the soldered leveled out amazingly. I worked my way up the core until I got the upper header plate and then flipped the core for access to the tubes.

 When soldering, both soft (lead based) or hard (silver based) the most important thing is to never get the metal too hot. Once the surface has been burned or oxidized there's no sense going any further until that area has been cleaned.
 
 With that in mind I was very careful to only heat the fins/tubes until the solder would melt when applied. With the upper header finished I worked my way back down the other side. In the picture you can see that the coverage is about 85-90%. More than enough to transmit the heat of the tubes into the fins.

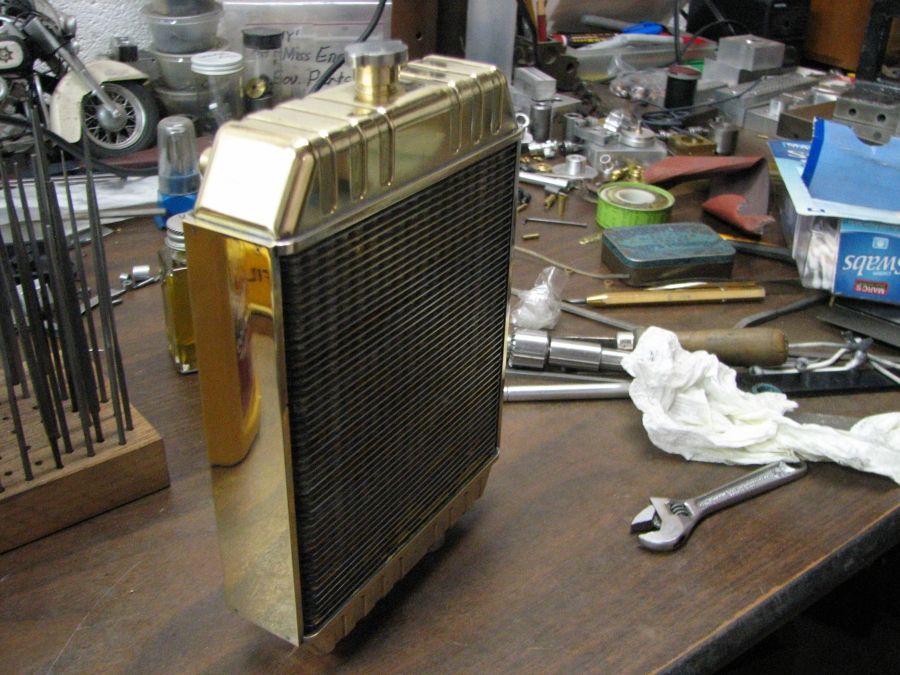
 Whether I paint the core or leave it as bare metal I wanted the tanks to be buffed brass so prior to soldering the fittings to the tanks I buffed them to a high gloss using a dedicated 6 inch buffing wheel and some small mounted buffs to get in the corners. I then inserted the filler neck, outlet tubes and drain bushing and soldered them from the inside so the solder wouldn't show on the outside of the tanks.
 
 I realized that when I soldered the header plates the solder wicked everywhere, which is a good thing, but in doing so it built up a fillet around the inside flange and this would have to be cleaned out so that I could get the tanks mounted. Trying to file soft solder is practically useless so I had to come up with a small scraper to remove the built up solder. I took an old Allen wrench and ground the short leg square, thin enough to fit between the outer row of tubes and the tank flange. I made sure to have clearance on the sides so as to give the leading edges a nice sharp corner. I then honed the leading edge to further sharpen  the corners. I then mounted the Allen wrench into a small drill chuck and pulled it along the inside of the flange. The solder peeled up in a nice curl. I worked my way around the flange cleaning up the edges and test fitting the tanks along the way. Once the tanks fell into place it was time to solder them.

 At this point I reverted back to the solder flux in a tube (for lead based solders). I coated the inside of the flange and the edges of the tanks. I only mounted one tank at a time so that I could use the flat end to stand the tank up. I started applying heat and when the original solder started to get shiny I dabbed my little stick of solder to the joint line. I could see it start to wick along the joint so I played the torch along the edge dabbing here and there with the stick. Once I was sure the tank was sealed well I flipped the core over and did the other end.

 Now I'm sure most of you have done some soft soldering. When using the paste flux it doesn't clean up very easily. Normally it's on the outside of a part so scrubbing with hot water and copper cleaner will remove it. In this case I had flux inside so I needed to remove it. I have some very good (expensive) brass cleaning liquid. I thought I would just put some in the bottom of a plastic tub and dip the rad into it allowing the cleaner to go inside and neutralize the flux. Good plan I thought! I only let the tank ends sit in the fluid for no more than 2 minutes but in that time the cleaner removed probably about .00005 of metal. Just enough to remove all the buffed surface. Not a big deal you say, just rebuff. Well the problem is now all those little projections are sticking out of the tanks and trying to get down into the tiny corners is virtually impossible.

 I did my best spending another hour or so buffing and polishing with everything in my arsenal and finally got the tanks presentable. Not as nice as I had hoped for but unless one looks close they look pretty good.

 Another lesson learned!

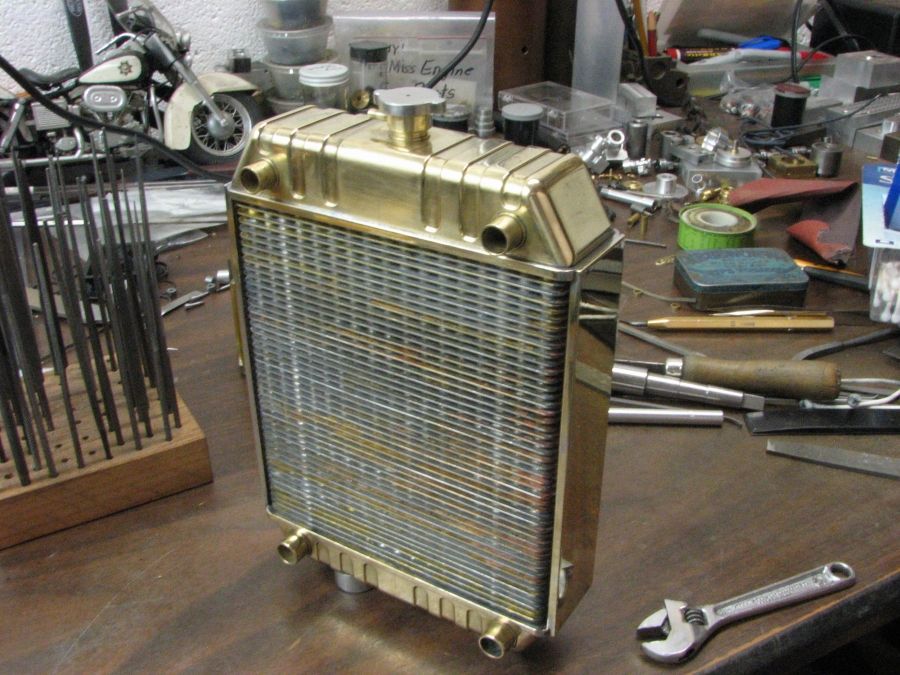
The pictures show 1. The header plate with the solder around all the tubes, 2. The coverage of the solder around the fins and tubes and the finished radiator. All that remains is to attach a couple of angled mounting plates to the sides and she'll be finished.

 Having completed this project and learned so many things if there comes a need in the future for another one I think I will explore some other avenues first.

 Thanks for watching.
gbritnell


« Last Edit: October 28, 2015, 01:13:30 PM by gbritnell »
Talent unshared is talent wasted.

Offline gbritnell

  • Full Member
  • ****
  • Posts: 2472
Re: Flathead V-8
« Reply #532 on: October 28, 2015, 01:07:00 PM »
Well I typed up the new response and before posting it I saved it to a word program. I then posted it and got the error message. I hit the back button and it took me back to the message where I could preview it with no problem. I then tried to repost it and got the same error so I left the site and came back to try again, same thing. The next thing I did was to try and post just the message with no pictures and Ta Da, it posted. Now I went into the edit mode and added the pictures. When I tried to repost I got the same error message. It seems like it has something to do with adding the pictures.
Anyway the posting is here so I will put the photos into my Photobucket account and add them.
gbritnell
Talent unshared is talent wasted.

Offline steamer

  • Global Moderator
  • Full Member
  • *****
  • Posts: 12699
  • Central Massachusetts, USA
Re: Flathead V-8
« Reply #533 on: October 28, 2015, 03:09:32 PM »
George,

When you embed a picture, there is a limit to overall file size / post.    I think it's something like 10 meg.     That may be the source of the problem.

Dave
"Mister M'Andrew, don't you think steam spoils romance at sea?"
Damned ijjit!

Offline gbritnell

  • Full Member
  • ****
  • Posts: 2472
Re: Flathead V-8
« Reply #534 on: October 28, 2015, 03:23:58 PM »
Hi Dave,
I have been resizing my pictures in Irfanview before posting them forever. They are always the same size and sometimes I post the limit with no problems. Every once in awhile this issue comes up so it can't just be from the photo sizes. I'll just have to be more careful when I have a long text posting and do it in Word first. I guess I get complacent and just post here first.
Thanks for the suggestions.
gbritnell
Talent unshared is talent wasted.

Offline Roger B

  • Global Moderator
  • Full Member
  • *****
  • Posts: 6164
  • Switzerland
Re: Flathead V-8
« Reply #535 on: October 28, 2015, 03:46:30 PM »
The radiator looks magnificent  :praise2:  :praise2:

Every so often I get a picture that will not upload. Like you they are taken on the same camera and compressed with the same software but sometime one will just not work  ::)
Best regards

Roger

Offline kvom

  • Full Member
  • *****
  • Posts: 2649
Re: Flathead V-8
« Reply #536 on: October 28, 2015, 06:17:42 PM »
Since only the first row of tubes can be seen through the front and back, did you really need the two middle rows for cooling?

Beautiful result!

Offline gbritnell

  • Full Member
  • ****
  • Posts: 2472
Re: Flathead V-8
« Reply #537 on: October 28, 2015, 07:17:23 PM »
Knowing how hot these small engines get while running I laid out as many water tubes as I could fit in. Did I need them, I can't say but the fins had to be made anyway so it was just a matter of drilling and reaming more holes.
Thanks for the compliments.
gbritnell
Talent unshared is talent wasted.

Offline fumopuc

  • Full Member
  • *****
  • Posts: 3252
  • Munich, Germany, EU
Re: Flathead V-8
« Reply #538 on: October 28, 2015, 07:20:14 PM »
George, this radiator is brilliant.
Kind Regards
Achim

Offline steamer

  • Global Moderator
  • Full Member
  • *****
  • Posts: 12699
  • Central Massachusetts, USA
Re: Flathead V-8
« Reply #539 on: October 28, 2015, 08:42:31 PM »
Radiator is beautiful George!!!!!

On the behalf of...well ...EVERYONE!.......I want to let you know how thankful we all are for you sharing your work here.      BIG TIME!!!!!


Dave

"Mister M'Andrew, don't you think steam spoils romance at sea?"
Damned ijjit!


SimplePortal 2.3.5 © 2008-2012, SimplePortal