Author Topic: Spinster  (Read 180692 times)

Offline zeeprogrammer

  • Full Member
  • *****
  • Posts: 6811
  • West Chester, PA, USA
Spinster
« on: July 29, 2012, 04:25:47 PM »
A finger-treadle engine in the form of a spinning wheel.

My daughter spins wool and some time ago I thought it would be neat to make a model of one.
I haven't had much time in the shop but have done some drawings and a little experimentation in the time I do get.

It's a 1/5 scale model of a double-drive Castle style spinning wheel.

It won't spin fiber but I'd like it to be functional enough to spin two threads together to make 'yarn'.

Many of you know I started this some time ago. But I ran into a number of issues. The original was a model of a single-drive Saxony (or Cinderella) spinning wheel. But to get fibers (or threads) to spin requires a difference in speed between the bobbin and the flyer. With a single-drive this is accomplished by braking the bobbin with a tension-able band (a Scotch brake I think it's called). I realized this would be unlikely to accomplish on such a small scale. A double-drive system makes this more automatic.

I have a number of other requirements. For one, I didn't want it to look too 'machiney' (have at it Marv  ;D). For instance, to mate two bars together you might drill and tap through both and bolt them. But I didn't want the hole to be seen on the other side. I would like to see a bolt on both sides. Since the hole depth is on the order of 1/4" I had to think of something else. You'll see this shortly.

I'd like to really bling this up but I expect I'll save that for later. By which time I may be so disgusted with my work that I'll move on to something else before I 'finish' it.  ;D

I've finished the drawings and started some experimenting. I'm not too happy with the design of a couple of aspects (the bed and more importantly the stand that holds the maiden) but it's a first go.

A real challenge (besides the scale) will be the flywheel. 3.6" diameter. (It may not fit my lathe!). In the early thread I was needled into considering a spoked wheel (some of you know who did the needling...his name starts with 'M', ends with 'v', and has the letters 'a' and 'r' somewhere in-between). So the current design is a brass ring with aluminum spokes and a split aluminum hub screwed together to keep everything in place. No idea if that will work.

So here's some pics. Sorry for the quality. I hope to get better at this too.

Here's a pic of the prototype:


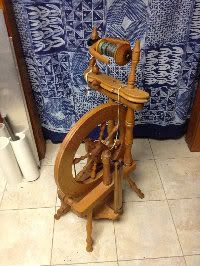
Don't know why it's sideways. The original picture was but I rotated it in PB and it shows rotated correctly in PB. But hey...it's wood and we don't want to look at it too long.

Here's a bobbin:


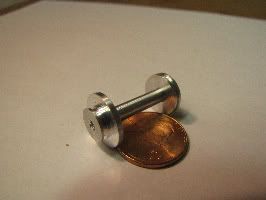
It came out pretty well but I doubt it will work. I need to chamfer the grooves so the band won't slip off.

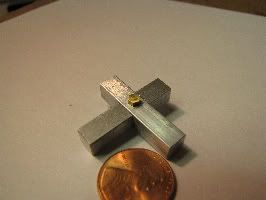
Here's what I meant about pinning two bars together. What I did was take 1/8" hex rod, made an 0-80 bolt and a 'pin'.


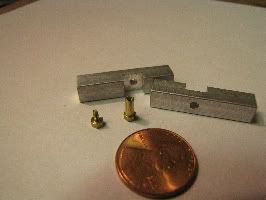
Here's the bolt in the pin:


Here's two bars pinned together. The other side looks the same.


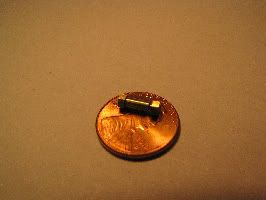
This next pic shows part of the flyer assembly. Fairly small. It's the 4th attempt and still I either got the central hole off or the sides milled at different distances. It's pretty rough. I used a steel button to try and round the edges as well as rounding around the central hole. Not a good job and I'll try again later.


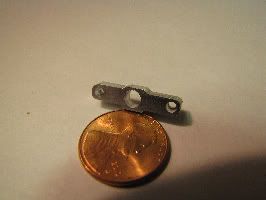
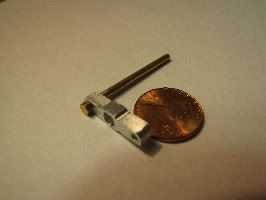
This pic shows one of the 'legs' of the flyer. That will be a challenge too. You have to have a way to move the fiber (thread) along the leg to fill the bobbin. On wood systems this is done with open eye-lets. I'm hoping spaced holes with a little slot to the side will do the same.


I have no idea when I can continue to work on this. It may even die a quiet death as my attention is easily distracted.


Carl (aka Zee) Will sometimes respond to 'hey' but never 'hey you'.
"To work. To work."
Zee-Another Thread Trasher.

Offline Alan Haisley

  • Full Member
  • ****
  • Posts: 693
  • Fuquay-Varina, North Carolina, USA
Re: Spinster
« Reply #1 on: July 29, 2012, 04:55:51 PM »
Carl,


I hope that you can stick with that. Small parts are as fascinating to see as they are difficult to make.


Alan

Offline mklotz

  • Full Member
  • *****
  • Posts: 2623
  • LA, CA, USA
    • SOFTWARE FOR PEOPLE WHO BUILD THINGS!
Re: Spinster
« Reply #2 on: July 29, 2012, 05:05:38 PM »
Head "needler" checking in here.

I like the bolt and pin arrangement.  For a less (gag) "machiney" look you might want to try faceting the hex heads.  Spinning wheel builders working in wood would probably have glued and doweled such a half-lap joint but a decorative, rosehead-like metal joiner would not be too out of place.

If the flywheel exceeds your lathe capacity, there will probably be lots of volunteers to turn the ring for you.

It's looking good so far.  Stick with it.  Unusual projects like this are great teachers.
Regards, Marv
Home Shop Freeware
https://www.myvirtualnetwork.com/mklotz

Offline Dean W

  • Full Member
  • ****
  • Posts: 200
  • A balanced diet is a bag of M&Ms in each hand...
    • Home Shop Projects
Re: Spinster
« Reply #3 on: July 29, 2012, 11:19:54 PM »
Zee has a project going on MEM, and now all is right with the world!
Take all the time it takes, Carl.  I'm just happy it's here.
Dean
In beautiful N. Idaho, U.S.A.

Shop Projects:
http://www.deansphotographica.com/machining/projects/projects.html

Offline mklotz

  • Full Member
  • *****
  • Posts: 2623
  • LA, CA, USA
    • SOFTWARE FOR PEOPLE WHO BUILD THINGS!
Re: Spinster
« Reply #4 on: July 29, 2012, 11:41:33 PM »
What Dean said.  Yeah.
Regards, Marv
Home Shop Freeware
https://www.myvirtualnetwork.com/mklotz

Offline zeeprogrammer

  • Full Member
  • *****
  • Posts: 6811
  • West Chester, PA, USA
Re: Spinster
« Reply #5 on: July 30, 2012, 03:14:56 AM »
Thanks guys. I really appreciate the support.

I've been thinking about that flyer arm...and the difficulty getting the ends and middle rounded.
Thinking about how I might use the rotary table.
Thinking I have idea.
Thinking I won't know stupid till I try it.
Thinking I'll try it next weekend.
Hoping I can try it next weekend.
Wishing I could try it now.

Have to do the flyer arm before I can do the spindle. Much like doing the cylinder and fitting a piston to it.

Need to order the brass for the flywheel too.
Not to worry. I average 2 to 4 tries before I get it right. I'll order enough for 3.

This new forum has given me a kick. Not to mention the friends. Thanks for that.

Carl (aka Zee) Will sometimes respond to 'hey' but never 'hey you'.
"To work. To work."
Zee-Another Thread Trasher.

Offline cfellows

  • Rest In Peace
  • Full Member
  • *
  • Posts: 1700
Re: Spinster
« Reply #6 on: July 30, 2012, 03:03:27 PM »
Zee, not to put any pressure on you, but it's good to see you have a project, metal working project that is!  Always enjoy following your threads.

Chuck
So many projects, so little time...

Troutsqueezer

  • Guest
Re: Spinster
« Reply #7 on: July 30, 2012, 03:49:52 PM »
Brass in that diameter...gonna cost a bit. Good thing you've been working some overtime, eh? I've seen a few posts where someone is turning flywheels on the mini-lathe with a pretty good-sized flywheel, larger than what you need for this, so it is possible.

I suspect you and I are similar with respect to this hobby. That is, when I'm in the house or doing some of my other hobbies, I think about the machining hobby often enough but getting out there to the shed and actually doing it takes a bit of effort and often gets put on the back burner.  :smokin2:  :atcomputer:   :bandrock:  :happyreader:   But when I finally do get out there, I don't want to stop and find myself wondering why I waited so long to start working on my engines again.

Then the cycle repeats itself.   :shrug:

Offline mklotz

  • Full Member
  • *****
  • Posts: 2623
  • LA, CA, USA
    • SOFTWARE FOR PEOPLE WHO BUILD THINGS!
Re: Spinster
« Reply #8 on: July 30, 2012, 04:00:36 PM »
Rounding the ends of the flyer arm...

Hang it between the jaws of the mill vise from a rod (diameter doesn't matter) resting on the tops of the vise jaws.  Adjust the height of the endmill above the vise jaws such that it will be cutting at the correct radius for the rounded over end.  Clamp part and make a cut.  Unclamp part, rotate slightly, make another cut.  Sip from jelly jar and repeat until ennui sets in or jelly jar is empty.

You'll end up with a faceted end on the part.  Slather it with marking out dye and file/sandpaper gently until all the dye has disappeared.  Sip from jelly jar.

I can't tell the part size from the picture but it looks too small for my other method to be safe. If the piece were larger, I would suggest rotating it on a vise-held pin against a spinning rotary file.  (Similar to the technique I use in the rounding over jig post I made recently.)  However, I think your hands would be too close to the tool for this to be safe.  Unless the part is a lot bigger than I think it is, don't try it.  My first technique above is safer since your hands don't have to be anywhere near the part while cutting.
Regards, Marv
Home Shop Freeware
https://www.myvirtualnetwork.com/mklotz

Offline Alan Haisley

  • Full Member
  • ****
  • Posts: 693
  • Fuquay-Varina, North Carolina, USA
Re: Spinster
« Reply #9 on: July 30, 2012, 04:44:08 PM »
Another rounding ...

Unfortunately Carl, I don't remember just what shop equipment you have, but just in case: I have used a rotary table with clamps to hold a piece while applying Marv's technique. The advantage to this way is that once you have it roughed down close you can use the RT to mill the piece smooth. Also, it keeps the fingers out of the way.

Alan

Offline arnoldb

  • Administrator
  • Full Member
  • *****
  • Posts: 1341
  • Windhoek, Namibia
Re: Spinster
« Reply #10 on: July 30, 2012, 06:32:01 PM »
 ;D Good to see you making parts in the shop again Carl!

I'd agree with Marv about the rounding over - just be careful that you press down the piece well each time you rotate it a bit while clamping it up again.  And check that you don't get swarf under the rod in the process - if you happen to have swarf trapped under the rod, the next cut will be too deep... DAMHIKT  :-[

The rotary table will work as well - and you could even make your spin indexer do it with a bit of thought  ;)

Kind regards, Arnold
Building an engine takes Patience, Planning, Preparation and Machining.
Procrastination is nearly the same, but it precludes machining.
Thus, an engine will only be built once the procrastination stops and the machining begins!

Offline zeeprogrammer

  • Full Member
  • *****
  • Posts: 6811
  • West Chester, PA, USA
Re: Spinster
« Reply #11 on: July 31, 2012, 01:49:13 AM »
Thanks guys. It's very much appreciated.

Chuck, it's good to see read you. Get your avatar up. It's a wonderful pic. Very comfortable.

Trout...very true what you said. Imagine my surprise when I logged onto HMEM and saw everyone gone! I knew it couldn't have been me. I hadn't worn the tu-tu in a long time. And yes...now that I've started...I can't stop thinking about machining. More on this in a bit. As for the brass...I haven't priced it yet. I figure on using plate 1/4" thick, 3.75 or 4" wide, and sufficient length to mess up at least twice. A foot I guess. Too little can be a project killer...too much is a new project creator. (And I hope to cut it in a way I can keep most of the center for other projects. Would it be stupid to use a hole saw?)

Alan...I've got a mini-lathe and a mini-mill. Also a spin indexer, a rotary table, and a couple of vises. I like that mini-mill. The mini-lathe is destined to go in the corner some day. I intend to get something larger but that's a few years off yet.

As I mentioned...I've been thinking a lot about this. I really hope I get a chance in the shop this weekend. But here's the thought...

It's a small piece, less than 1/4 by 1/4 by 1. With a hole in the middle, and two holes at the end. The holes at the end are drilled through to get a 0-80 in and bored 3/32 part way through to set a bit of rod in that the 0-80 attaches to. You'll remember the earlier picture.

The idea I'm thinking is...

Mill some 1/4x1/4 aluminum to the required height. The width doesn't matter.
Drill a hole anywhere near the center, smaller than the final hole.
Mount some scrap aluminum on the rotary.
Mill it flat.
Put some double-stick down and mount the part on that with a bolt.

Then mill the outline with a small end-mill.
Going slow and easy I should be able to cut the edges to the outline I want without the part twisting.
If that doesn't work...then maybe glue it down. I can also clamp one end while milling the other.

Then drill and bore the end holes.
Tap through the end holes and hold the part down with some small bolts.
Remove the center bolt and then drill and ream the center to size.

Description might not be good...but if I'm lucky...we'll see it happen this weekend. It's much like making that forward/reverse lever on the horizontal mill engine.

Gosh. I feel so excited.
Uh-oh...
Carl (aka Zee) Will sometimes respond to 'hey' but never 'hey you'.
"To work. To work."
Zee-Another Thread Trasher.

Offline vcutajar

  • Full Member
  • *****
  • Posts: 2555
  • Marsascala, MALTA
Re: Spinster
« Reply #12 on: August 01, 2012, 01:56:59 AM »
An unusual project which makes it more interesting.  Will be following also.

Vince

Offline ironman123

  • Full Member
  • ****
  • Posts: 166
Re: Spinster
« Reply #13 on: August 01, 2012, 04:19:29 AM »
Me too.

Ray
Ray
Central Texas

Offline swilliams

  • Full Member
  • ****
  • Posts: 896
  • Canberra Australia
Re: Spinster
« Reply #14 on: August 02, 2012, 11:46:29 AM »
Me Three

Steve


SimplePortal 2.3.5 © 2008-2012, SimplePortal