Author Topic: An Upshur Farm Engine (slight return)  (Read 58233 times)

Offline tvoght

  • Full Member
  • ****
  • Posts: 1003
  • Indiana
Re: An Upshur Farm Engine (slight return)
« Reply #15 on: July 27, 2012, 12:45:03 PM »
The rings that were previously made to go on the ends of the cylinder
sleeve were not quite complete. They needed holes drilled to pass the studs
which extend from the front plate of the frame, through the cylinder and
cylinder head. The holes need to be pretty accurately located, as they will
be drilled for a close fit on the studs. In fact, the plans call for a #29
drill, which is .002 *smaller* than the diameter of a 6-32 screw. I'll be
drilling a #28, which is .002 larger.

I turned a locating plug of 12L14 steel for a slip fit of the rings. Since
the turnings on the end of the cylinder sleeve turned out somewhat different
diameters (.874 and .867), I had bored the rings to fit their respective
ends, and here I turned two steps on the plug to fit each ring. Here's the
plug before cutoff with the rings slipped onto it, The larger bore first,
then the smaller.


I drilled out the center of the plug to make cutoff easier, and to relieve
the center so that when I placed it on my mill bed, the contact would be
around the outer edge. I clamped at the ring's edge onto the tooling plate I
still had clamped to the table. I first roughly centered the spindle on the
plug with a drill bit through the hole, then centered as close as I could with
an indicator.


It was then a simple matter of locating the holes with the DRO, center-
drilling and drilling through and into the sacrificial plate.


Please excuse the quality of the photos.

Thanks everybody who's watching,
--Tim

chuck foster

  • Guest
Re: An Upshur Farm Engine (slight return)
« Reply #16 on: July 27, 2012, 12:49:25 PM »
this engine is looking great and you are moving along at a cracking good pace  8)

as far as the photos they look fine to me  ;D

chuck

Offline vcutajar

  • Full Member
  • *****
  • Posts: 2555
  • Marsascala, MALTA
Re: An Upshur Farm Engine (slight return)
« Reply #17 on: July 27, 2012, 08:47:29 PM »
Tim

I am subscribing to this thread so that I can continue following you here.

Vince

Offline Dean W

  • Full Member
  • ****
  • Posts: 200
  • A balanced diet is a bag of M&Ms in each hand...
    • Home Shop Projects
Re: An Upshur Farm Engine (slight return)
« Reply #18 on: July 27, 2012, 09:27:15 PM »
Wow Tim, you have a really well documented build here.  Thank you!  It's very interesting.   :ThumbsUp:
Dean
In beautiful N. Idaho, U.S.A.

Shop Projects:
http://www.deansphotographica.com/machining/projects/projects.html

Offline tvoght

  • Full Member
  • ****
  • Posts: 1003
  • Indiana
Re: An Upshur Farm Engine (slight return)
« Reply #19 on: July 28, 2012, 12:21:55 AM »
Chuck, my pace is not so great unfortunately. All this took place weeks ago.
I'm still catching up with re-posting these, and I don't want to overwhelm the
recent posts list by doing it all at once. When I get caught up in real-time,
my pace will slow considerably!

Vince, you have been following along the whole time, and I sure appreciate it.
Be assured I'm still focused like a laser on your Kiwi build.

Dean, good to have you watching, and you too, George and Rudy. Thanks for all your
comments.

~~~
Now I'm going to take care of the rocker arm, rocker arm post, and associated
hardware to sort of prepare myself for making the head.

The rocker arm is made from some 5/16 thick 303 stainless I have on hand.
I sawed out a piece long enough to clamp on the ends. I put it in the mill
vise and cleaned up one side.


Then I clamped it down to a sacrificial plate I still had clamped to my
mill table. I thinned it down between the clamps to .125. Actually, several
thousandths thinner as it turned out, but I'm happy.


Then I cut it to width (.25) by side milling. In this process, the DRO is
zeroed with reference to the first edge after I cut it. The DRO was zeroed
in the X axis to roughly the center of the section I've worked down.


Two semi-circular features are added with the .5 inch endmill by side-milling.
All the numbers for the DRO were worked out quickly in CAD before hand.


The pivot hole and hole for the pushrod clevis pin are drilled and reamed.
The plans simply have 2-56 screws in these places, but I plan to make up some
little brass shoulder screws for these places. You may ignore what seems to
be a place where I milled a little deep on the right end.


While I could have hung this end off the vise jaws on a drill bit and faceted
it for rounding, I'm taking this opportunity to come up to speed on using a
step-off chart for this kind of thing. Here I've stepped off the rounded end.
I may have over done it on the number of steps, but this was kind of fun,
and I'm satisfied with the results.


The other end really called for a step-off chart because there is no through
hole for reference. I rounded off that end, and then thinking on my feet,
decided to use a few middle values off the chart to step out the feature
around the pivot hole. I kind of eye-balled the position before cinching the
vise. After unclamping it occurred to me that I might have done the same
thing for the transition between the large and small radii at the ends. At
this point though, I'm feeling a little lucky with my 'eye-ball' technique,
and that transition is left to filing.


Here is the part before it has been touched by emery or file. It's laying on
the chart I used.


Offline tvoght

  • Full Member
  • ****
  • Posts: 1003
  • Indiana
Re: An Upshur Farm Engine (slight return)
« Reply #20 on: July 28, 2012, 12:26:19 AM »
Next up is the rocker arm post, which I made from 12L14 steel.
I put a length of 1/4" round in a collet in my lathe and turned
the shaft diameter and just cleaned up the portion beyond that.


I then put the collet in a square collet block. This picture shows
what I learned about using these collet blocks. To tighten that ring,
you need a pin spanner something like this. I should have made one to
save money, but this is the one I bought, and it's a wonderful thing.


With the collet block in the mill vise, I milled off the flat
portion where the rocker arm will pivot and drilled and tapped
for a 2-56 screw.


This picture shows a tool I really like. A tap wrench with a pilot
which is held in a drill chuck or 1/2" collet. Another wonderful
thing.


All that rounding I did on the rocker arm with the step-off charts
was on radii of .125. The top portion of this post is .25 wide as
well, so I once again made use of the step-off chart I'd generated
for the rocker arm. Here's the part right off the mill. Another thing
I wanted to mention is that for all but the simplest parts, I take
an enumerated set of step-by-step operations with me to the shop.
I've seen this recommended by Bogstandard a few times, and I
absolutely agree with him. Without it, I could not do this, even in
the crude way that I do.


Offline tvoght

  • Full Member
  • ****
  • Posts: 1003
  • Indiana
Re: An Upshur Farm Engine (slight return)
« Reply #21 on: July 28, 2012, 12:28:26 AM »
At certain pivot points in the design, the plans call for just a 2-56 screw
through a free fit hole. I already mentioned that when I made the rocker arm
and post. There I said that I was reaming the rocker arm 3/32 and that I would
make a shoulder screw as a pivot. Here's my process.

Starting with quarter-inch brass rod in a square collet block, I milled four
sides for a 5/32 square head. I'm doing enough length here for two screws I'll
need and then some.


With the collet in the lathe, I turned to diameter for a 2-56 thread. I
haphazardly provided some relief for the thread. Length and depth were by-
gosh-and-by-golly.


I threaded it using a piloted die holder held in the tailstock.


Then I cut the shoulder to .093. Looks like I've got more than enough
relief.


I parted off and got this. A pretty big nub to remove, but not bad, I
think.


I needed another (to different length specifications) for the rocker arm
clevis.


I still had enough square leftover to make a couple of nuts. I drilled and
tapped the length of the squared portion.


Then cutoff two. I slipped a small drill bit in there to catch them.


Tonight's results, badly in need of all-around cleanup.


Thanks everyone!
--Tim

Offline tvoght

  • Full Member
  • ****
  • Posts: 1003
  • Indiana
Re: An Upshur Farm Engine (slight return)
« Reply #22 on: July 28, 2012, 12:30:57 AM »
To clean up the parting nubs that were left on the screws I made previously,
I put a short piece of steel in a collet and drilled it for a 2-56 thread,
then drilled and reamed for the shoulder portion of the screw, then
threaded the bottom of the hole. I was then able to clean up the screws in
the little fixture.


I made up the clevis from a piece of quarter inch brass round. I did all
of the work in a collet, both in a 4-sided block and in the lathe. I do not
regret my recent purchase of the collet blocks. Here I have rounded off the
end of the clevis (using the step and cut method), and have cut the slot for
the rocker arm. I'm leaving out most of the details, because it's all stuff
I've done before in this log.


Finished after turning down a shoulder and drilling and tapping for the
pushrod.


A trial fit of rocker arm, rocker arm post, and clevis. I'm not really
happy with the scale of the hardware. I may eventually want to re-make the
screws and nuts with smaller heads.


Thanks for watching my efforts.
--Tim

chuck foster

  • Guest
Re: An Upshur Farm Engine (slight return)
« Reply #23 on: July 28, 2012, 01:13:22 AM »
THANK YOU for allowing us to watch your efforts  8) :ThumbsUp:

chuck

Offline gmac

  • Full Member
  • ****
  • Posts: 102
  • British Columbia Canada
Re: An Upshur Farm Engine (slight return)
« Reply #24 on: July 28, 2012, 01:27:18 AM »
Tim;
Your build is helping more than you know - it's motivated me to get back to my Upshur Twin project that died a slow death of a thousand tiny cuts. I need this material, I need this tooling, I need to fabricate this, I need DRO's, but, but, but.....
I'll be watching since the two engines have a lot in common.

Cheers  Garry

Offline tvoght

  • Full Member
  • ****
  • Posts: 1003
  • Indiana
Re: An Upshur Farm Engine (slight return)
« Reply #25 on: July 28, 2012, 02:36:58 AM »
Chuck, thanks for keeping an eye on me!

Garry, hope we can look forward to a build log soon on your Upshur Twin.

On with the reruns...

~~~
It's been a few days since I posted, and in the interim I made some valves.
I actually produced at least two useable ones, but I'm not yet completely
happy, so I'm coming back to them after a little thinking break. I started
on the head instead.

I sawed off a piece of aluminum rod and chucked it up as centered as I could
(my 3-jaw chuck is adjustable). I faced off the end and just cleaned up the
circumference with emery.


I started a cutoff with plenty of extra length as I plan to finish the cutoff
end on the mill. When cutoff began to be unpleasant, I finished the job with
a hacksaw (lathe turned off).


I clamped between v-blocks in the mill vise with the faced end on parallels.
I am kicking myself repeatedly for not providing some shims to protect against
the v-blocks. Like most stupid mistakes there is no really "why". Maybe I'll
know next time? I didn't realize what I'd done until I had performed a lot
more work.


The sawed side was milled to get the head to correct thickness.


I center-drilled for the various holes I would drill.


Then drilled the holes and finally reamed the 4 larger ones.


I had previously made a fixture from the MIC-6 tool plate with holes drilled
and tapped for mounting the head. Here it is mounted on the plate. The plate
is as square as I could make it and the head is centered.


I was then able to use the fixture in the angle block to set up for three
holes to be made around the circumference for exhaust, intake, and spark.
Here I have reamed for the exhaust pipe.


Here's the part still on the fixture plate with all machining (save for the
valve seats) finished. You can see one spot between the plug and exhaust
holes where the v-block dug in.


Thanks for keeping an eye on me.

--Tim

Offline tvoght

  • Full Member
  • ****
  • Posts: 1003
  • Indiana
Re: An Upshur Farm Engine (slight return)
« Reply #26 on: July 28, 2012, 02:45:01 AM »
I made some valves trying closely to follow a procedure spelled out in an
excellent sequence of words and pictures in the build of gbritnell's
5-cylinder radial (on another site).

While I did create at least 2 valves that would surely have worked, I was
unhappy, mostly about the finish I got on the stem and the trouble I had
getting a smooth transition from stem to seating face. The material is 303
stainless. I used a cutting tool with a relatively sharp point and zero
leading angle, this to try and reduce radial forces and concentrate cutting
forces axially along the stem to prevent flexing. I guess the sharp point
contributes to the less-than perfect finish, resulting in some grooves which
are not easily removed with abrasive.


I imagine a little more effort along those lines would have resulted in valves
I was very happy with, but I was also getting bothered by the repeatability of
my efforts (that 2 steps forward, 1 step back sort of feeling). In the
interest of experimentation and trial-and- error learning, I decided to pursue
the idea of a valve machining jig I saw in Issue 7 of Model Engine Builder
magazine. The article describes essentially a combined follower rest and form
tool, the form of which is to cut the underside of the valve head and the stem
at the same time. The tool described had the underside angle ground into the
cutting tool, but I took the different approach of mounting the cutter at the
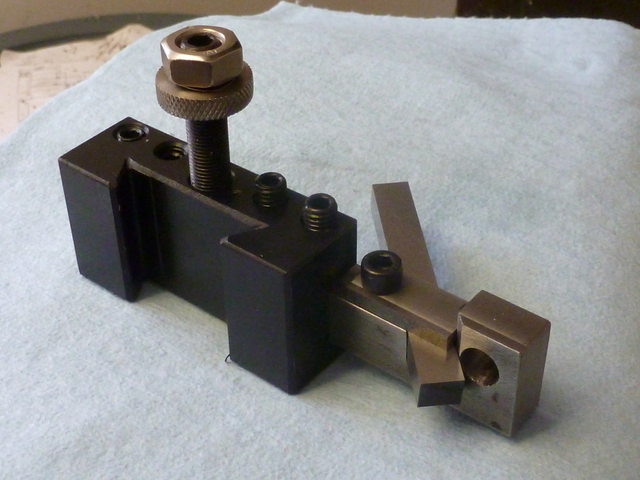
desired 45 degree angle. This made grinding the cutter much easier. Here is the
jig mounted in a QCTP holder. The cutter here has not yet been ground, but you
get the idea. The reamed hole closely fits the 3/8" stock which will be held
in a collet.


My first step closely follows George's procedure. With the stock in a collet,
I cut a short section down to stem size and cut a groove for an e-clip (the
plans call for the retainer being loctited onto the stem, but this is another
of my departures from plan). Incidentally, I ground the groove cutting tool
myself, and while it's not perfect, it helped to build my confidence in tool-
grinding. It works good enough, and I think next time I can do better! Oh, I
should mention I've gone from 303 stainless to 416 stainless. The 416 machines
better.


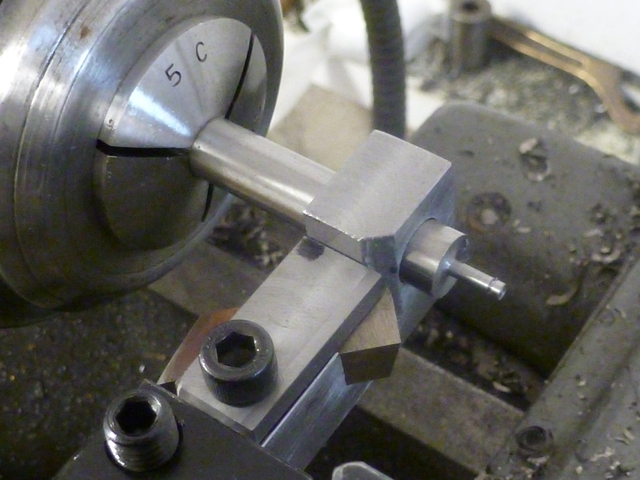
Getting the stock started into the jig is a little fiddly. The cutter is
withdrawn to get it out of the way. Once at this point, I pulled back the
cross slide just enough to feel a touch, trying to ensure that any radial
force would immediately meet resistance at the backside of the bore. I ensured
smooth operation all the way to the collet, and then slathered the stock to
the left of the jig with cutting oil. The article suggests drilling an oiling
cavity at the top, but I forgot to do that.


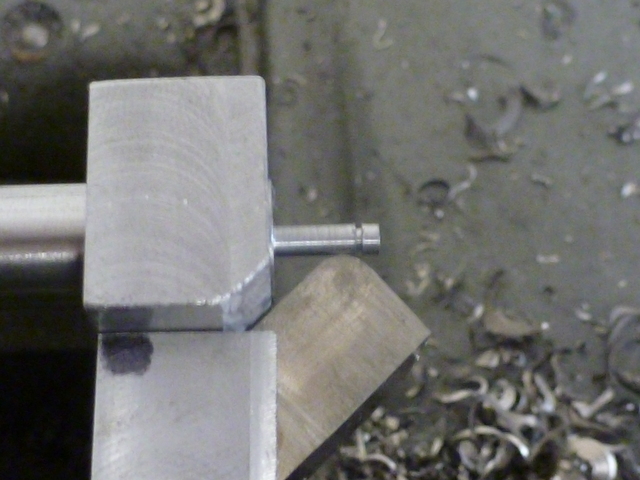
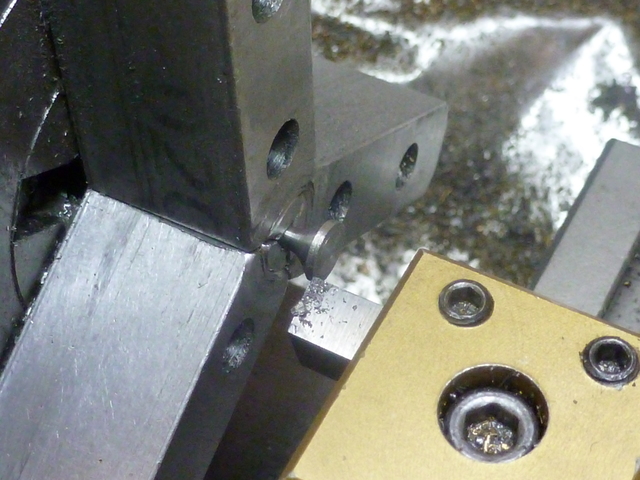
I advanced the cutter to touch the sized stem, and clamped it. Here you can
see the radius of the form tool. There is side and end relief, as well as
side -rake ground in, which is not obvious in this picture.


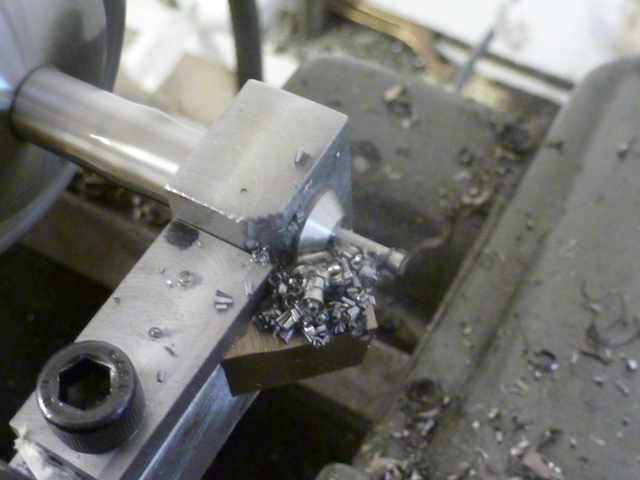
I cut with power carriage feed on the slowest gear, spindle speed somewhat
slower than I used with the sharp pointed tool. This is an action shot. There
is absolutely no chatter.


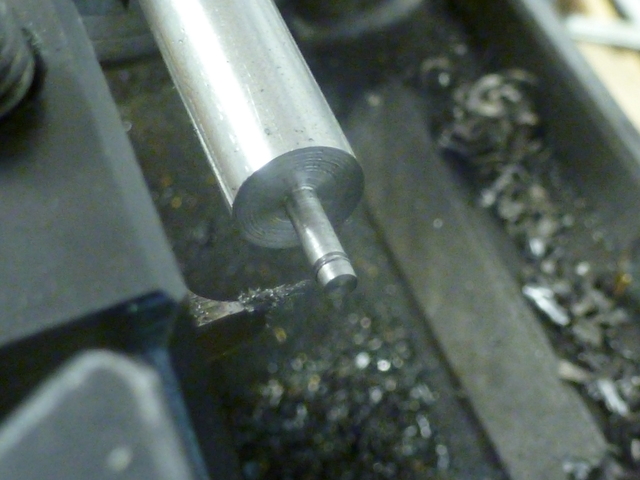
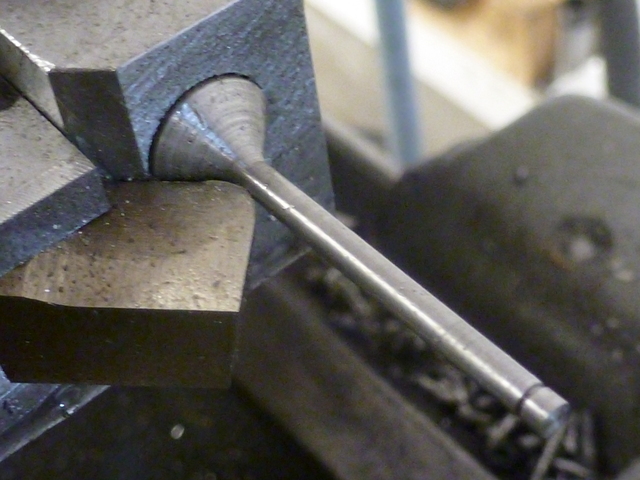
After stopping the feed, I pulled back from the work a little before turning
off the spindle (photo). Then I loosened the cutter and pulled it back some
to prevent scraping when I cranked the jig back.


I worked the stem and head underside with emery some (probably not enough),
then turned the head diameter and parted off.


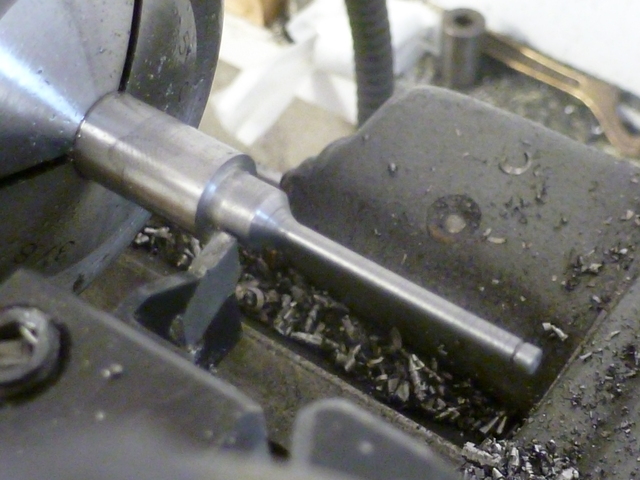
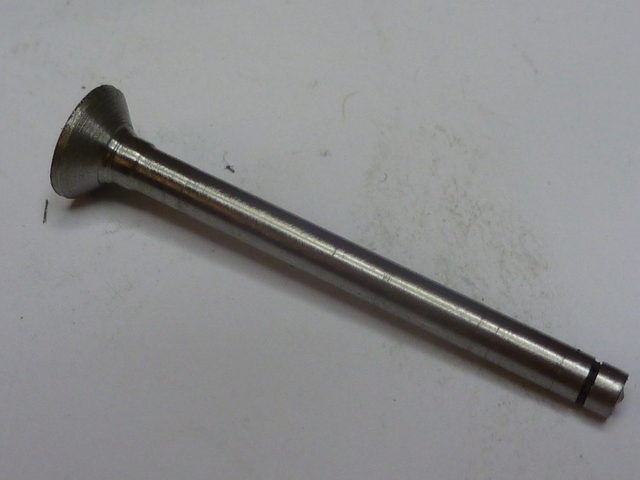
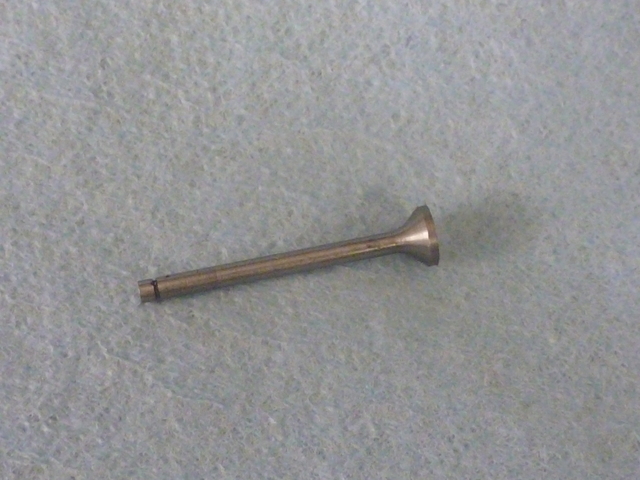
I pulled the good old Taig into service for facing the top of the head.


Here it is. Not as pretty as the one I just saw in Vince's Kiwi build, but I
think this will work. Most importantly, this process seems quite repeatable,
and I feel that the next one I make can only be better. Forward progress
does wonders for my sanity.


Having done all this, I'm still pretty sure I could have eventually
gotten equal or better results using George's method, but I'm glad I tried
this. Comments and criticisms are welcome as usual.

Thanks for looking in,
--Tim

Offline tvoght

  • Full Member
  • ****
  • Posts: 1003
  • Indiana
Re: An Upshur Farm Engine (slight return)
« Reply #27 on: July 28, 2012, 02:49:03 AM »
The editing of the original gets a little dicey here as I'm referring to builds on other web sites, and to portions of builds that don't appear on this site, but may soon...
Hope you don't  get too confused.

~~~
Today, I made valve guides and retainers out of brass. The work was so
straightforward I'm not going to describe it, except to show a little picture.


It seemed about time to make the valve seat cutter, and I approached it with
apprehension. I made it pretty much to Upshur's plan, but keeping in mind all
I had read from gbritnell on the subject, and also the counterbore cutter
that Dave (steamer) showed recently in his Wallaby build.

I used W-1 drill rod. Placed in a collet, I center-drilled and drilled for
a pilot. The pilot will be a #42 drill blank (the same size used to drill the
valve guide). I did not want to make the pilot integral with the cutter,
because this is to be my first successful tool steel hardening experience, and
I don't want the fear of warpage to be a part of it.


I used the valve jig I made previously to cut the cutter. The follower support
is not necessary, but this was easy to do and to get an angle matching the
valve.


Into a collet block it went, and to the mill. I milled to to form one side of
the flutes...


And then the other.


Then I had to file in the back-rake. I had to just jump in and start filing
before the geometry became clear in my head. I ended up making part of one,
and then a second more correct one. Here is a side-on shot of one of the
flutes showing how I brought the rake up the cutting edge. The collet block
was handy for holding the part under my magnifier lamp while filing.


Now the hardening. I've read it time and again; heat to bright cherry red and
plunge into water (W-1 rod, remember). I guess it was bright cherry red when
I plunged. I've also seen reference to cooked carrots... It was definitely
a uniform color, and I felt 'heated through' the entire cutting area.
I think it is George who suggested that since this is a hand tool with very
light duty, there is no reason to draw the hardness. So I called hardening
finished. I dressed the cutting edges some with a diamond lap.


I stuck in a drill blank pilot and cut a seat in a test piece. It cuts,
and even under magnification, the finish looks pretty good. Still, I'll be
doing a little more work with finer diamond laps and I'll loctite the pilot in
before I go at my head with it.


Thanks again everybody for looking,
--Tim

Offline tvoght

  • Full Member
  • ****
  • Posts: 1003
  • Indiana
Re: An Upshur Farm Engine (slight return)
« Reply #28 on: July 28, 2012, 02:53:51 AM »
The valve guides I made previously were turned for a sliding fit in reamed
holes in the head. I admit my plan was to use loctite on them (the plans
say that would be alright). Then I was reading vcutajar's Kiwi log (on another site), and I saw where he had pressed his in.

Funny thing about reading some of the build logs, you are prompted to try
and do better. So I remade a pair of valve guides for a slight interference
fit in the reamed holes (about a half a thou over), and came up with a little
jig to ensure they would be pressed in straight. I had gone out and got some
#42 drill rods yesterday, one of which will be used as the pilot in the valve
seat cutter above. I used another to make a "toolmaker's reamer" That reamer
was used to finish the holes in the valve guides, and a couple of
parts of the jig you see below.

Here is a plug turned to closely fit the reamed guide holes in the head.
It is reamed to fit a length of the #42 drill rod.


The following photo sequence shows the plug and rod in place in the head, then
the addition of the valve guide, then a "presser" piece which is also
reamed #42 and bears on the top of the valve guide.


The actual pressing took place in the mill vise. Here is the setup after
the first guide has been pressed in to depth. I did apply some 609 loctite to
the valve guide before pressing it in. I don't know if that does anything for
a press fit.


And here is the head with both valve guides installed.


Thanks,
--Tim

Offline tvoght

  • Full Member
  • ****
  • Posts: 1003
  • Indiana
Re: An Upshur Farm Engine (slight return)
« Reply #29 on: July 28, 2012, 02:56:33 AM »
This post gets us up-to-date, and any further posts will be fresh material (farm engine fresh).


~~~
Still more work on the head. The plans show the upper edge rounded over, and
though it seemed a little late in the game, I decided to go ahead and do it.
In my 4-jaw Taig chuck on the rotary table, I centered things up and used a
corner-rounding bit on it. Uneventful. Job done.


To lap the mating surface with the cylinder, I laid wet-or-dry paper on my
little granite block and scrubbed in a figure-8 pattern (where did I read that
thing about the figure-8 pattern?). I worked down through 150, 320, 400, and
600 grit to get to the point you see in the first picture. 600 is the finest
I had. I laid a sheet of paper down on the granite and then squirted out a
blob of toothpaste, then lapped some more. The second picture shows the
result. The camera really brings out scratch marks, and I'm hard pressed to
pick out any in that second picture.


Before I proceed, I wanted to make up a little pressure testing fixture to
test the valves. I used the squaring fixture I'd made for drilling side holes
in the head. I milled out a chamber for the valves to operate in and drilled
and tapped for a small pipe into the chamber. I have pipe, taps and dies at
3/16-40, which is the thread PM Research use for small steam engines.


I hope this helps me nip any sealing problems in the bud early on. This shot
also shows that I made and installed a plug for sealing up the outer end of
the cross hole made for creating the right-angle bend in the sparking hole.
That leaves only the rocker arm post hole to fill.


Thanks for your vigilance,
--Tim


SimplePortal 2.3.5 © 2008-2012, SimplePortal