Author Topic: Bernay Build - MZT  (Read 35018 times)

Offline mzt

  • Full Member
  • ****
  • Posts: 226
Re: Bernay Build - MZT
« Reply #45 on: July 30, 2012, 01:18:17 PM »
Here's a short video of my self dismounting engine (castle nuts are in order, there).
Working pressure goeas from 0 to 3bars, over that value the duct tape would cease holding the pipes in place and they would pop with a scaring bang.

<a href="https://www.youtube.com/watch?v=rIZO1hw88xI" target="_blank">http://www.youtube.com/watch?v=rIZO1hw88xI</a>

Marcello


This is a fitting job,
not a production job that can be measured in.

Offline ref1ection

  • Full Member
  • ****
  • Posts: 49
  • Oshawa, Ontario, Canada
Re: Bernay Build - MZT
« Reply #46 on: August 01, 2012, 05:27:43 AM »
It looks great with lots of interesting action.  :cheers:

Ray
Indecision... the key to flexibility!

Offline swilliams

  • Full Member
  • ****
  • Posts: 896
  • Canberra Australia
Re: Bernay Build - MZT
« Reply #47 on: August 01, 2012, 08:12:16 AM »
fantastic engine, well done  :pinkelephant:

Where can one obtain the plans for this from?

:cheers:
Steve


Offline Maryak

  • Rest In Peace
  • Full Member
  • *
  • Posts: 1818
  • Aldinga Beach South Australia
Re: Bernay Build - MZT
« Reply #48 on: August 01, 2012, 08:40:44 AM »
Marcello,

Beautiful build  :ThumbsUp:  :ThumbsUp:  :ThumbsUp:

Best Regards
Bob
Если вы у Тетушки были яйца, она была бы Дядюшкой

Offline mzt

  • Full Member
  • ****
  • Posts: 226
Re: Bernay Build - MZT
« Reply #49 on: August 01, 2012, 09:53:38 AM »
Steve,

here they are, two PDFs attached to the posts:
http://www.classicsteamengineering.com/index.php?topic=42.0
They are a lot of pages: don't let them scare You, that's a rewarding engine.
(At some point into the build I printed them at 16 per sheet, to gain a three or four pages 'index')
The picture You'll see there corrects an error into the one of the pages, showing the valve arms into the correct position.

Marcello


This is a fitting job,
not a production job that can be measured in.

Offline mzt

  • Full Member
  • ****
  • Posts: 226
Re: Bernay Build - MZT
« Reply #50 on: August 01, 2012, 10:06:59 AM »
It looks great with lots of interesting action.  :cheers:

Ray

Ray,
Yep! The pistons TCD/BDC occurring at different angles than the 0 - 180 deg.  of the crankshaft I was used to almost drove me mad when timing the valves.

Bob,
there's still a lot of small works to do to have it 'completed' with all the parts. Fact is I'm now running it instead of my machines.   ;D

Marcello
This is a fitting job,
not a production job that can be measured in.

Offline swilliams

  • Full Member
  • ****
  • Posts: 896
  • Canberra Australia
Re: Bernay Build - MZT
« Reply #51 on: August 01, 2012, 11:04:29 AM »
Thanks Marcello, it's an awesome engine. Really good of PatJ to put the plans out there.

Steve

Offline sbwhart

  • Full Member
  • ****
  • Posts: 745
  • Live Long and Prosper
Re: Bernay Build - MZT
« Reply #52 on: August 01, 2012, 05:22:15 PM »
What a cracking engine Marcello fascinating to watch and a masterful build log

Thanks for showing

Just had a scan through of PatJ drawings very tempting   :mischief:

Stew
A little bit of clearance never got in the way

Offline ozzie46

  • Full Member
  • ****
  • Posts: 343
Re: Bernay Build - MZT
« Reply #53 on: August 01, 2012, 05:24:32 PM »


  Absolutely magnificent.  :P :P :P

  Ron

Offline Captain Jerry

  • Full Member
  • ****
  • Posts: 1071
  • Summerfield, FL USA
Re: Bernay Build - MZT
« Reply #54 on: August 01, 2012, 07:50:52 PM »
Very nice model and build story.  I followed all the way and loved every post.  Thanks for the show.

Jerry
NOTARY SOJAK

There are things that you can do and some things you can't do. Don't worry about it. try it anyway.

Offline Bearcar1

  • Full Member
  • ****
  • Posts: 829
  • Chicagoland Area, USA
Re: Bernay Build - MZT
« Reply #55 on: August 03, 2012, 05:33:42 AM »
Splendid build thread Marcello. I have enjoyed the entire ride. The video was a gas to watch as well.  :ThumbsUp:

BC1
Jim

Offline mzt

  • Full Member
  • ****
  • Posts: 226
Re: Bernay Build - MZT
« Reply #56 on: August 03, 2012, 10:30:23 AM »
Thanks everybody for the kind words!!!
Marcello

--

In those last nights I've made a few small parts to have the steam pipes properly fitted. Ended with some bad words and the scrap box weighting a little more,
but I've got clearer ideas on how they should be.
Those scrapboxed (well, not all of them: quite a few have missed the landing area) ones may do for the 'modern materials' build: now I calmed down I gotta recollect them and have a check.
 
As for the plans, PatJ has recently released v12 of them (in a single .pdf file)  and  two PDFs about the 3d models of the parts.
Same address than before:

http://www.classicsteamengineering.com/index.php?topic=42.msg3598


This is a fitting job,
not a production job that can be measured in.

Offline mzt

  • Full Member
  • ****
  • Posts: 226
Re: Bernay Build - MZT
« Reply #57 on: August 08, 2012, 01:26:37 PM »

Some pipe fittings...

Here?s the second set I made, the first one went flying in direction of the scrap box when I realized I had
left not enough space to fit studs and nuts.


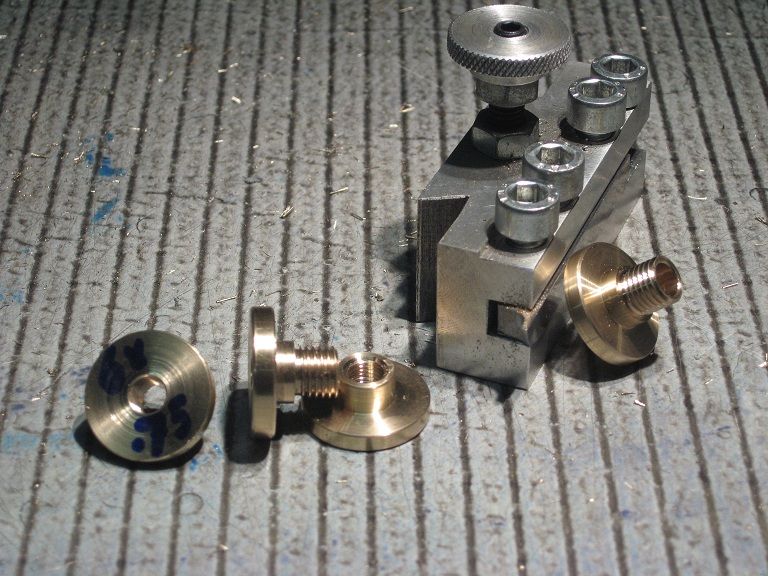
Later, I recollected them all: they might do with SH screws, on the ?modern materials? Bernay. I have not checked, yet.

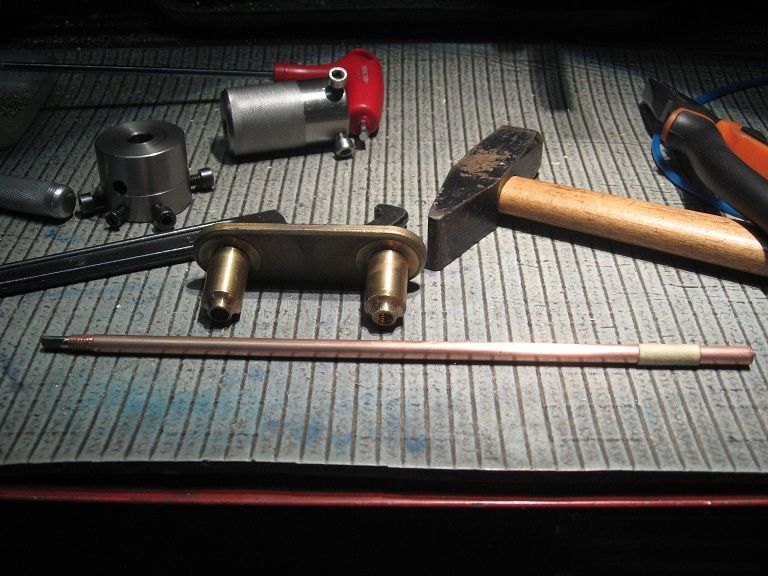
While I was making them, I made myself a tool I should have made ages ago: nothing fancier than a short parting tool,
0.8mm wide, ground so it protrudes from the left of the bit. Works a treat when cutting the runout groove for a thread
against a shoulder.


..and pipe bending.

Material is 6.2mm external dia. 4mm bore copper pipe: first of all, I straightened  that short piece through forcing a
4mm steel rod through the bore. Results were not that bad.


Next, I chucked the cored pipe into the lathe, and reduced the ends to threading diameter: no way I could do that without
some support into the copper, then used a die to thread one end M6x0.75, the other end M6x1.

 
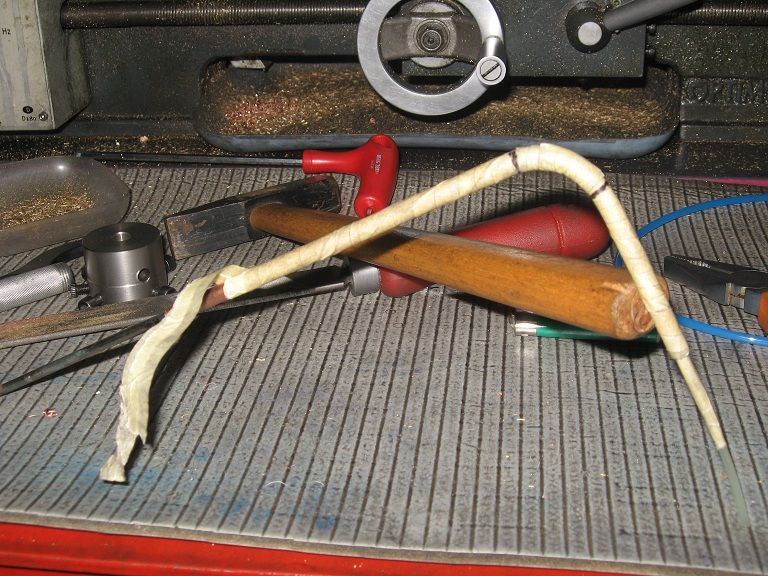
When it came to bending the pipe to a ?nice curve?, I wrapped a length of strictly coiled masking tape over it, put a couple
of marks where (I thought*) the curve should start and finish, inserted the 4mm steel rod on the long arm, till it reached
the start position and fitted a flexible core (plastic brushcutter wire, brought to diameter by wrapping some more masking
tape on it) into the other end.

Bent it over a 30mm rod set in the vice, using hands and a piece of 8mm inner dia. tubing to add some lever.


Here it is without the masking tape.


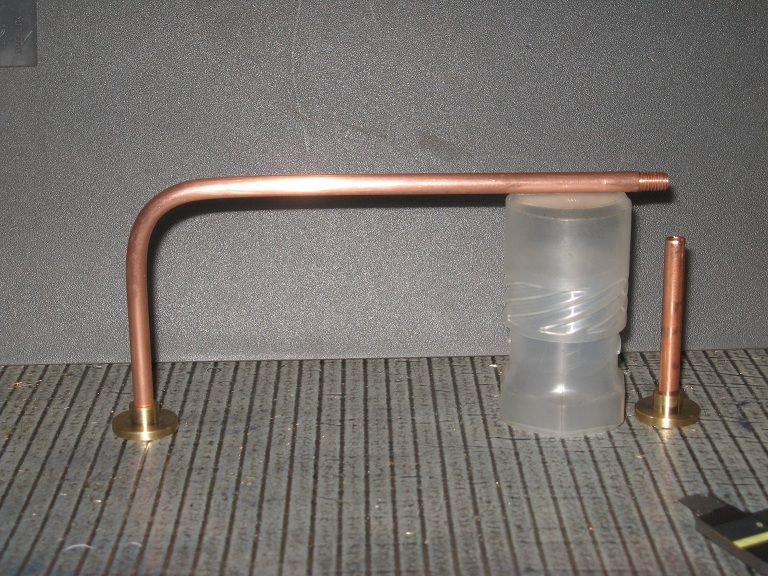
(*) It is obviously too short on the longer arm and too long on the short one, but that can be fixed.
Somehow.


Marcello
This is a fitting job,
not a production job that can be measured in.

Offline mzt

  • Full Member
  • ****
  • Posts: 226
Re: Bernay Build - MZT
« Reply #58 on: August 10, 2012, 12:55:07 PM »

Some hacksaw work

From this


To this


Plus a little drilling and tapping on the flanges: they came out well.
These 'finishing' tasks are never ending!


Marcello


This is a fitting job,
not a production job that can be measured in.

Offline swilliams

  • Full Member
  • ****
  • Posts: 896
  • Canberra Australia
Re: Bernay Build - MZT
« Reply #59 on: August 10, 2012, 01:09:56 PM »
Quote
These 'finishing' tasks are never ending!

I hear ya on that one Marcello

Steve


SimplePortal 2.3.5 © 2008-2012, SimplePortal