Author Topic: A New 5cc Aero Diesel Engine Project  (Read 91516 times)

Offline Dave Otto

  • Full Member
  • *****
  • Posts: 4712
  • Boise, Idaho USA
    • Photo Bucket
Re: A New 5cc Aero Diesel Engine Project
« Reply #120 on: April 20, 2013, 01:25:07 AM »
Beautiful work Ramon,

Some interesting tips on heat treating; thanks so much.

When you screw cut the crankshaft threads how do you finish the inboard end? Is there a thread relief or do you pull the threading tool out at the proper time? If the latter do you have any tips on how to do this consistently for each cut?

Thanks for taking the time to post your wonderful work.


Dave

Offline zeeprogrammer

  • Full Member
  • *****
  • Posts: 6811
  • West Chester, PA, USA
Re: A New 5cc Aero Diesel Engine Project
« Reply #121 on: April 20, 2013, 12:44:35 PM »
Very interesting post Ramon.
I know next to nothing about heat treating and found this very helpful.
Carl (aka Zee) Will sometimes respond to 'hey' but never 'hey you'.
"To work. To work."
Zee-Another Thread Trasher.

Offline Dan Rowe

  • Full Member
  • ****
  • Posts: 1170
  • Dripping Springs TX USA
Re: A New 5cc Aero Diesel Engine Project
« Reply #122 on: April 20, 2013, 02:42:49 PM »
Once quenched the pins were polished back to bright steel and cleaned of all traces of oil before tempering in a tray of hot sand.
The sand should be very hot before putting the part in as this helps ensure consistency if multiple parts are being treated. It is not a good idea to put more than one part in at a time as once up to temp required it's surprising how quickly it will travel through it's desired colour and once past - well  ::)


Ramon many thanks for your detailed descriptions and photos. The pan of sand was heated before placing in the pin in did you have to heat the sand while the pin was in the sand? What was the heat source? It looks like the pan is setting on something is that a heater or a stand?

Dan
ShaylocoDan

Offline Ramon Wilson

  • Full Member
  • ****
  • Posts: 1942
  • Suffolk in the UK
Re: A New 5cc Aero Diesel Engine Project
« Reply #123 on: April 20, 2013, 05:52:55 PM »
Hi guys just home from a good days sailing  :) Thanks as usual for your kind comments and input. Glad to see you are still hanging in here Zee  :)


When you screw cut the crankshaft threads how do you finish the inboard end? Is there a thread relief or do you pull the threading tool out at the proper time? If the latter do you have any tips on how to do this consistently for each cut?

Dave

Hi Don, a good question. Because of wanting to maintain maximm strength in the shaft no there's no relief which means, as you say, pulling the tool out in time. Theres no 'scientific' way to do this by hand just by eye and quickness - setting the speed to match your personal reaction is about the only thing I could say that helps.  Sometimes it catches you out when you're a little slow on the up take but worst is bringing it out too quick leaving more to take off the next time. A run out for the thread is much the better way to go if possible.

Ramon many thanks for your detailed descriptions and photos. The pan of sand was heated before placing in the pin in did you have to heat the sand while the pin was in the sand? What was the heat source? It looks like the pan is setting on something is that a heater or a stand?

Dan

Hi Dan, Yes the small tray - the ubiquitous tobacco tin - is standing on a butane camping gas stove on a low flame throughout the process. Reason for getting the sand hot first is to stabilise the temp of the sand. If you put a part in and then heat the sand it takes quite a time for the colours to begin to show and theres the temptation to be distracted - typically that's when the heat 'magically intensifies' and takes the part beyond the colour/temper desired ::) The sand is HOT - keep your fingers away - don't ask  ::)

BTW the sand should be very dry - if it's damp when first setting this up then let it heat up for a good while turning the sand to totally get rid of any moisture.
The other thing worth a mention is if a part is quenched out after tempering and it's thought it should be given a bit more don't put it back into the sand expecting a further colour change as this won't happen - the part has to be recleaned back to bright steel - all traces of oil removed and the part re tempered. This will then show a colour again without affecting the temper of the part other than at the 'new' colour. (Of course this doesn't apply if it's been over tempered in the first place) Tempering twice is usually carried out on a commercial basis on GFS/Silver steel equivalent metals so this will not affect the part.

If a part is over tempered then it can be reheated and quenched and then re-tempered however the reheating for hardening tends to bring the carbon to the surface and this can leave a soft skin - not very thick agreed but something, if not aware of, thick enough to sometimes confuse when a file is rubbed over to check for hardness.

Hope this helps a bit more,

Regards - Ramon

"I ain't here for the long time but I am here for a good time"
(a very apt phrase - thanks to a well meaning MEM friend)

Offline b.lindsey

  • Global Moderator
  • Full Member
  • *****
  • Posts: 13860
  • Dallas, NC, USA
    • Workbench-Miniatures
Re: A New 5cc Aero Diesel Engine Project
« Reply #124 on: April 21, 2013, 01:11:29 AM »
Still watching with much interest Ramon. Excellent pictures and a great build log in all respects.

Bill

Offline Ramon Wilson

  • Full Member
  • ****
  • Posts: 1942
  • Suffolk in the UK
Re: A New 5cc Aero Diesel Engine Project
« Reply #125 on: May 05, 2013, 10:21:38 PM »
Hullo again everyone,

A few days ago I placed a new post on the forum to the effect that I was disillusioned and was departing MEM.

That was due to my reaction to what I considered an uncalled for and somewhat heated response toward me in another post. It was not one of dummy throwing or the fact that someone had disagreed but quite simply that if this is how this is to be at times I'm afraid there's no part for it in the quiet life I try to lead.

As the post life was extremely short most members will probably be unaware of the situation but the whole thing was quite upsetting. However what took me back, and I have to say completely by surprise, was the virtual immediate response both on the thread and via PM's by fellow members including two moderators asking me to reconsider.

It was after a discussion with Sue then, who reminded me of my own philosophy that sometimes events make it so easy to get negative due to one unpleasant thing rather than to remain positive about all the good things that I began to realise what I was going to miss. With that in mind I set out to try to have the posts removed but found that in this short space of time not only had they been removed but that I had also been banned for a week - cut off at the stocking tops as the saying goes - unable to respond even to defend myself.

It's said "a week is a long time in politics" and these last few days seemed very long indeed but did give me time to rethink the situation. Although the thought 'I don't need this in my life' was still very much in my mind that was tempered by realising just how much pleasure this forum and all the 'forum friends' I've met on here actually matter. I don't belong to any clubs - this (and HMEM) is my club.

Suffice to say with the support of the Admin team (and to whom a huge thank you is in order) the ban has been lifted and I'm very much back on song.

Some things are sent to try us - sometimes they are trivial in hindsight but at the time they don't feel like it - lets hope this is the last time this happens to anyone on here - if I was French I could only cry 'Vive La MEM'

Enough - What's done is done - time to move on. Let's talk about engines  :)


I have been beavering away when the super weather and subsequent garden distraction would allow. I had a very pleasant morning over my friend Lee's the other day to bead blast the cases - No pics as yet as they need a dip in the ultra sonic cleaner before assembly but all parts are now made save for the wrist pins. Assembly is not far away then.

Here are a few pics to bring it up to date - well nearly .....

The rotors were made from Tufnol again but this time the rough diameter was turned to fit that clamping plate that gets so much use. It made the transfer from lathe to mill much easier for this part.


The needle valve parts were next. The needles are made from 16swg piano wire and ground by rotating it on the side of the off hand grinder before running it in the lathe and supporting it at the tip by a piece of hardwood. The tip can then be trued and polished using a worn needle file conventional or diamond. This method produces quite concentric and efficient needles.


This shows one with the lathe running - very little run out


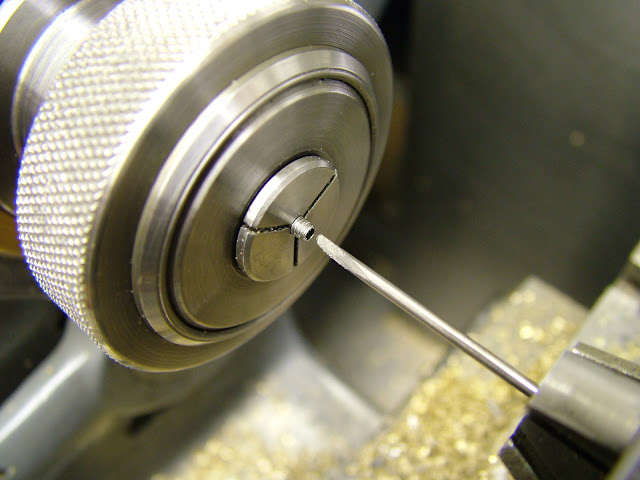
The threaded portion is made from a 7BA screw, held gingerly in a collet and drilled thru then 'reamed' using a piece of the piano wire ground at an acute angle as a reamer. This produces a good 'Loctite' fit on the wire. Constant withdrawal to clear the swarf is neccessary as it soon builds up and will jam on the taper.


I finished machining the pistons and contra pistons today so there is just the wrist pins to do then the lapping of piston and liners can get underway.

'Tangler' - Rod,  recently requested if I could be more specific in showing the lapping process that I use. Jo has also intimated she'd like more detail for her Crosskill engine. I had actually begun to take some pics to cover this subject to make it as detailed as I can so I think the best thing would be to combine it all together on a separate thread. I will try to begin that tomorrow night.

It's good to be back guys - you just don't know how good that feels  :)

Regards for now - Ramon


"I ain't here for the long time but I am here for a good time"
(a very apt phrase - thanks to a well meaning MEM friend)

Offline b.lindsey

  • Global Moderator
  • Full Member
  • *****
  • Posts: 13860
  • Dallas, NC, USA
    • Workbench-Miniatures
Re: A New 5cc Aero Diesel Engine Project
« Reply #126 on: May 05, 2013, 10:32:43 PM »
Good to have you back Ramon and thanks for this update. Will look forward to the thread on lapping too.

Bill

Offline Don1966

  • Full Member
  • *****
  • Posts: 6818
  • Columbia, MS
Re: A New 5cc Aero Diesel Engine Project
« Reply #127 on: May 05, 2013, 10:43:58 PM »
Hi Ramon, I have no knowledge of any problems you have had, but I am glad you have reconsidered and returned to us. You have so much knowledge to offer us and I for one would be very disappointed to see you leave. Problems do arise but we must remember that sometimes no matter how small they are they can be turned into a mold hill. Some rules have to be followed and I do understand this.
 Remember some of us are grateful for what you can contribute to us. Thank you for your continued inputs.

Don

Offline Dan Rowe

  • Full Member
  • ****
  • Posts: 1170
  • Dripping Springs TX USA
Re: A New 5cc Aero Diesel Engine Project
« Reply #128 on: May 05, 2013, 10:58:49 PM »
Ramon, I always read and enjoy your posts and I am especially looking forward to your lapping methods. There are several high pressure metal to metal fits on diesel ships engines that have to be maintained by micro lapping, so I have had some experience but you have a real knack for explaining machine operations with clear photos and words.

Many thanks for your efforts.
 :cheers:
Dan
ShaylocoDan

Offline tvoght

  • Full Member
  • ****
  • Posts: 1003
  • Indiana
Re: A New 5cc Aero Diesel Engine Project
« Reply #129 on: May 05, 2013, 11:08:05 PM »
Very, very pleased to see you back, Ramon. Looking forward to continued progress on these engines.

--Tim

Offline steamer

  • Global Moderator
  • Full Member
  • *****
  • Posts: 12699
  • Central Massachusetts, USA
Re: A New 5cc Aero Diesel Engine Project
« Reply #130 on: May 05, 2013, 11:08:37 PM »
So glad you're here Ramon!

 :praise2: :praise2: :praise2:

Dave
"Mister M'Andrew, don't you think steam spoils romance at sea?"
Damned ijjit!

Offline tangler

  • Full Member
  • ****
  • Posts: 834
  • Christchurch, UK
Re: A New 5cc Aero Diesel Engine Project
« Reply #131 on: May 05, 2013, 11:11:31 PM »
Ramon,

I'm very pleased that you are back with us.

Rod

Offline steamer

  • Global Moderator
  • Full Member
  • *****
  • Posts: 12699
  • Central Massachusetts, USA
Re: A New 5cc Aero Diesel Engine Project
« Reply #132 on: May 05, 2013, 11:14:14 PM »
Ramon ....what you did to support that needle is just brilliant!....just like a Jacot tool!

Awesome my friend!

 :praise2:
"Mister M'Andrew, don't you think steam spoils romance at sea?"
Damned ijjit!

Offline pgp001

  • Full Member
  • ****
  • Posts: 813
  • West Yorkshire - UK
Re: A New 5cc Aero Diesel Engine Project
« Reply #133 on: May 05, 2013, 11:21:51 PM »
Ramon

Nice to see you back, I hope all the problems we had are just memories.

Phil

Offline AussieJimG

  • Rest In Peace
  • Full Member
  • *
  • Posts: 450
  • Bywong, NSW, Australia
Re: A New 5cc Aero Diesel Engine Project
« Reply #134 on: May 06, 2013, 01:05:19 AM »
I did not see the problems you mention but I am glad you are back with us. Your expertise and explanations are much appreciated.

Jim


SimplePortal 2.3.5 © 2008-2012, SimplePortal