Author Topic: A New 5cc Aero Diesel Engine Project  (Read 91339 times)

Offline Ramon Wilson

  • Full Member
  • ****
  • Posts: 1942
  • Suffolk in the UK
Re: A New 5cc Aero Diesel Engine Project
« Reply #75 on: March 22, 2013, 11:26:36 PM »
Hi guys, I got back onto the engines today and have made a good start on the cylinder heads.

One of the reasons I took a couple of days out was that last night I was invited to talk about the engines made so far to members of the Halesworth MES and needed some time to prepare for it.

I'm really pleased to tell you that I had a thoroughly enjoyable time, was warmly welcomed and somewhat mildly surprised but very taken indeed to see that what are predominently locomotive and traction engine minded members take such an interest in these little engines and their manufacture   :) 
It was also rewarding in not only the doing, but, in describing the way that conrods are held for turning, came away with a priceless tip for holding fish bellied rods for further machining as well as a very nice gesture from a complete stranger of a gift of a Russian made engine.

Back soon with some pics of current play  ;)

Regards - Ramon
"I ain't here for the long time but I am here for a good time"
(a very apt phrase - thanks to a well meaning MEM friend)

Offline steamer

  • Global Moderator
  • Full Member
  • *****
  • Posts: 12699
  • Central Massachusetts, USA
Re: A New 5cc Aero Diesel Engine Project
« Reply #76 on: March 22, 2013, 11:37:49 PM »
OK

The tip regarding the fishbelly rod.....?....pictures and description please!

And a Russian made engine......now I don't need to ask about that do I?....... 8)

Dave


"Mister M'Andrew, don't you think steam spoils romance at sea?"
Damned ijjit!

Offline Ramon Wilson

  • Full Member
  • ****
  • Posts: 1942
  • Suffolk in the UK
Re: A New 5cc Aero Diesel Engine Project
« Reply #77 on: March 22, 2013, 11:48:22 PM »
Gimme time Dave - all will be revealed ;) ;)
"I ain't here for the long time but I am here for a good time"
(a very apt phrase - thanks to a well meaning MEM friend)

Offline Ramon Wilson

  • Full Member
  • ****
  • Posts: 1942
  • Suffolk in the UK
Re: A New 5cc Aero Diesel Engine Project
« Reply #78 on: March 24, 2013, 11:47:51 PM »
Hi guys, - just a quick update. The cylinder heads were finished off today - just basic turnings but here's the sequence if it's of interest

First off was to part off some blanks and bore them. The Mk3 and Elites are blind bores with a slide fit over the liner. The Elite Mk2 had fins shrunk onto the liner so this was made a tad undersize and has a separate head. there was a spare liner left over from the Mk1&2 build so this was used as a plug gauge for the three and will have the fins shrunk on to it at a later stage before lapping.


Held on another freshly turned expanding mandrel the first three were faced off to length to a stop then the ODs finish turned.


The next op was to drill them through and counterbore the holes for the head bolts. It was found on the last engines that the drill tends to wander far less when drilling from solid than through precut fins plus it's much easier to debur the holes in the fins done this way.


The top angle was turned then the fins cut with a 2.3mm wide grooving tool ground from a FC3 cutter shank. Drilling and tapping for the comp screw was the last op.

The expanding mandrel was then reduced a thou or so by filing and polishing to accept the Mk2 fins and these were drilled through. Another grooving tool, this time 1mm wide was ground up and the fins gingerly cut, depth of cut on all heads was 5.1mm. Despite a bit of vibration with the interupted cuts as it passed the drilled holes this thin tool held up well.


Last off was to make the head to suit.  A blank was set in the soft jaws and the base and a 1mm register to fit the fins turned before reversing and taking out the deep groove - another 'FC3' tool bit being ground up for this. The holes were drilled and counterbored and then the eight cooling holes drilled .....


It's been quite a while since this little gizmo was used but those holes (48 divs) in the chuck came into play on this op


The two parts for the Mk2 head .....


..... and all heads finished ready to fit


Well that's another stage done, I'm waiting for some ali for the prop drivers and prop nuts which should hopefully be here in a couple of days so in the meantime I've cut off some tougher ali for the con-rods. With all the ali out of the way it'll be time for a good clean down before tackling the steel bits.

Regards for now - Ramon
"I ain't here for the long time but I am here for a good time"
(a very apt phrase - thanks to a well meaning MEM friend)

Offline steamer

  • Global Moderator
  • Full Member
  • *****
  • Posts: 12699
  • Central Massachusetts, USA
Re: A New 5cc Aero Diesel Engine Project
« Reply #79 on: March 25, 2013, 12:15:37 AM »
Hey Ramon,

Nice!

I like the indexer....I plan to put the same thing on the back of the SB...

Dave
"Mister M'Andrew, don't you think steam spoils romance at sea?"
Damned ijjit!

Offline Don1966

  • Full Member
  • *****
  • Posts: 6818
  • Columbia, MS
Re: A New 5cc Aero Diesel Engine Project
« Reply #80 on: March 25, 2013, 01:19:20 AM »
Hi Ramon, another great job on your engines. You have a tendency of making it all look so easy. I also like the indexer on your Myford. I have one that takes advantage of the tapped hole on the back side of the lathe behind the Chuck. I have attached a photo of it. I haven't drilled my chuck yet I was wondering what number holes would be the best combinations?

Don

Offline bp

  • Full Member
  • ****
  • Posts: 80
  • Adelaide, SA
Re: A New 5cc Aero Diesel Engine Project
« Reply #81 on: March 25, 2013, 03:29:54 AM »
Hi Ramon,
That indexer is a much better version of one that I was thinking of making, for exactly the same purpose that you use it for!  Just one thing has been slowing....well stopping progress.  Do you use any form of brake or clamp to stop the spindle chattering, or is it all down to a good fit of the detent pin??
As always your threads are fantastic, very informative.  Keep it up!
cheers
Bill

Offline swilliams

  • Full Member
  • ****
  • Posts: 896
  • Canberra Australia
Re: A New 5cc Aero Diesel Engine Project
« Reply #82 on: March 25, 2013, 04:27:13 AM »
Looking great Ramon

Always nice to see some indexing and drilling spindle action on the lathe. I like your idea about removable heads on the home made cutters too.

Steve

Offline Ramon Wilson

  • Full Member
  • ****
  • Posts: 1942
  • Suffolk in the UK
Re: A New 5cc Aero Diesel Engine Project
« Reply #83 on: March 25, 2013, 09:57:05 AM »
'Morning guys, Thanks as usual for your input and comments.

Re the number of holes Don, I guess it depends on the most likely use. In the early days this was the only form of dividing I had.
Using a cross slide milling attachment held vertically to a piece of thick GFS itself bolted to a vertical slide I was able to (rather precariously I might add  ::)) mill away an area on which to mount a detent plate


The limitation of 60 teeth was what lead to the holes in the chuck - 48 and 50 divs to fill in some of the gaps.

Bill,  for plain drilling or counterboring I haven't found it neccessary to have some kind of spindle lock. If milling is carried out I put the lathe in low gear on the pulleys - not backgear that is - and keep the drive belts tight and the clutch engaged. Can't say I have ever noticed any movement.

When the Bentley first began to take shape however dividing was done using a home made dividing plate that locked inside the back end of the spindle, the detent being attached to the gear spindles. This did seem to have a smidgeon of movement so that milled flat area was handy again but with this little attachment which locked things solid (a posed pic, as the other two, its bolted down when in use)


Hope that is useful to you - I have posted these pics somewhere before - HMEM I guess - so apologies for repeating it but thought it might be worth while.

Well the snow has gone - looking at some parts of the country that makes us lucky - but that bitter wind is still blowing from the East - time to make those conrods  ;)

Regards for now - Ramon

Edit Don - sorry, I didn't answer your question. If its basic dividing you want then 24 divs will probably suffice for most needs
« Last Edit: March 25, 2013, 10:10:33 AM by Ramon »
"I ain't here for the long time but I am here for a good time"
(a very apt phrase - thanks to a well meaning MEM friend)

Offline b.lindsey

  • Global Moderator
  • Full Member
  • *****
  • Posts: 13860
  • Dallas, NC, USA
    • Workbench-Miniatures
Re: A New 5cc Aero Diesel Engine Project
« Reply #84 on: March 25, 2013, 11:17:47 AM »
Very informative as always Ramon...those heads look fantastic too!!!

Bill

Offline steamer

  • Global Moderator
  • Full Member
  • *****
  • Posts: 12699
  • Central Massachusetts, USA
Re: A New 5cc Aero Diesel Engine Project
« Reply #85 on: March 25, 2013, 11:18:47 AM »
NICE Ramon!  Thanks for posting that again here!

24 or 48 wold be my answer too..
"Mister M'Andrew, don't you think steam spoils romance at sea?"
Damned ijjit!

Offline Ramon Wilson

  • Full Member
  • ****
  • Posts: 1942
  • Suffolk in the UK
Re: A New 5cc Aero Diesel Engine Project
« Reply #86 on: March 27, 2013, 11:31:02 PM »
Hi Guys, it's been a productive if somewhat interuptive couple of days. I finally bit the bullet and bought a shot blasting cabinet which arrived yesterday - the day after ordering it which is pretty good for 'free delivery' :) and, talking of which, I had ordered some 6082 ali for the prop drivers and prop nuts late on Friday off Ebay and much to my surprise it arrived, post free as well, on Monday morning just as I started the con rods  :D Good service all round eh?.

The conrods are made from a tough aluminium called Alumec 89.  It machines beautifully with an almost chromium like sheen and whilst  it's easy enough to bandsaw it it's a real devil to hacksaw as it soon work hardens to that process. I first used it many years ago when working for a small jobbing workshop where we used to make moulds for a local blow moulding company and have had some scraps squirreled away for years  ;)

Prior to the first Etas made, all con-rods had been milled. Turning them had previously been fought shy of because of holding them to form the second ball end. The drawings were laid out with milled rods but the fact that this was not correct to prototype began to bug and the idea of turning a tapered split bush to fit inside a collet was conceived. Much to my surprise that proved to be an efficient manner of holding them and the rods for the Super Tigres and this latest batch were made with relative ease. The making of these were covered on the Tigre build but I'll run through it again as it may be of use. Apologies in advance if considered repeating myself  :-\

First off was to cut a slice of a small block then cut that into strips about 50mm long. These were quickly milled to square section .5mm over finished size then held in the SC4jaw turned to 11.1 diameter for about 30mm then reversed in a collet to give five round blanks


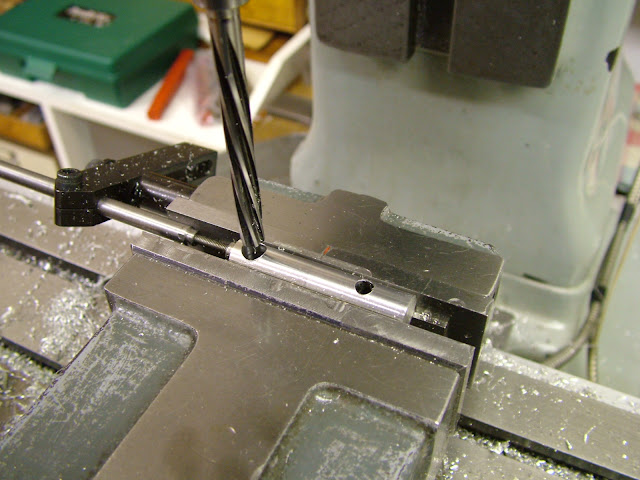
These blanks were then drilled and reamed on the mill, stops being set to maintain consistency


Held in a 7/16" collet the first (bottom) end was formed using the original tooling made from a small piece of GFS


Then it was extended out of the collet to turn the shank, supporting it with the brass bush which has a 30 degree taper for the centre to impinge upon and a 45degree taper to support the rod. The shank is turned parallel to it's major diameter first, then taper turned using the topslide to flair into the big end. The excessive overhang of the tool is to allow clearance of the topslide against the tailstock - one of the very few annoying limitations I feel about the Myford.


First stage looked like this along with the split bush turned at the same setting as the rods. The small end diameter is worked out
according to the length of the busht, drilled thru at that size then carefully bored until the taper cut finishes as it breaks the small end.


Holding this in a collet provides more than adequate gripping power to form the second ball end. Incidentally the tool is set symmetrical about the hole by eye, inking up and moving the topslide until both sides of the hole appear even


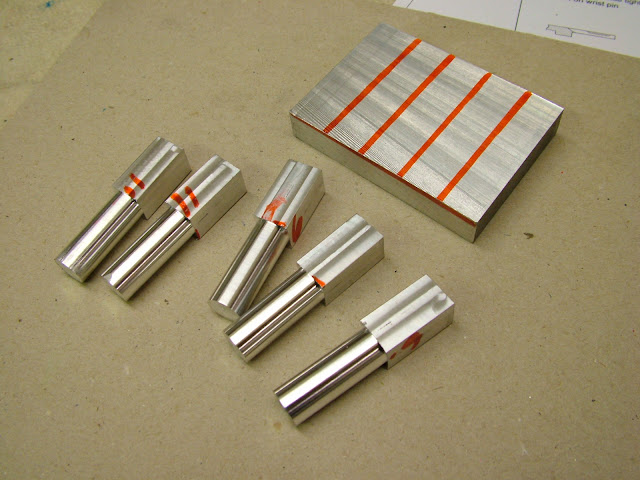
The finished little end....


... and the finished rods


Well there you are - a few more pics which I trust might prove useful to someone - there appears to be a lack of small engines such as these being mentioned on here - is anyone else making anything similar ?

I was hoping to have the prop drivers finished today too which would bring the ali parts to and end but time was not on side today so that will have to wait until tomorrow.

Regards for now Ramon


« Last Edit: March 27, 2013, 11:36:03 PM by Ramon »
"I ain't here for the long time but I am here for a good time"
(a very apt phrase - thanks to a well meaning MEM friend)

Offline zeeprogrammer

  • Full Member
  • *****
  • Posts: 6811
  • West Chester, PA, USA
Re: A New 5cc Aero Diesel Engine Project
« Reply #87 on: March 28, 2013, 12:24:50 AM »
Wow. Those are nice looking.
You make it all look easy...but I know it's not.
Carl (aka Zee) Will sometimes respond to 'hey' but never 'hey you'.
"To work. To work."
Zee-Another Thread Trasher.

Offline steamer

  • Global Moderator
  • Full Member
  • *****
  • Posts: 12699
  • Central Massachusetts, USA
Re: A New 5cc Aero Diesel Engine Project
« Reply #88 on: March 28, 2013, 12:33:44 AM »
Ramon...you could be making a garbage disposal and I'd watch!...... :praise2:

You just keep it coming and I'll pay attention!
Nice rods!

Dave
"Mister M'Andrew, don't you think steam spoils romance at sea?"
Damned ijjit!

Offline Don1966

  • Full Member
  • *****
  • Posts: 6818
  • Columbia, MS
Re: A New 5cc Aero Diesel Engine Project
« Reply #89 on: March 28, 2013, 12:45:15 AM »
Ramon, many thanks for your reply and I had drilled my ER32 collet chuck with 24 holes. I was wanting different for the chuck 50 and 48 seem adequate.
I did enjoy the way you did the Conrods. It's always at treat to learn something new watching your progress.  As always great work.  :praise2:

Don


SimplePortal 2.3.5 © 2008-2012, SimplePortal