Thanks Jo. Pity you're so far away; you'll just have to take your chances on the 21st

. The "Lantern" chuck works, but I need to get my finger out and build a proper kit for the different screws I use; on more than one occasion I've wished I had a better selection, and it's about time I built a decent useful set

. In fact, after the Corliss, there's a lot of tool-related work in my future...
Eric, Thanks. Well, she's definitely worthy of the eye... but unfortunately some jewelery she wore told me not to go too far

Cheers Nick - I just told her it's for building model engines; I skipped the Corliss description and rather joined in on how to spend the bit of extra cash-in-hand we all have available in Namibia after a lowering of income tax rates last month
Thanks Vince - though the score wasn't quite that big - just a handful of screws. The taps I bought through this same optician about two years ago - albeit at a very reasonable price. Unfortunately they can't get die nuts the same way... And I'll bide my time; it may just be possible to get some very thin silver solder and silver solder paste through them as well - of late, I frequently pass the shop on my way to some of my clients, and once I see they're very quiet, I'll pop in and discuss that; don't want to make a nuisance of myself

Ron, thank you. Like Marv mentioned, when they get smaller you need a tap guide or tapping stand of some form. And light fingers; the finer the threads, the lighter the touch you need. Don't be afraid of the small sizes; I know it's daunting - four odd years ago I thought an M3 was really small; in fact I commented on that on my "first running" engine build. Now M3 seems positively large, M2 have become a "normal" size, and less than that are just a new experience requiring some thought before-hand. In fact, once I can get my fingers on M1 taps, I'll happily give them a go and build one of George Britnell's small engines. The screws do get a bit small, and a pair of tweezers starts to become mandatory. A good magnifying glass should help as well; in fact, I'm in the market for one of those myself

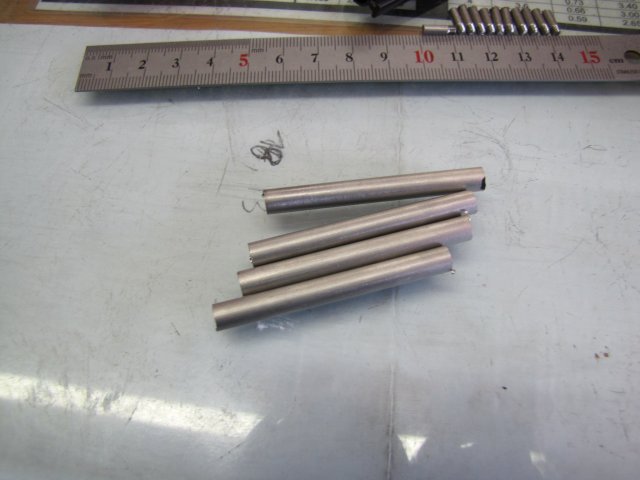
Shop time's been a bit scarce of late, but I eventually got some this afternoon. During the week I managed to pop over to a supplier, and purchased a meter of 6mm stainless steel rod. Somehow, the rod included two 50x50x50mm aluminium cubes from the off-cut bin as well; those just jumped into my grubby paws for some unfathomable reason

.
So I started off with some sections sawed from the stainless rod:
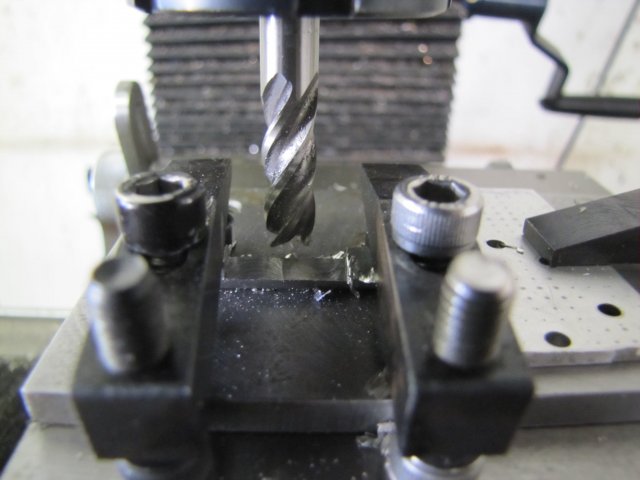
Those were faced of on one side each on the lathe. I've not done much "multiples of the same part" work yet, but for the rest of the operations it seemed prudent that I set up some way of work-holding to make the four valves. The tooling plate would work, so on to the mill with the tooling plate mounted in the vise. A later photo shows more detail; this blurry one hides some of the setup, but essentially I screwed some cap-screws straight into the plate to use their heads to locate the workpieces against. The clamp on the right-hand side screwed directly to the plate acts as a depth-stop to butt the workpieces up against. Then I added the two clamps to hold the workpieces down - at a slight angle so that they would both hold the material down on the plate and also against the heads of the cap screws on the plate.

Confusing - I know, and also, there's a booboo waiting to happen; see if you can spot it:

Anyway, that lot worked to mill the workpieces to the correct length.
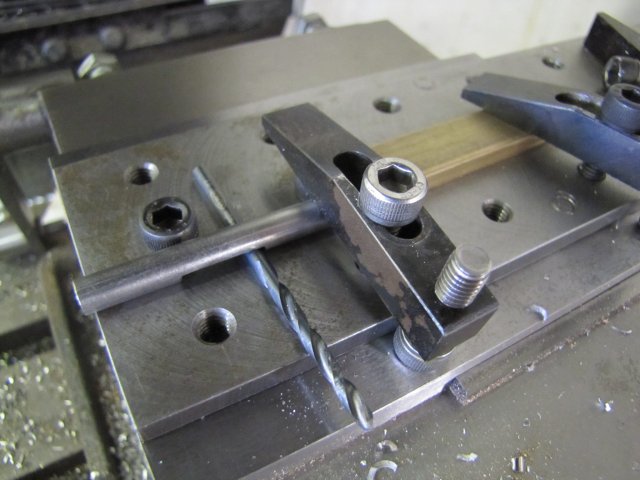
I changed the set-up slightly for the port cut-outs; you'll notice the scrap bit of aluminium I added for a better depth-stop to mill out the valve sections; things were a bit tight on the left-hand side, but OK:
On to the next machining operation. The workpieces needed 1.5 x 1.5mm slots on the valve-train side, parallel to the cut-outs in the valves. To set this up, I used the shank of a 3mm drill in the cut-outs to locate things. Here you can also see one of the cap head screws I bolted down to the plate to guide things; the other is just barely visible below the clamp:
With the second clamp added, I started making the slots with my 1mm and 0.5mm slitting saws ganged together:
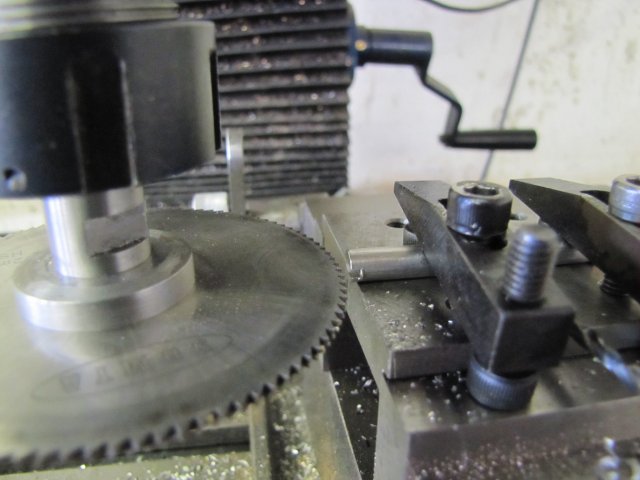
If you look carefully, you might see the boo-boo happening. It's easy in retrospect, but I didn't see things coming, except that the slots all ended up more off-center on each one, even though I'd taken good care to center things when I started...
Anyway, I slotted all the valves on both sides - slotting on either side is not on the plans, but will make setting the valve timing easier later on in the build. I ended up with this lot:
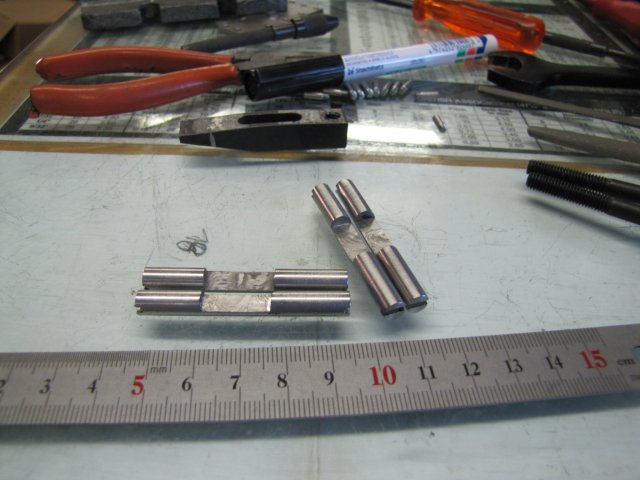
Looks OK - only if one would consider a surface-finish in the cut-outs left by some metal-munching rodent acceptable...
And the lot in the photo above is far away from good enough... I've alluded to the booboo, so it's time I explain the predicament to those that have not fallen off their chairs laughing yet. The back supports of the clamps were pressing on the mill vise jaws rather than on the tooling plate itself, so, as I tightened each workpiece in turn, the tooling plate lifted out of the vise. Have a look at the second photo in this post; the tooling plate is pretty much flush on the vise jaws, and on the last one, it's lifted nearly 0.5mm above the vise jaws... I didn't expect that - only in retrospect does it make sense... So I ended up with badly of-center slotted valves. Bummer. Lesson learned though. Re-Do needed, and I might just pull another "Lazy Arnold" - and make the valves in one piece...
Even though the parts made today sucks, I still tried them in the engine. Things
really sucked after that - much to my surprise

. This was the first time I got to try out the cylinder with sort-of valves in place. With all the valves in a closed position, the crank-side pack nut made nice suck-blow sounds when I spun the flywheel. And on the other end, with the palm of my hand covering the cylinder opening, there was enough suck and blow coming from the piston strokes to really feel. And with the one of the intake valves opened a fraction, there was a very nice Shushhh Shushhh steaming-like sound. Like mentioned; I didn't expect things to suck (or blow) that much... The piston still needs a ring, the packing nut needs packing and so on, but for now, I'm happy. Things may look cruddy, but she
just might will end up a runner

Kind regards, Arnold


